Fujimi 1/72 Ju 87D-1 Stuka
| I bought this Stuka model (Fujimi kit number F-14) because I wanted to have a training model, to practice painting, decaling and weathering. I have no special interest in the Stuka, and that meant I would be able to build it straight from the box, without worrying about research or a 100% correct paint job. This Fujimi model was well suited, since I expected an easy build, it had engraved panel lines, and it had an interesting camouflage, with RLM 79 patches over an RLM 70/71/65 European scheme.
|
The model
As explained in the introduction, I chose not to do any research on the model, just build it. Therefore I have little to comment on the Fujimi model. I thought it was a nice model, although it had some minor problems that required extra work. The model was issued in 1985, an era when cockpits were still simple.
Twenty-two years after I finished the model, I learned that there are serious doubts about the nose length of the Fujimi Stuka, see the Best Ju-87 in 1/72 scale thread on Britmodeller. Also, see this interesting thread on Hyperscale about the length of all Stuka versions: Nobody told me the Monogram/Revell Stuka was more accurate than the Hasegawa thread on Britmodeller. At the same time I learned that the original aircraft probably was a D-3 instead of a D-1, courtesy of the Fujimi 1/72nd Ju 87D-3 build report by 'Bish' on Britmodeller.
Also long after finishing the model, I found two photos and a profile of the real aircraft: photo 1, photo 2, profile. You can easily see the resemblance with the box art, where the artist extended the left wing to create a more dramatic view.
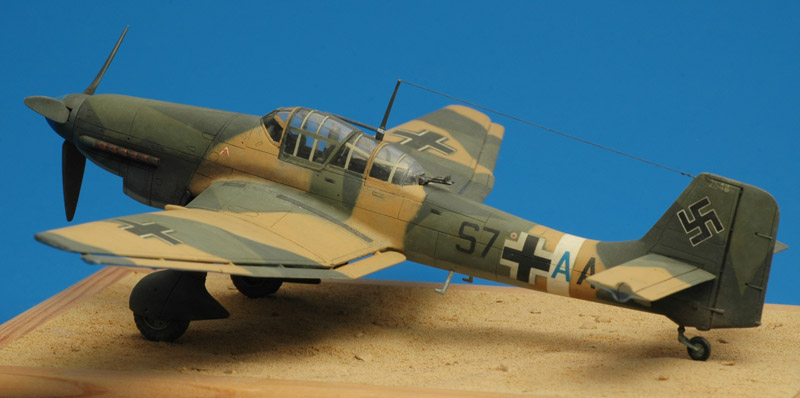
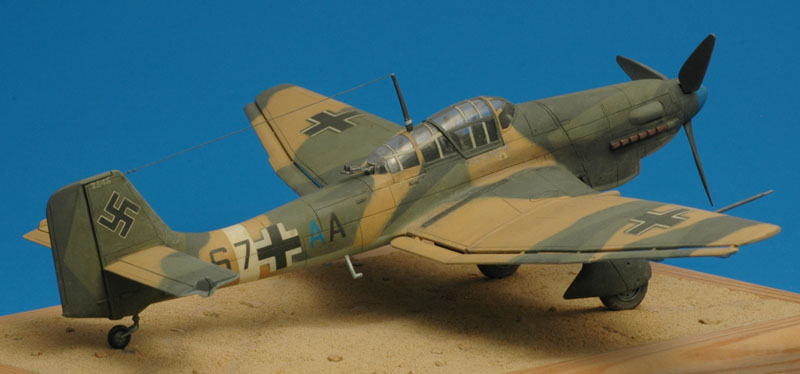
The aircraft portrays a Stuka of the Geschwaderstab of Stukageschwader 3 (St.G3), flown by the Geschwaderkommodore Oberstleutnant Walter Sigel. Hence the model's 'S7+AA' code. It was stationed in Derna, Libya in summer 1942. The kit's second decal option is 'T6+BK' of 2./SG 2 'Immelmann', in the standard RLM 70/71/65 scheme.
The plan
I decided beforehand to build and paint the model exactly according to the Fujimi instructions, without trying to find a photo of the real aircraft. This was a deliberate choice, to focus the work on the painting, decaling and weathering, and not drown in research, which is what usually happens with my projects. One example is the debate about the yellow-brownish color; it could be one of two Italian yellows used while no real RLM79 was available, or one of two RLM79 variants. I simply used RLM79 as made by Model Master.
At the same time, I must admit that I don't like this approach much. To my taste, way too many modelers build their models without trying to find a photo of the actual aircraft they are building. Hardly any report on (otherwise great) sites as Hyperscale, Aircraft Resource Center and Modeling Madness shows a photo of the subject in 1:1 scale. If you take my own specialty, the Me 163B Komet, I have seen a very large number of Komet models that bear very little resemblance to what you see in wartime photos of the actual aircraft. But enough lecturing, I will do just the same this time! The main purpose of this article is to show the building techniques I used, NOT how to build an accurate Stuka.
Construction
I built this model before I started photographing my work, so there are no photos, just comments. The model generally fitted well. I experienced the following problems:
The engine cowling was too narrow where it connected to the main fuselage; I added a piece of plastic card between the two halves
The canopies did not fit perfectly. The front canopy wasn't wide enough, and I decided to use drops of superglue to force-glue it in position. The dreaded superglue fogging did not occur. The rear canopy also suffered from some fit problems, and it was also attached with superglue. This time I did get a little fogging though. Then it turned out that the front and rear canopies did not align properly: the rear part leaned to the left, making an irregular step between the canopy parts. I again used super glue to force-bond it into position.
Some steps had to eliminated at the lower side where wing and fuselage met
Both tailplanes were curved, and had to be bent straight
Although I tried really hard to build it as a 'straight out of the box' model, I performed the following small modifications:
The openings for the propeller blades on the spinner were modified a little, and an extra panel line was added to the spinner
I added a landing light. I cut out the kit's grey plastic 'landing light', painted the inside dark grey, and glued a block of clear plastic in the opening. This block had a small hole drilled in its rear face to represent the light bulb (with a little silver paint). Then the block was sanded into the wing's contour, and lastly I polished it. It sounds like a lot of work, but it was really easy
The integrally moulded tail wheel survived all my handling until it broke off just before painting. I drilled a hole in the fuselage, and combined a piece of steel wire and parts of the original wheel to build a replacement
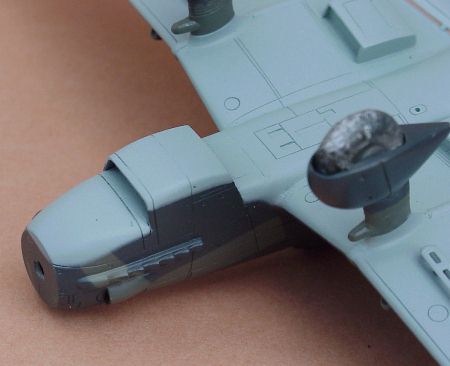
I was getting close to painting the model. First job was to mask the canopy. I used adhesive aluminium foil, not expensive Bare Metal Foil, but Cheap Chocolate Foil. See my Canopy masking with Cheap Chocolate Foil page for all the details. Due to the large number of panes in the Stuka's canopy, this masking consumed many hours. But the end result looked really cool. The landing light was also masked this way. The photo below shows the forward canopy covered in foil. Also visible is some of the puttying and shimming during construction. The main wheels had been painted and then packed in aluminium foil, and then the spatted main landing gear legs were assembled and glued to the wing.
Painting part 1
Then the painting drama started. I started off with Humbrol matt enamels. The base coat of a sort-of RLM65 (Humbrol 65 straight from the tin) turned out very grainy. I decided to rub down to model with 1200 sandpaper, a very tedious job. And because I sanded through the paint in some places, I had to repaint it. More grainy paint. I then decided to continue with the top colors, and to try to smooth out the grainy paint later with gloss clear coats. Next was one of the greens, I don't recall whether it was 70 or 71. That paint resulted in an even grainier surface, close to 300 sandpaper! The corners between fuselage and wings were worst. This was completely unacceptable, and I put the model away. Months later I stripped the paint off the model using NaOH (sodium hydroxide), and swore never to use matt Humbrol paints again. Note that I had painted models successfully with Humbrol satin paints before, and I did not expect problems of this magnitude with matt paints. Perhaps I'll once learn a trick to avoid grainy paint.
Painting part 2
Perhaps a year later I bought some Model Master II enamels. These semi-gloss paints turned out to spray very easily, and I took my stripped Stuka out of the box. I had to mask the canopy again with adhesive aluminum foil, since the masks had been damaged in the paint stripping process. The masking was different from the masking shown earlier. In the mean time I had learned that part of the canopy framing was internal. I therefore masked the panels in such a way that only the external frames would receive camouflage colors. Contrary to common practice of starting with the lightest color, I decided to paint the top colors (70 and 71) first. I started with 71, and achieved a very nice smooth paint coat. This made me very enthusiastic again! Finally a paint that worked for me.
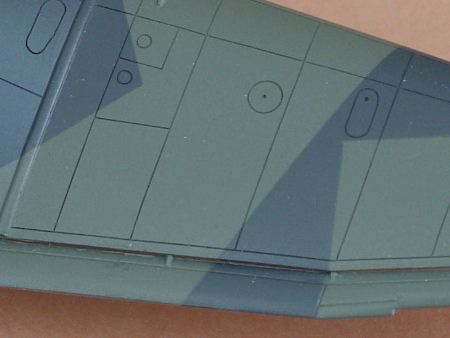
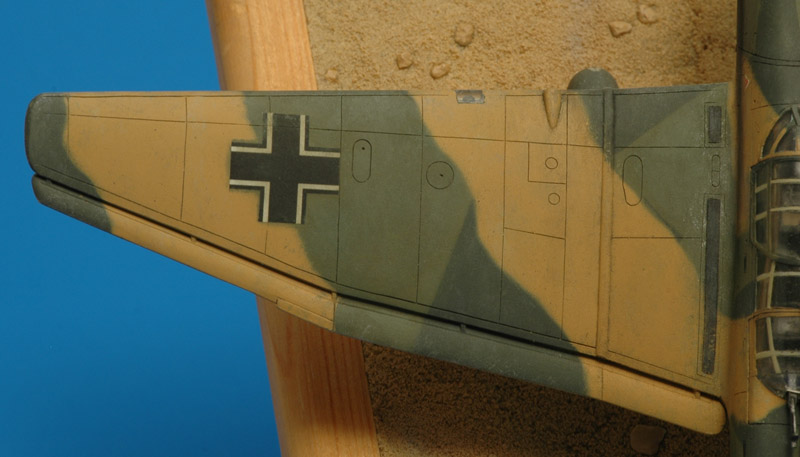
Then I spent a lot of hours on the masking of the splinter camo, exactly following the Fujimi pattern. I laid down the pattern using Tamiya tape. However, airbrushing at this point would result in a small ridge of paint against the tape. Therefore I added another layer of tape exactly on top of the first layer of tape, and lastly a third layer of tape which had an overhang of some 0.5 millimeters. Only then I sprayed the RLM 70, and with the paint a mere 10 minutes old I removed the masking (I was so curious), and found a very nice result. There was no paint ridge, and the 'hard edge' between the two colors had just a touch of 'soft edge' to make it look realistic. Definitely a technique I will use again. However, I was surprised by the huge contrast between the two colors. Some color checking later revealed that Model Master's RLM 70 and 71 deviate quite a lot from accepted FS matches. On the other hand, they match the well-respected Xtracolor RLM 70 and 71 pretty close. Who's right here? Oh well .. The photo below shows the result of the masking.
Time for RLM 65. I used tape masking on the wings, and Blu-Tack sausages on the fuselage. The third paint layer went on pretty nice too, and no bleeding from the dark colors underneath. So much for the standard technique of starting with the lightest color, and ending with the darkest color. Note that the wheels are still wrapped in aluminium foil.
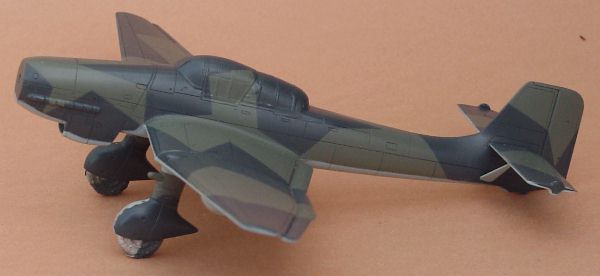
The photo below shows the model after the basic European camouflage of RLM 70/71/65 was applied. The contrast between the greens is way too strong I believe, but it does show the splinter camo to advantage. The canopy is still masked, and the left main gear spat was undergoing a small repair. So far I was really happy with the progress, although the model looked highly unrealistic at this stage.
At this point I decided to make things a little difficult. Somehow I wanted to make the model show that the brown RLM79 patches were added 'in-theatre' over the existing markings. Question was how the ground crew would have handled such a task. Would they have sprayed around existing markings, or would they have taped them off? A study of East front winter camouflages showed both techniques. I decided to try to simulate spray painting around the markings. Thus it was time to add most of the decals now. First though I painted the white fuselage band (the North African tactical marking). The band was masked and sprayed white.
Decals part 1
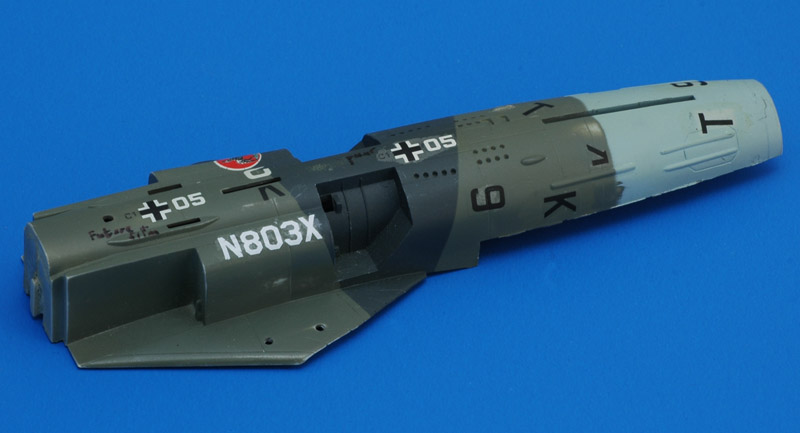
Being completely unfamiliar with Fujimi decals, I first performed some tests on a scrap model I had painted along with the Stuka (shown below, you have to guess the type). These tests revealed a lot of problems, see for example the silvering of the '6' decal roughly in the middle of the photo. I tried combinations of Micro Set, Micro Sol, Future, polishing the paint, and some more. Although Sol did seem to soften the decals, they wouldn't pull into panel lines themselves. 'Helping' the decals with a needle worked, but also risked tearing the decal.
When I thought I had developed a technique that worked well enough, I started with the wing crosses. The results were mediocre; they didn't want to conform much to the surface, and adhesion was poor. Next were the fuselage codes. These would cross numerous panel lines, and I didn't want to take risks there. So I tried a new technique: cutting the decal wherever it crossed a panel line. The cutting was difficult to measure, but it worked; a technique to remember. However this decal silvered very badly, despite all my precautions. The only solution was to overpaint the affected areas with a tiny brush. I had only one decal left: the fuselage code for the left side. And only then I found the solution for the silvering problem: I wiped off the decal glue, and attached the decal with Future. Finally it worked! But still I had to cut up the decal. After drying, I filled in the cuts in the decal with black and blue paint using a tiny brush. This improved the appearance a lot.
This left only a few decals. First I added Xtradecal swastikas to the fin. Then the Werknummer was cut in two (horizontally) and added to the fin tip. Fujimi's decals for the letters 'A' on the landing gear spats were way too large, and I replaced them with A's from a 'ROYAL NAVY' decal from an old Matchbox Lynx (I think). The only decals left off were the 'AA' markings on the left fuselage side, and 'S7' markings on the right side. These would be added after the RLM79 patches. Finally I added a layer of Humbrol Satin clear (135) to blend in all the decals. Despite all the problems it looked pretty good. The photo below shows the Fujimi decals of the fuselage code and the Werknummer (both cut in pieces), and the Xtradecal swastika that conformed using conventional means (Micro Set and Sol). Note however that the photo was taken after weathering and the painting of the RLM 79 patches.

Weathering part 1
I had planned to use pastels to weather this model. I knew about the discolouring effect of subsequent clear coats, so I made some test samples to judge the changes. Armed with that knowledge I went ahead. The first try was way too subtle, and after a clear coat all traces of pastel had disappeared. For the second try I mixed some pastels, and applied these more liberally. A clear coat revealed that on RLM70 nothing was left of the pastel powder, but on the RLM71 is looked like sh!t (literally). At this point I promised myself I would never try it again; the technique had worked brilliantly on my YF-23, but failed on the Bf 109, Me 163 and now the Stuka.
Plan B was to achieve the desired 'anti-monochromatic finish' by using paint. For this purpose I mixed the basic colors with all kinds of greys, browns and greens, and painted (scrubbed) these on the model in a randomly fashion. In some places the effect was too strong, and straight paint was scrubbed over the affected areas. The decals were treated the same way, which made them blend into the paint job considerably. Another layer of Humbrol 135 was necessary to cancel out different degrees of glossiness, and only then I was able to judge the result. It looked good enough, better than my Me 163. The photo below tries to capture the painting technique, but it doesn't do a good job.

Painting part 3
Time for African patches! I was very curious to see how they would change the model's appearance. However, a new complication had emerged: the Humbrol 135 satin clear coats I had painted over the Model Master II RLM colors showed very poor adhesion. Tamiya tape and even Humbrol Maskol would lift it. The only solution I saw was the use Blu Tack sausages (as originally intended) and mask the areas in between with aluminium foil, instead of Maskol. The Maskol method would have been quick and easy; fitting pieces of foil cost me a lot more time. Anyway, to create the 'spraying around the markings' effect I had to apply the Blu Tack sausages very carefully over the markings. But when I removed them after spray painting (I used Model Master II RLM79), it appeared I had grossly misjudged the underspray effect. The wing crosses were now partially overpainted with RLM 79. Because the paint hadn't cured fully yet, I was able to remove the larger part with a cotton swab with some white spirit. But it looks a little strange now.
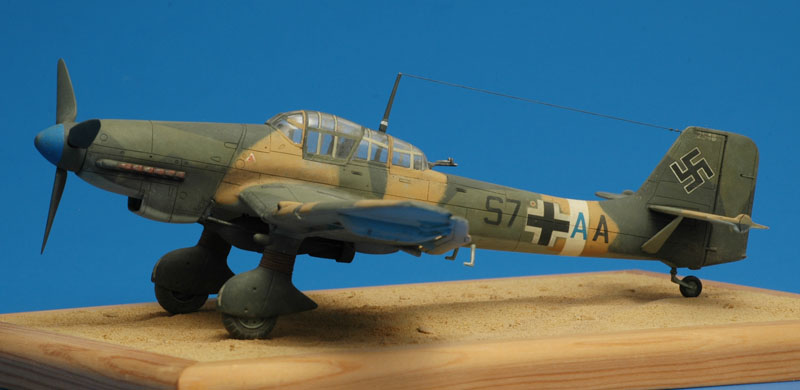
Even worse was the discovery that the Blu Tack had removed part of the right fuselage cross decal. This decal had silvered badly, and its adhesion must have been minimal. Luckily I located the pieces of decal in the Blu Tack, removed them very carefully, and attached them again with Future. You have to look really hard to see the damage, another successful rescue! The last item painted was the spinner tip. Fujimi says it's RLM 79, but another source reported it was blue. Since this was a Geschwader commander's aircraft, I decided to go for the Geschwaderstab color, blue.
Decals part 2
The last two decals, 'AA' on the left side and 'S7' on the right side, were now added on top of the RLM79 patches and the white fuselage band. Using the now established decal technique, they went on perfectly. Again the cuts in the decals were filled in with paint.
Weathering part 2
The fresh RLM 79 patches looked very unnatural now. Time to weather them, and the complete RLM65 lower side, with the technique described above. After that the model looked more like a real aircraft and less like a toy model, so I was pretty satisfied. However, I wanted to add some more life to the model, by adding signs of usage. This however I found not so easy. Perhaps I lacked inspiration, but I couldn't think of more than some chipping on the walkways, gun smoke (pastel), exhaust smoke (pastel), and an attempt at chipping around some wing hatches. I also washed the model in selected places (engine cowling, control surfaces, trim surfaces); overall the engraved panel lines are so deep that they didn't need a wash at all.
Finishing touches
Some of the detail work performed to finish the model:
The Stuka has a complicated canopy framing. Part of the frames are external, and I had masked those that were in camouflage colors. The rest of the frames are internal, and are either RLM02 or RLM66 (interior colors). I decided to use RLM02 for them, and brush paint them on the canopy. However the Fujimi canopy did not really suit itself to this approach; the 'internal' frame lines are as wide as the external ones, so it looks kinda strange. Furthermore, the frame lines of the top of the canopy are flush with engraved borders, while those on the sides are raised. In the end it looked a little crappy, but it was the best I could do
I added the antenna mast, and superglued a stretched sprue antenna to the mast and the fin. The heat of a smoking (blown out) match tensioned it. I added two drops of white glue near the fin tip and then painted the wire dark grey
I wanted to use the small 50 kg bombs on the wing pylons, but they suffered from mould shift bad enough to make them unusable.
For the centerline trapeze, Fujimi offers a 1000 kg bomb and a 500 kg bomb. I opted for the biggest one since I liked its shape best. But I still don't know whether it's a SC1000 or SD1000 bomb, or maybe even an SD500 bomb. I painted the bomb dark grey with a black wash and medium grey drybrush. It was quite a puzzle to find out how the release mechanism connected to the model. It turned out that it had to be glued right behind the radiator exhaust. It didn't fit though, and the insides of the mounts had to be sanded considerably.
I replaced the kit's pitot tube with a piece of steel wire around which I heat-stretched a polystyrene tube
Last to add, because of their extreme vulnerability, were the aileron mass balances. With the model inverted, I positioned them on a small blob of Blue Tack, and used superglue to secure them
Base
Since I had decided to build the model straight out of the box, and largely stuck to that plan, I ended up with a rather boring model. It had no displaced control surfaces, open canopy, or anything else. These days I definitely want a model to tell a little story. To make the best of it, I decided to add a base to the model. I had tried that only once before and it failed, so this was to be my first base that I would actually use. While building the model I often placed it on a piece of foam to protect it. I noticed that I really liked the dimensions of that piece of foam. Thus the dimensions were decided. I bought some wood profile, and built a picture frame from it, with a piece of aluminium sheet glued in it. The 'sand' is something we call 'silver sand' (used in bird cages I think) mixed with a little epoxy, to which small stones from the garden were added. Looking back, this is way too course, the sand is almost pebble-size. The whole thing was then spray painted in a light brown/pinkish color. I glued all wheels with pins to the base, because the model no longer offered means to lift it by itself (due to the antenna wire and mass balances). I should have oversprayed the wheels with some of the base color, the model now does not 'connect' properly to its base.
Finished
And there it was, my seventh model. I achieved 99% of my plans and ideas with this model, which is a very good score I think. I entered the model in the Dutch IPMS 2000 Nationals, where it received a third place in 1/72 category.
In 2001, RC modeller Patrick McLaughlin wrote to tell that he used my Stuka's paint scheme as inspiration for his 101" (2.56 meter) span Ju 87B Stuka model; photos of his model can be seen on Hyperscale. The article you just read was also republished in the April 2002 issue of IPMS Stockholm online magazine, it is missing some small updates however, and it doesn't have the better photos that I made later.
2021 upgrade: sleeping mechanic
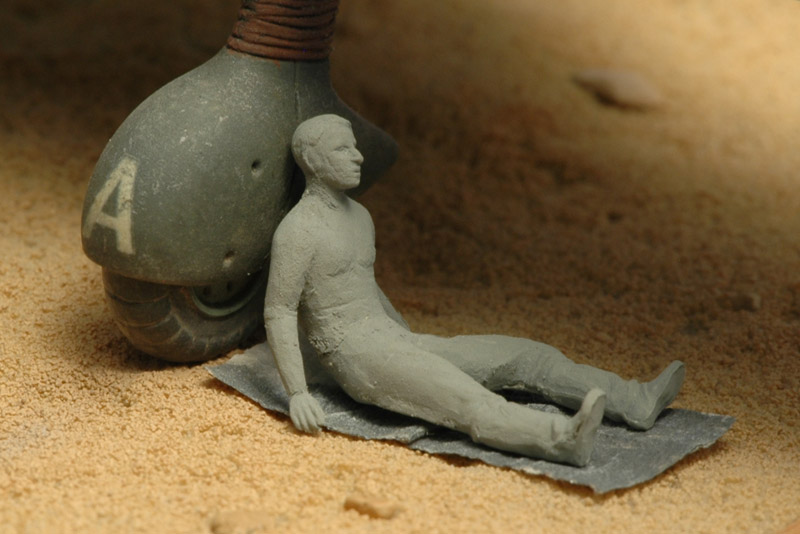
| I always had the feeling that there was still something missing, and maybe it was a figure. A sleeping mechanic under the Stuka, in the shadow of the wing, would be something different. I modified a bent-over person figure from Preiser set 72508 for the purpose. I wanted him to be bare-chested. Here it is seen mocked-up on a first attempt at a blanket. Some kind of cushion may also be required.
| 
|

| In 2021 the plan to add a figure became more concrete. I'm a member of IPMS-The Netherlands, Zuid-Holland chapter, and for a club project I needed to upgrade the model with one or two figures. First I glued the blanket to the desert floor, I used a piece of foam to exert a uniform pressure to the blanket.
Next I needed to fix the figure in one specific spot, because his shape needed to confrom accurately to the blanket. You can't have a figure 'floating' over the blanket! I saw only one solution: to fix the figure
with a minature bolt and nut. I had a rusty M1.4 set, of which the nut was sanded down to the smallest size possible, and then epoxy-glued into the butt of the figure. It also required drilling a 1.5 mm hole through the diorama, just ahead of the wing's leading edge, with a big risk of damaging the model.
The photo shows that the figure model suffered quite a lot of damage in the process: it's now missing its head, one arm and one hand.
|
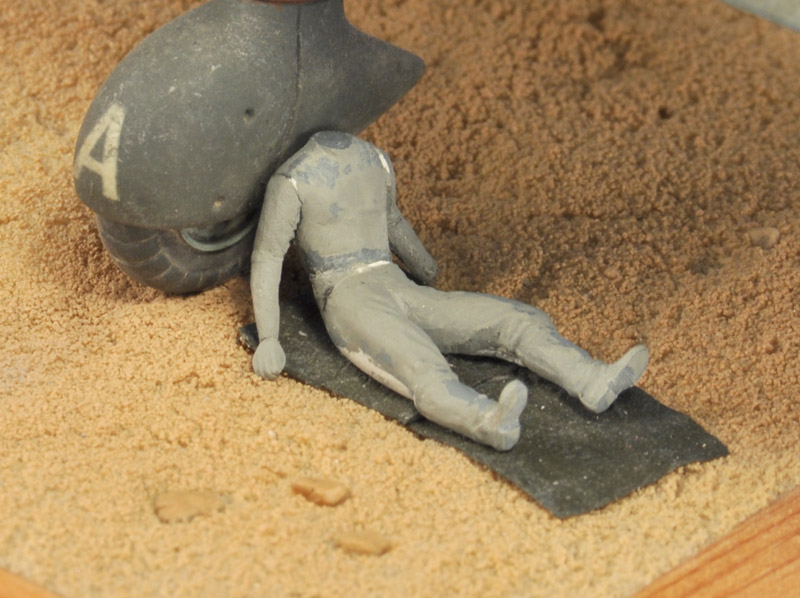
| Here the figure is bolted down, and the right arm has been reattached. The 'diorama' now looks quite unbalanced. Maybe I'll need to add another figure to restore that.
| 
|

| The figure has been restored with arms, hands and head, and coated with a layer of Mr Surfacer. I still want to add some kind of head gear, in a way someone would use to sleep in the daylight.
|
2021 upgrade: extra bombs
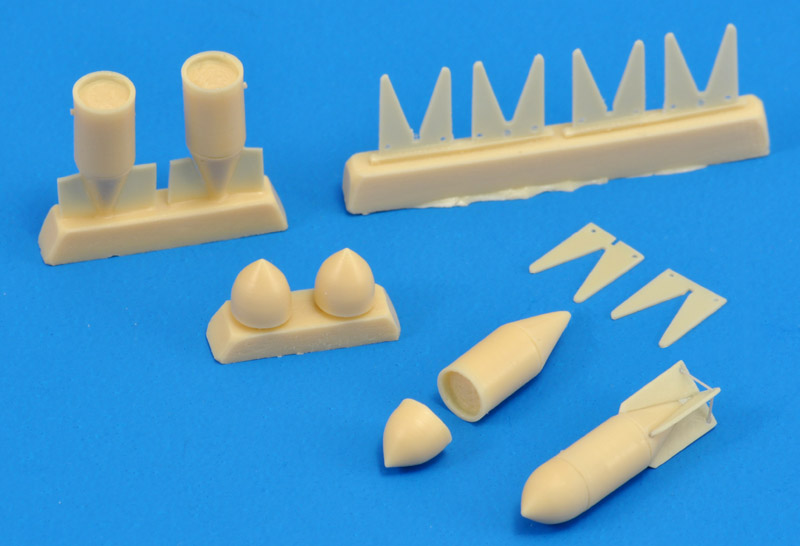
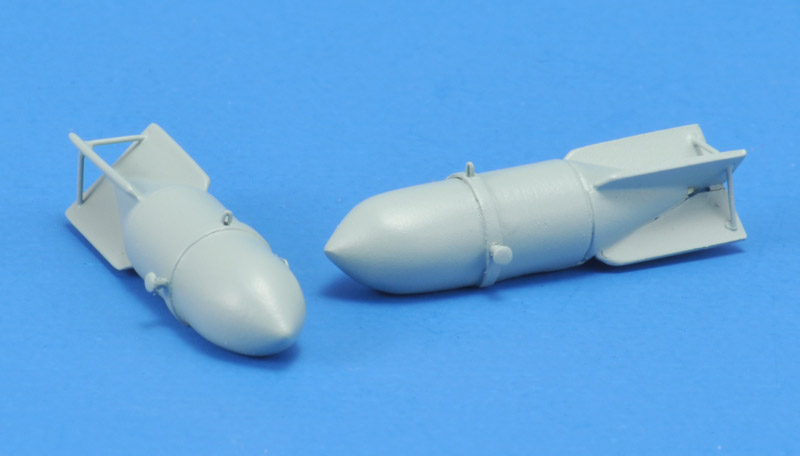
| With the figure in one corner of the base, the balance of the diorama was lost. I tried to solve that with 'something' in the other corner. That 'something' could be a couple of SC500 bombs with Stuka adapter rings, waiting for another mission. I had CMK 7184 SC500 bombs in stock, so I built two of them. Assembly of the tailfins is pretty tricky, but with a lot of fiddling I managed. The struts between the fins were made of 0.3 mm stretched sprue, instead of 0.6 mm wire as advised by CMK.
| 
|
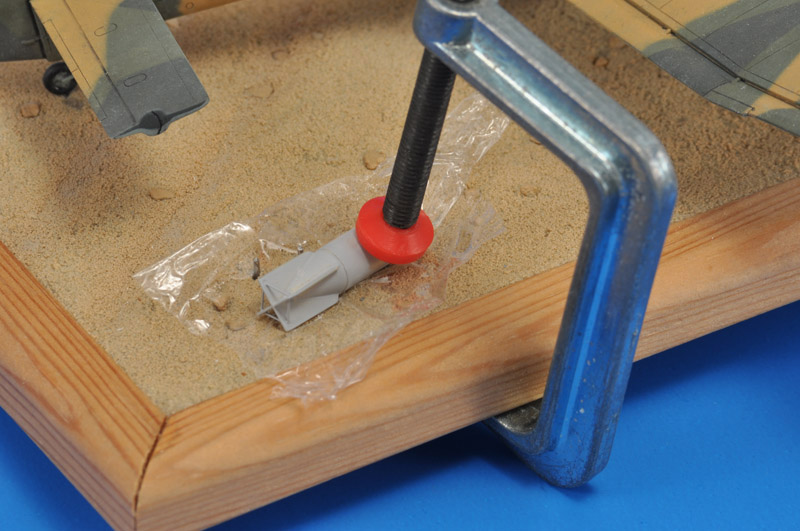
| I wanted the bombs to be recessed slightly in the sand, which is not easily achieved with my sand-epoxy mix that had 20 years to cure. I decided to sand off the bottom of each bomb, apply Apoxie clay and press it onto the diorama's surface, with a piece of kitchen wrap to avoid ahesion. Also required for this operation was a fixed position for each bomb, since the surface is totally irregular. I installed steel pins in the diorama, and corresponding holes in the bombs. Here you can see one bomb being pressed down while the Apoxie cures.
|
| This worked well, and the bomb is now lying in the sand, as opposed to on the sand. The rear bomb still needs to be done, and still floats above the surface.
| 
|

| I looked high and low for more information on the bomb suspension rings that were required to adapt a standard 250 or 500 kg bomb to the Stuka's centerline trapeze. The only thing I found was a drawing of an SD500 bomb with a 'suspension band' in OP 1666 - German Explosive Ordnance, Volume 1. Unfortunately the text does not mention it, nor does it give any further details.
|
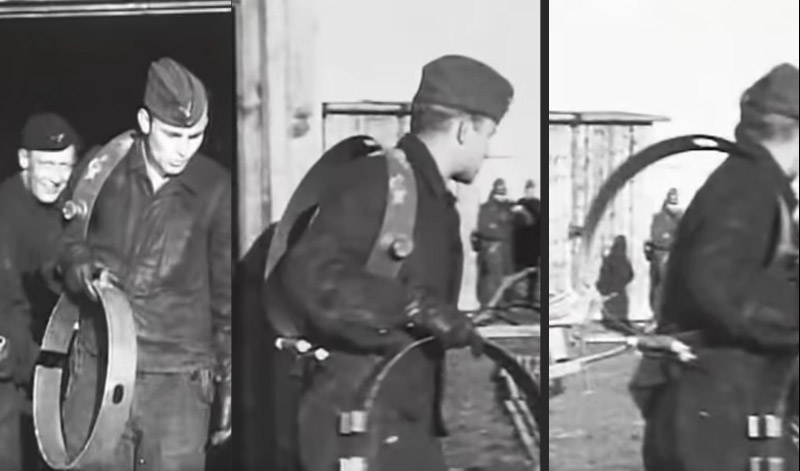
| It took me a long time before I found more, in the shape of a piece of film (Der Krieg in der Luft - teil 2) that shows two Stuka bomb suspension rings in clear detail. I combined parts of three screen shots in the picture on the right. One can see an opening for the standard bomb lug, two trunion pins at either side, and at the bottom a tightening mechanism using two bolts.
| 
|
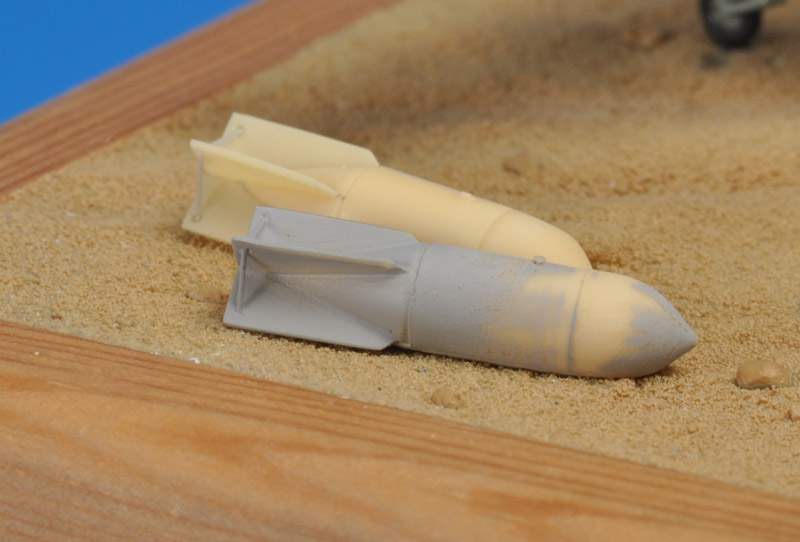
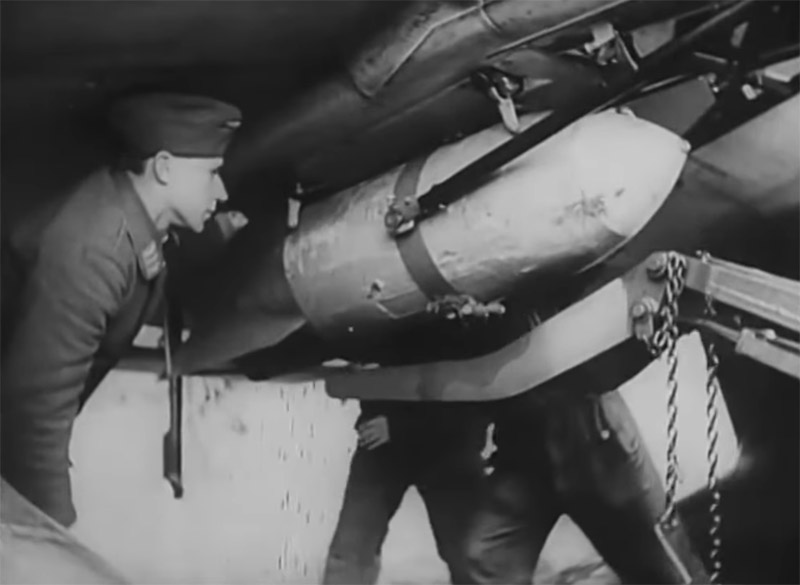
This looks like a smaller bomb to me, but viewed from the same angle. The tightening mechanism of the ring, using two bolts, is seen at the bottom. I've been told this is a concrete practice bomb; it has a white nose and rectangular pocket for the smoke cartridge.
I also found the German name for the ring: 'Führungszapfenband'. Not as good as 'Hubschrauberlandeplatz' or 'Rechtsschutzversicherungsgesellschaft', but close.
| 
|
| I converted the CMK SC500s with a 'Führungszapfenband' made from 1 x 0.2 mm strip, adding 0.5 mm rod at the 3 and 9 o'clock positions capped with a slice of 1.1 mm rod, and added a suspension hook from 0.2 mm silver steel wire. Here they are painted Model Master #2078 RLM 65.
|
I found the following information on SC500 colors:
D(Luft), 4300, Teil 1, Heft 3 - N.f.D. - "Abwurfmunition. Bomben. Munitions-Handbuch. Teil 1: Minenbomben. Heft 3: SC500. Ausgabe Dezember 1942" states: "Die Bomben sinds dunkelgrau gestrichen. Tropenmunition hat einen hellblauen Anstrich. Die erste Lieferung dieser Munition war aluminiumfarbig gestrichen. Seit Juli 1942 werden alle Bomben (auch Tropenmunition) beigegrau (Farbton RAL 7027) gestrichen."
OP 1666 'German Explosive Ordnance' (1946) and similar TM 9-1985-2 (1953) state: "Bombs which are carried in internal bomb bays (up through 500 kg) are usually colored dark green. Bombs which are carried in external bomb racks (1,000 kg and over) are usually colored sky blue. Color may also be controlled by the conditions of the bomb storage. Aluminum , tan , buff, etc., are colors that may be used."
I decided on one bomb in RLM76 overall, and one bomb with an RLM76 body and dark gray tail. As far as I know, there is no RLM color with the name 'Dunkelgrau', so that was very much open for discussion. I mixed Model Master 1592 'Black Gray' and 1723 'Gunship Gray' (FS 36118) in a 1:1 ratio, and used that for one tail. I used Bare Metal Foil for the masking.
The 'Führungszapfenband' looks metallic or gray in the photos shown above.
|
|
|
| Decals from a PrintScale sheet, 72-057, 'Die Markierung der Flugbomben. Luftwaffe 1930-1940'.
|
Return to models page