Before I analysed all three kits as shown on page 2, I bought a Hasegawa kit to build this car, and started right away. Halfway the conversion, that was going pretty well, I decided that the basic body shape of the Hasegawa kit simply wasn't suited, and I stopped. Since then I've found some more Tamiya 956 and 962 kits, and I'm ready to start over again. Until that nice day I'll leave the following report on this site.
The conversion from the 962C to the 962IMSA requires 9 minor and major modifications, listed below. I have not seen it yet, but Motor Racing Replica News magazine ran an article on the same thing.
IMSA tail
The biggest job is to build the IMSA specific tail. According to my sources, Porsche designed a new tail to meet the IMSA requirements. I think it was used by all teams in 1984, but by 1985 the standard Kurzheck (short tail) had been introduced through the rear door.
I performed a lot of measurements on photographs and came up with the following modifications:
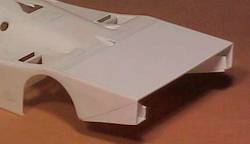
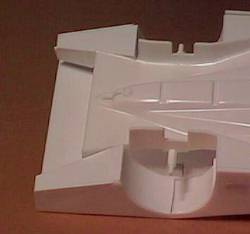
I started by cutting out a large piece of 1 mm thick plastic card to fit between the fins. This plate was mounted exactly horizontally. The plate extends quite a distance from the rear edge of the original body. I found out that the plate would bend a little under its own weight. This was solved by gluing 'stiffeners' on the inside. Since I used a 1 mm thick plate, there was a gap at the front end, that needed to be filled with strips of thinner plastic card.
Next I extended the sides of the rear body. Triangular pieces of plastic card were used on both sides. The height of the rear end of the body is 11 mm.
Then the fins were cut off.
Turning to the underside of the car, the lower sides of the rear fenders were constructed from another piece of plastic card. Their width is 18.5 mm at the wheel arch, tapering to 8 mm at the rear of the car. To this part a vertical part was glued, that would form the outside of the venturi tunnels. The height of this part was not important. All edges were then rounded slightly by sanding them.
To stabilise the parts described above, and to finish off the interior of the fenders, I curved a 17.5 mm wide strip of plastic card over my Exacto knife handle, and glued this inside the fender. The result of these modification can be seen in the following three pictures:
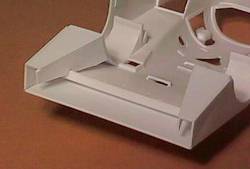
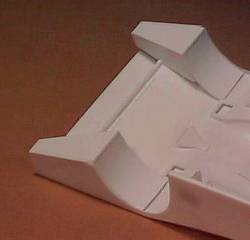
The next step was to rebuild the venturi tunnels. The Hasegawa bottom apparently is a 1988/89 version with quite low venturi tunnels. The first picture shows that they do not agree at all with the new rear body. As far as I can tell, the bottom plate should meet the lower edge of the extended tail, just like a Langheck underbody. I build a new underbody as follows:
The slope of the kit's tunnels is too shallow, so I cut out the 'roof' part of the tunnels, leaving only the sides. The cut extended past the rear axle.
Next step was assembling the upper and lower body parts with tape. This allowed accurate measurements for another large piece of plastic card. This piece is a rectangle with triangular pieces on the sides (see drawing that I will add later). The rectangular part will be attached to the bottom body, while the triangular parts will be attached to the rear fenders (just like on a Langheck 956/962). But for the gluing operation they must be left connected. The part was pre-scribed however, so cutting would be easy once the part was installed.
The card piece was then superglued to both the upper and lower body. The pre-scribed line was then scored repeatedly until it broke. After a light sanding of the edges a small strip was glued to the triangular parts, to create a step where the center part rests on.
Using a Tamiya 956 Langheck as an example, I lengthened the 'gearbox bump' with Milliput. The results of all these modifications can be seen in the following four pictures:
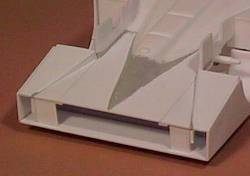
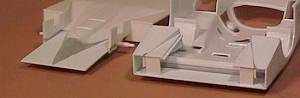
Unfortunately, after all these modifications I measured the body again, and noted $%#!!&!! that the rear end was 13mm high instead of the intended 11mm. Rebuilding was the only way to correct it, so I left it like that. To be added is the rear panel with tail lights and the huge exhaust pipe.
Moving the fins inboard
The fins of the rear wing were cut of during the reconstruction of the IMSA tail, and must be glued back a little more inboard. They should line up with the outside of the air outlet in front of the rear wheels. They should also keep the same distance from the rear of the car (as per IMSA rules). Then the narrowed wing can be glued back in place.
Adding a 'turbo bump'
The single turbo of the IMSA version is mounted overhead the differential, and requires a large 'turbo bump' on the engine cover. Many designs were used; this car had a square-looking bump with longitudinal slots in the front sides, and a separate square inlet on the right side. Penguin Productions Race Replicas (operated by Jim McCall) produces several versions, but not yet this one (although he has a master). So it's either back to scratch building or patiently waiting for the PPRR part.
>
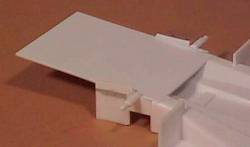
Engine cooling air inlet
The engine cooling inlet is wrongly placed on the car, for both the 962C and 962 IMSA. I filled the old one with pieces of card and superglue, and removed the bump surrounding it. After measurements of photographs, I sketched a new and larger one , and cut it out. The interior has yet to be created. The panel line between the cockpit and the engine cover has to be changed too: it now makes a detour around the new NACA-inlet. The old panel line was filled with superglue.
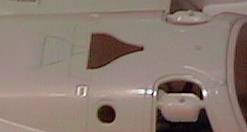
Removing rear brake air scoops
The small NACA ducts are OK, but the scoops have to be removed and faired over with a piece of card.

Closing the side exhausts
The 962IMSA had one central turbo and a rear exhaust, whereas the 962C had two turbos and exhausts in the sides. These thus have to be closed. I glued a piece of card on the inside, and then glued a cut-to-fit piece of 1mm card in the hole. I used superglue to fill the crevices.
Adding louvres in the body sides
I copy-cast louvres from my Tamiya Porsche 956, since it is quite a job to make them yourself. I cut a square opening in the Hasegawa body and glued the resin copies with CA.
Correcting the front fenders
The rear of the inner side of the front fenders in much too rounded on the Hasegawa kit. A comparison with photographs will reveal this (I will add a picture soon).
Wheels
Akin ran the car with BBS 16 inch multi-spoke wheels both front and rear, often covered with white brake ventilation plates (what are these things officially called?). My Hasegawa kit does not have these wheels, but the Tamiya 956 has BBS front wheels. Perry's Resin Replicas sells the BBS rear wheels.
That's how far I came when I decided to start over again. I'm now waiting for inspiration to start the conversion all over again, but now with Tamiya 956 and 962C kits.