Vacuum resin casting
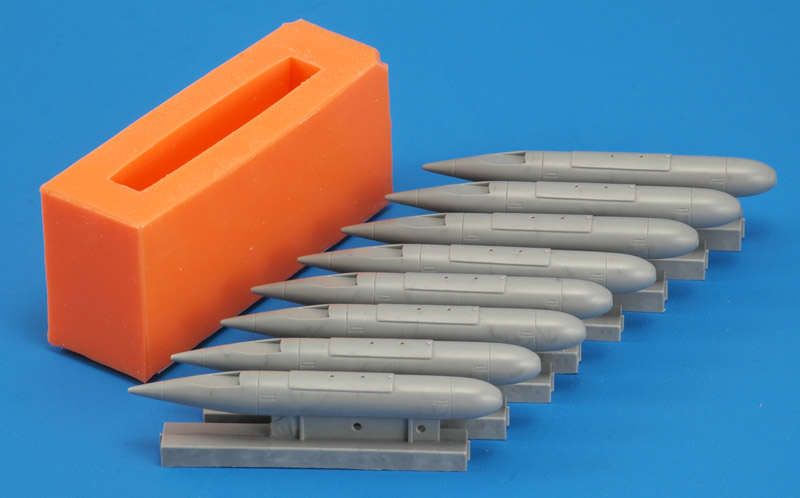
I started experimenting with resin casting around 1992, and it took me a few years before I found a process that consistently gave me excellent castings. Inspiration came mostly from studying commercial resin parts; I never found a manual or article that describes the vacuum casting process in detail.
There's an interesting cultural aspect to resin casting. It seems that vacuum casting is the European way of resin casting. In the USA pressure casting is the preferred method. I'm describing vacuum casting here.
|
My vacuum molding and casting process
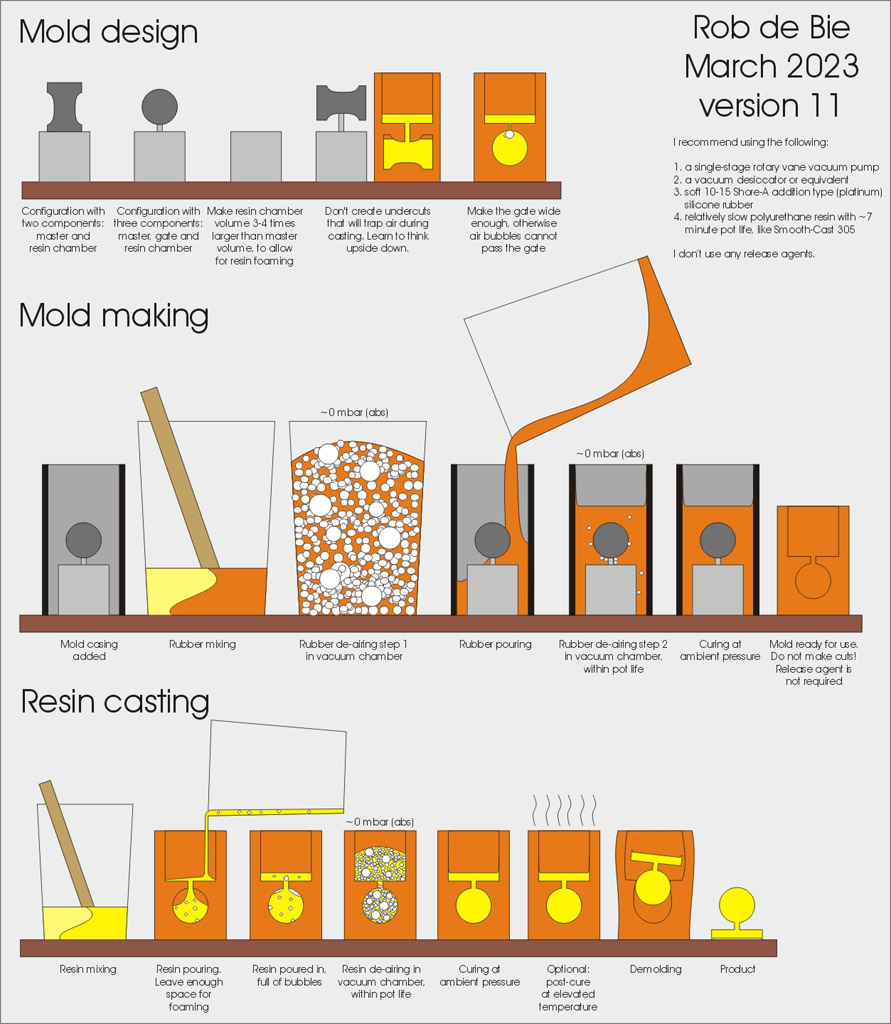
I made a graphic of the steps of the process that I use. I keep improving the graphic; this is the twelfth version.
There's one step that I haven't figured out completely, and that is post-curing at elevated temperature. Generally speaking, post-curing improves material properties of thermoset plastics. But I haven't noticed that effect with post-cured polyurethane castings. More experiments are planned.
Compared to pressure casting in two-part moulds, there are are two big advantages. The laborious claying to embed the part halfway, to create the division of the mould halves, is completely absent. Preparing a part for casting a mould is minutes work. And because the mould is one part, there are fewer mould parting lines left on the part - the castings are of better quality.
| 
|
Equipment
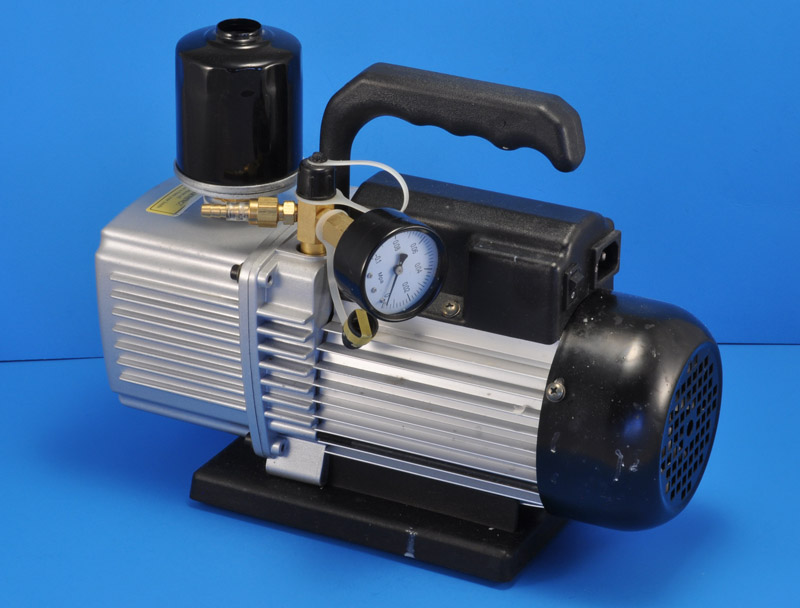
This is my no-brand Chinese single-stage rotary vane vacuum pump (see Wikipedia). It is marked as a 'Model Z-3', with a listed pumping capacity of 1.1 liters per second. But judging from the actual pumping capacity, it's probably a 'Model Z-1.5' instead, with a listed pumping capacity of 0.68 liters per second.
As far as I know, a rotary vane vacuum pump is much better suited to vacuum resin casting than a membrane vacuum pump. Most single-stage membrane pumps do not achieve a deep enough vacuum to de-air the resin. Currently, similar no-brand rotary vane pumps are roughly 150-200 euros in the Netherlands.
My pump came with a vacuum gauge that's pretty useless for this purpose, since I'm most interested in the 0 to 20 mbar (abs) range. But gauges for this range are expensive, and I learned to listen to the pump to judge the vacuum level. Plus you can see the resin bubbling vigorously when the vacuum is deep enough.
The black vertical cylinder is the oil mist filter, that my pump did not have originally. It added some 40 euros to the cost of the pump. I tried several other solutions, but nothing would catch the fine oil mist generated by the pump. This filter does its job properly. I duct its exhaust directly into the ventilation system, since it could contain unhealthy components.
| 
|
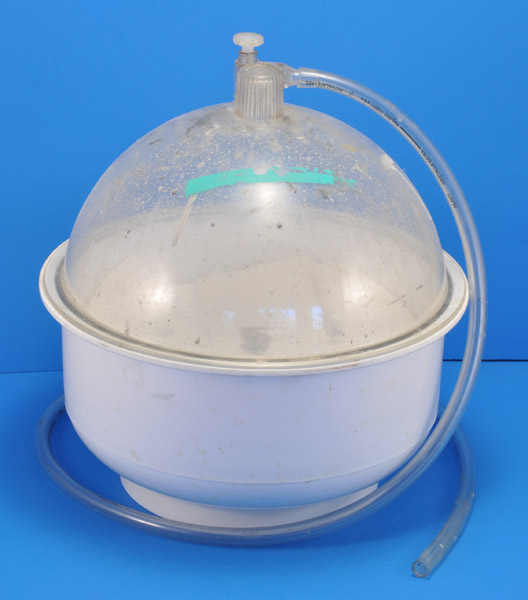
| Here's my 9.2 liter vacuum desiccator by Kartell (catalog number 554). The bottom half is made of polypropylene, the top half of polycarbonate. The dome used to be fully transparent, but the inside is coated with tiny drops of resin, because the resin bubbling can be violent. Plus I also used it for an industrial project, further dirtying the inside. When I bought mine some 15 years ago, it was around 75 euros. Correcting for inflation, I would expect 100-110 euros now.
A word on safety of vacuum chambers. For a while I thought an implosion of a vacuum chamber would be pretty harmless, since all fragments will fly towards the center. But I hadn't considered that the fragments mostly will continue their path, making the effect similar to an explosion. I've seen photos of the aftermath of a vacuum chamber implosion, with shards embedded deep in a wooden door. Since then, I treat my vacuum chamber with a lot of respect. Whenever possible, I try to be away from the vacuum chamber during the first run of each casting session.
Also, I replaced my vacuum chamber after seeing microcracks in the polycarbonate dome. Those were probably the result of using a strong solvent in the vacuum chamber. So there's another warning: your chemicals can have an unwanted effect on the strength of the materials of the vacuum chamber.
I'm using thick-walled 12x8 mm PVC tube, thinner-wall tube will collapse under the vacuum.
If you're Dutch, here are links to vacuum casting sets of three suppliers: Polyservice,
Polyestershoppen and Silicones and more
|
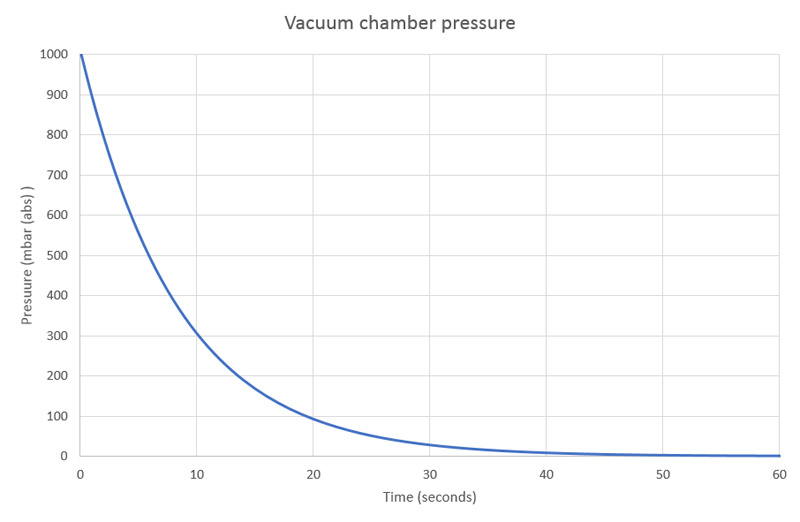
I calculated the differential equation for the (absolute) pressure as a function of time, assuming zero leakage, and no gasses escaping from the resin:
pressure as a function of time = starting pressure * e - pumping capacity / volume * time
Assuming standard atmosphere of 1013 mbar (abs), pumping capacity of 0.68 liters per second, and vacuum chamber volume of 9.2 liters, the equation becomes:
p(t) = 1013 * e -0.0739 * t
This theoretical function is plotted in the graph.
| 
|
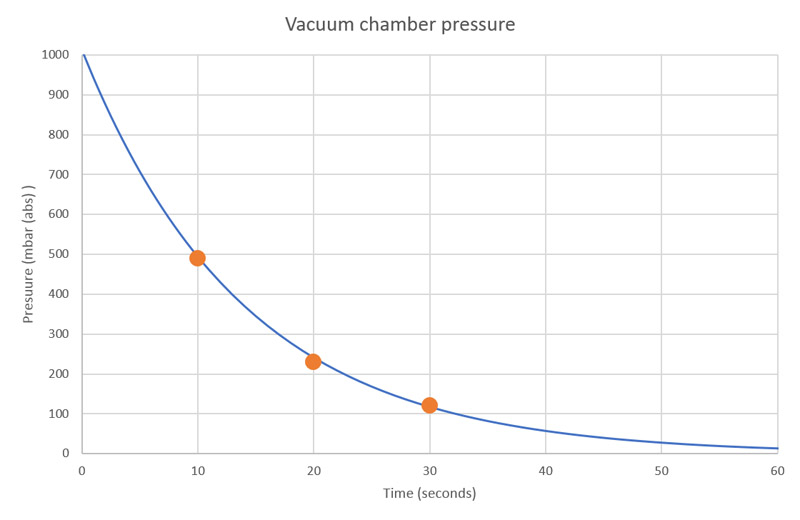
| I did measurement of the actual pressures at t=10, 20 and 30 seconds, finding ~490, 230 and 120 mbar (abs), and they matched the theoretical graph pretty well. Still, I adjusted the pump capacity from 0.68 to 0.66 liters per second, for a slightly better fit.
I can see the resin starting to foam around 40 seconds, and bubble (breaking the foam) around 55 seconds. At those points the pressure should be around ~50 and 15-20 mbar (abs) respectively. Earlier I thought that a much deeper vacuum was required, below 2 mbar. But that was probably an observation when working with epoxy resin. For polyurethane resin, you need a pump that can pull 10 mbar (abs) or better, to play it safe.
From the time that the resin bubbles, the actual pressure will deviate from the calculated value, since the resin is venting gasses, hopefully mostly entrapped air and absorbed moisture. I cannot quantify that, but there's no need for it either, as long as the resin is bubbling vigorously (i.e. de-airing).
Shortly after making this analysis, I met a modeler whose setup required around seven minutes to reach a decent vacuum. That exceeded the potlife of his resin system. He probably had a small pump and a large vacuum chamber, and he could analyse the problem with the method presented here.
|
Materials
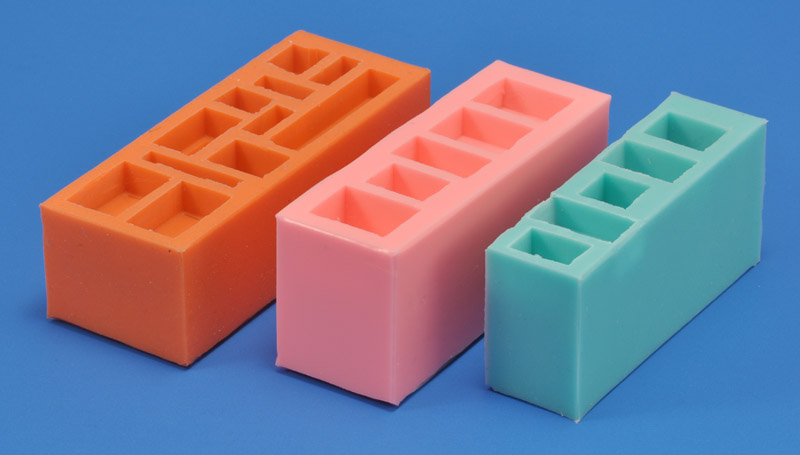
I've used three types of addition-type silicone rubber in the 10 to 15 Shore-A range, bought from Dutch suppliers. From left to right: PolyService 8510 (orange, 13 Shore-A), Silicones and More Pink 10, (pink, 10 Shore-A), Smooth-On Mold Star 15 Slow, (green, 15 Shore-A) bought from Form-X.
The difference in hardness (softness) between the three is noticable. For example a Pink 10 mould is really floppy, and should be supported lateraly during the cure of the castings. On the other hand, it will release parts with strong undercuts easily.
PolyService 8510 was my favorite, with good all-round performance, but the price increased rather drastically. Pink 10 is rather easily damaged: sharp edges of the casting will cause scratches inside the mould. Mold Star 15 is more viscous, but the moulds came out fine.
In the YouTube video Resin Casting Mistakes and How to Avoid Them, Smooth-On technician Milo reports and demonstrates that especially Part A need premixing, since filler components settle to the bottom.
| 
|
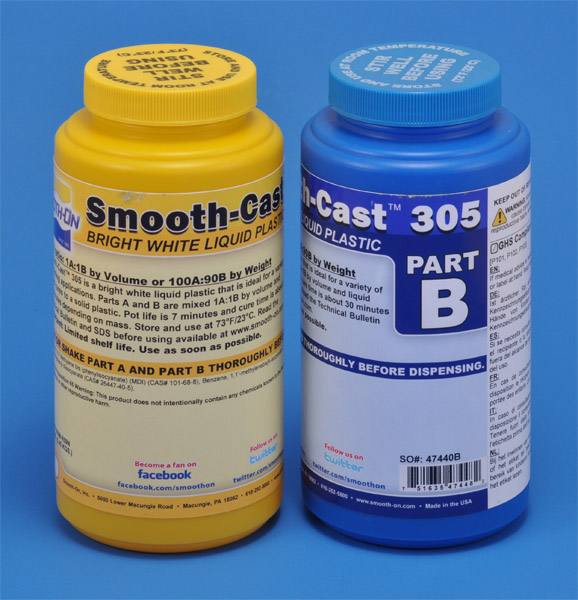
| I've used Smooth-Cast 305 for nearly all my castings. The main reason for using 305 is the 7 minute potlife, that is just right for my process. Most polyurethane casting resins have a 3 minute potlife, and that's too quick for me. I also like the slower cure of 305 because it means most castings won't heat up during the cure, which leads to shrinkage. A drawback of a slow resin is a longer demoulding time, in my case it's around two hours.
I always add a tiny amount of special polyurethane coloring, Coelan Farbpaste RAL9005 Tiefschwarz, to change the color from white to a light gray. Details are difficult to see on white parts, and gray solves that.
I use 10 ml syringes to measure equal volumes of Part A and Part B. The mixing ratio is 1:1 by volume, and 1:0.9 if you measure by weight. I use the simplest type of syringes available, without rubber plungers seen on more sophisticated syringes. The rubber could swell up due to the chemicals.
I never use release agents, for two reasons. First is that I think it's impossible to apply a release agent to a detailed and deep single piece mould, even with a spray can. Second is that I don't want a release agent on my castings, that need to be painted later.
|
Various photos of my casting process
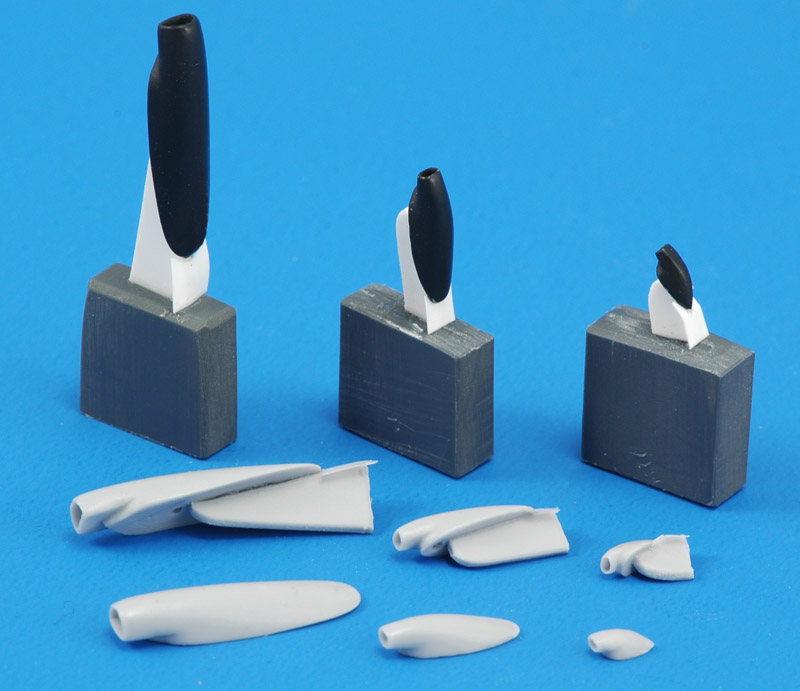
| Here's a typical project, a set of small U-2C underfuselage cooling air inlets. The master parts are seen at the rear, on their casting blocks. The parts are positioned vertically because of the openings. At the front, the castings with and without the gates can be seen.
| 
|
| The photo shows three parts to be copied, fitted with a casting block and a piece of 1 mm plastic card in between (gate). The soft silicone rubber accepts large undercuts, as you will see.
|
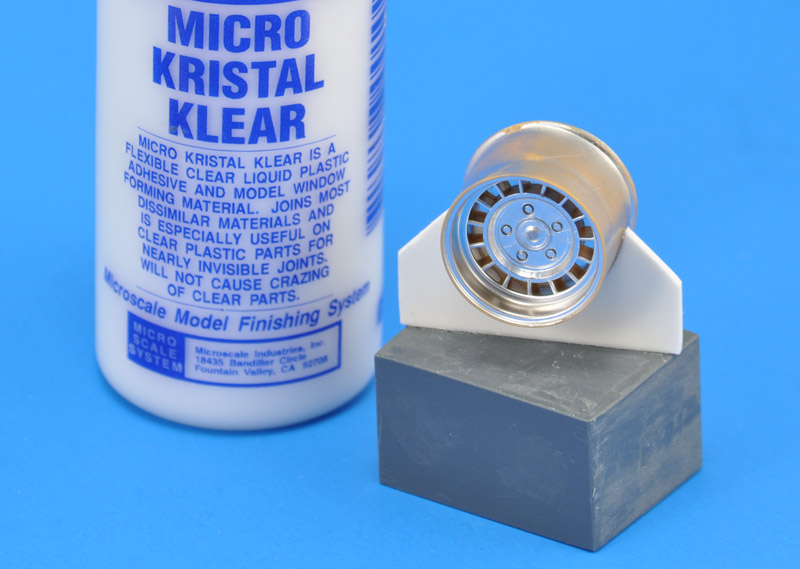
| Here's a wheel, prepared to be copied. It's a pretty radical mold when it comes to undercuts, but for me this the best way to cast a resin wheel. The spoke holes have been closed with Kristal Klear, which makes a very thin film when dry.
| 
|
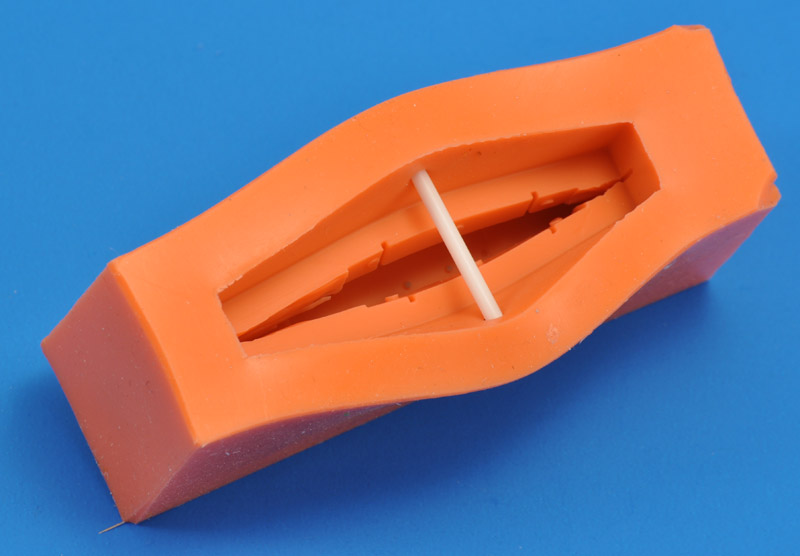
| A view inside a typical mold, held open to show the interior. Note that I do not make cuts that reach the exterior of the mold, because they would form paths for air leakage during the vacuum process.
|
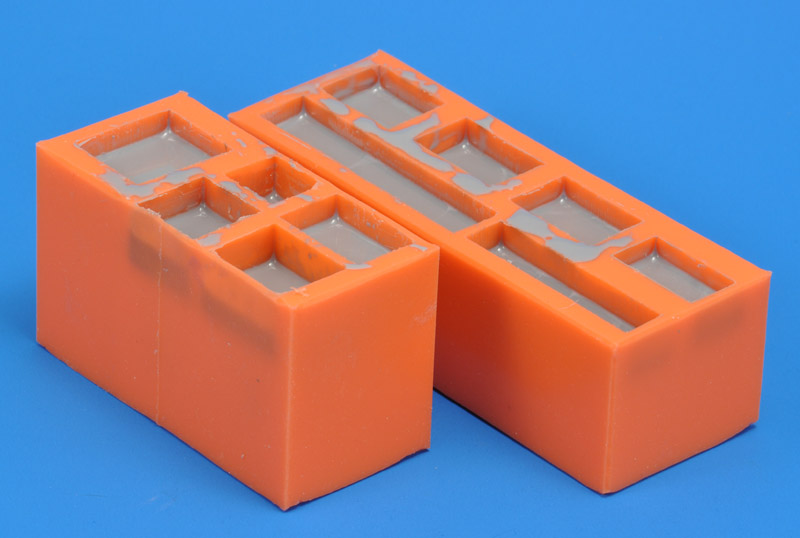
| The resin has been cast and cured. The foaming of the resin under vacuum left some flash on the top face of the molds.
| 
|
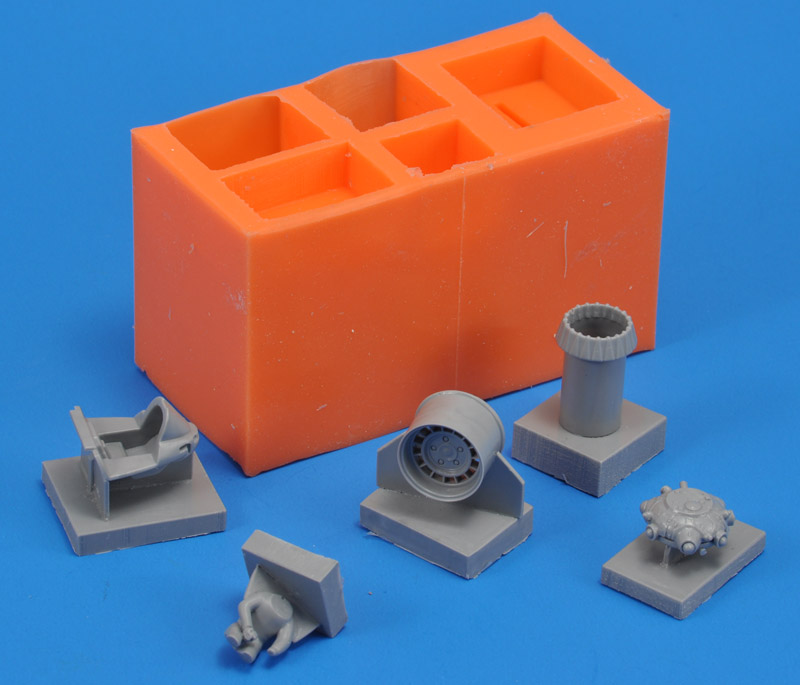
| The result: five nice castings. Note the heavy undercuts on most of these parts. Releasing the parts can be a bit of a struggle, but the rubber takes the abuse well.
|
| The parts come out perfect, consistently, without air bubbles. The castings blocks show a bit of variation in their volume. They need to have some thickness (strength), because they are the part that you grab to pull the part out of the mold.
| 
|
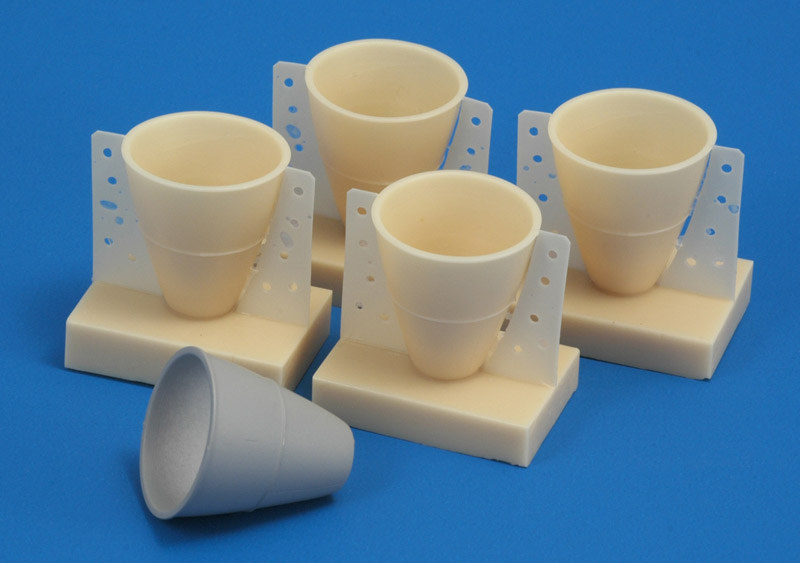
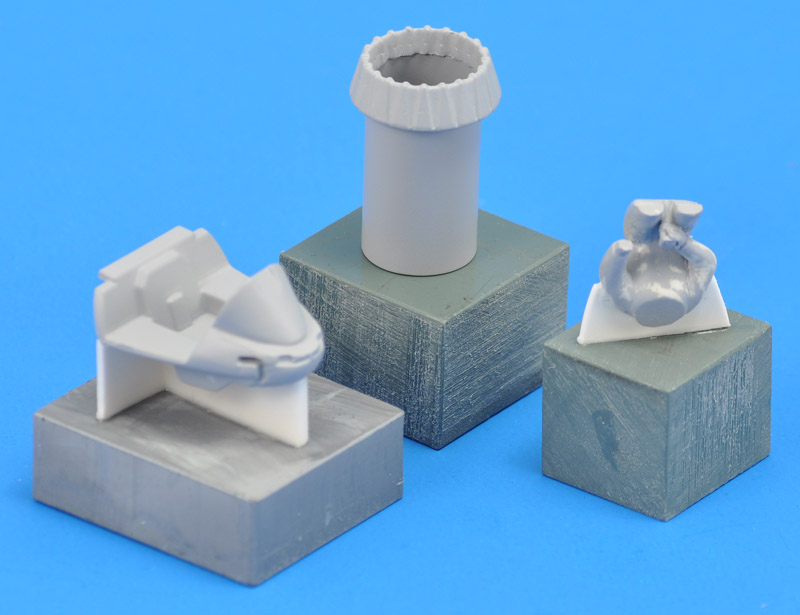
| I reworked the rocket nozzle of the RealSpace 1/96 Apollo Command & Service Module, and cast copies of my master. It's another example of the undercuts that are possible. The 'swiss cheese' pieces of the sides create a wider opening for the part to release.
|
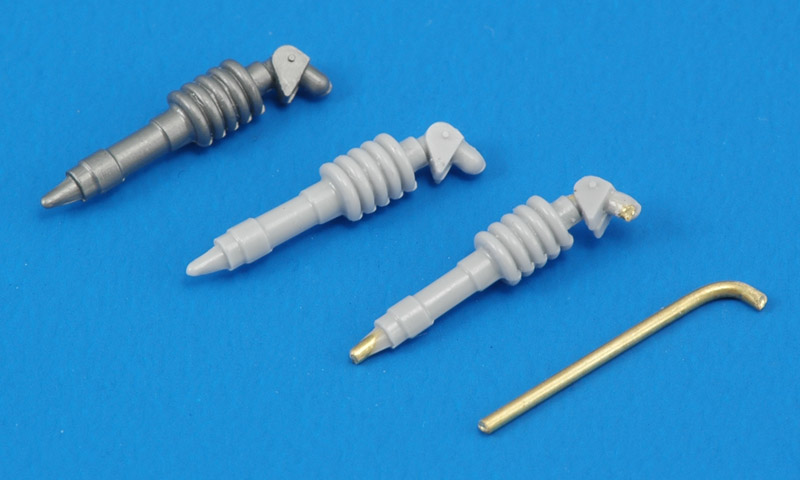
| If a part needs more strength, you can insert a steel or brass wire in the mould, then cast as usual. This is a landing gear strut from a Hawk 1/32 H-43B, possibly 60 years old. Its plastic had become very brittle, and the top bracket had broken off. I made a mould using the repaired but weakened part. Before casting,I inserted a 1 mm brass wire, and it worked perfectly.
| 
|
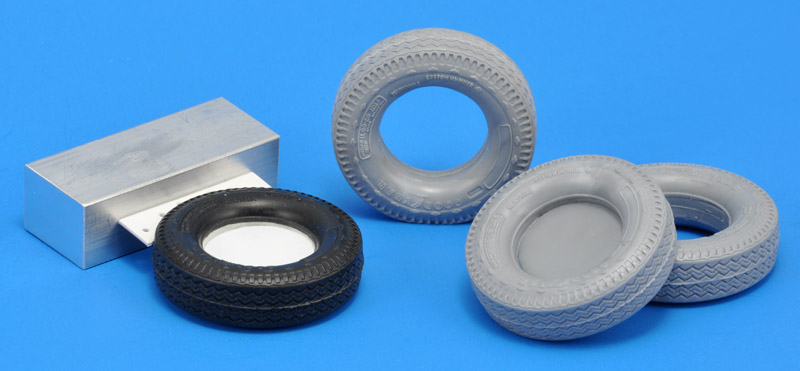
| Here's how I copied an Ertl truck tire with single-piece mold and vacuum casting. I filled the master tire with Apoxie Sculpt to make it solid. A thin plastic card disc was glued inside the tire. The rearmost casting has that disc removed, plus the flash on the thread, that was very difficult to remove on the original PVC (?) version. I also sanded the bottom, making the tire look like its actually carrying a load. Many trucks models stand 'on their toes' in my view.
|
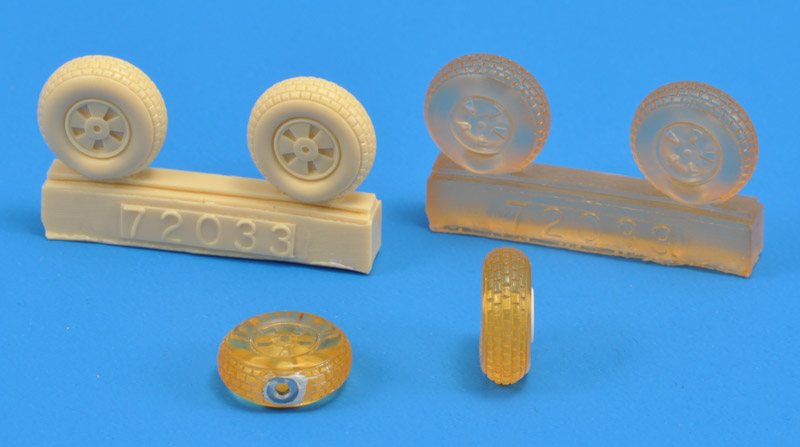
| Here's an old project, for my Airfix 1/72 prototype Mosquito. I bought the True Details aftermarket Mosquito tyres, and they are very nice detailed. But they were egg-shaped for some reason, and the bulges (which were in fashion at the time) were horrible. I decided to modify one tyre to get rid of the egg-shape and the bulges. I made a mould of this modified tyre to cast two copies in clear (but yellowed) epoxy. The modified wheels are seen at the front. Note the absent bulges. I drilled a hole in the bottom of each wheel, and glued a nut inside, so the model can be bolted down on a diorama.
| 
|
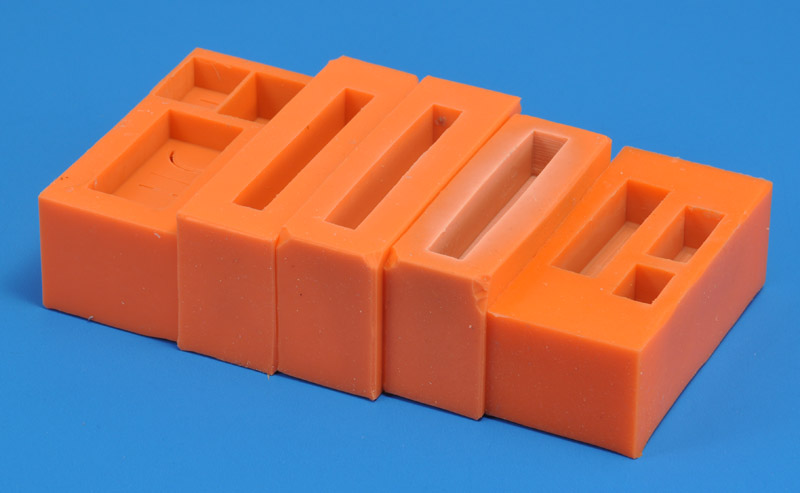
| Usually I place my filled molds in a row after filling with resin (absent here), to hold the rather floppy molds to their original shape, while the resin cures.
The mold second from the right shows clear signs of being at the end of its life. The silicone rubber slowly discolors to a whitish color. Another sign is that releasing the castings becomes more and more difficult; the release properties of the silicone rubber deteriorate.
|
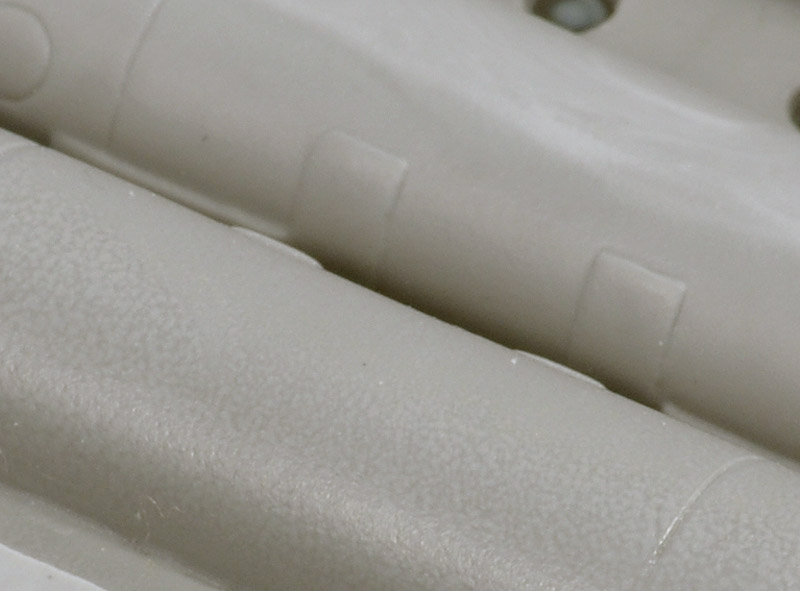
There's a third indicator of mold life. After twenty pours, my castings start showing a surface texture that the master definitely does not have. Here's an example, showing the 3rd casting (rear) and the 25th casting (front). The difference between the two castings can be seen clearly. The texture can be sanded off, but it's a lot of work and damages the details. I chose to use my moulds for a maximum of 20 castings.
Update: it seems that my current choice of silicone rubber, Smooth-On Mold Star 15 Slow, is only good for ~15 castings, before I see surface defects slowly developing on the castings.
I checked out Robert Tolone YouTube channel, and found one video discussing mould life: How Many Castings Can You Get From A Mold?. In the example that he discussed, he got 22 castings from the mould, stating "that is about as long as I would expect this mold to last". Therefore my 20 castings limit is not unusual. I've heard others report achieving 30 castings, but never 40-50 castings. But it does make me wonder how commercial casters deal with this problem. Replacing the moulds after just 20 castings is hardly economically viable I would think.
If I ever want to investigate further, this scientfic article could be a good start: The Deterioration Mechanism of Silicone Molds in Polyurethane Vacuum Casting. Possible this one too: Effect of Isocyanate Absorption on the Mechanical Properties of Silicone Elastomers in Polyurethane Vacuum Casting
| 
|
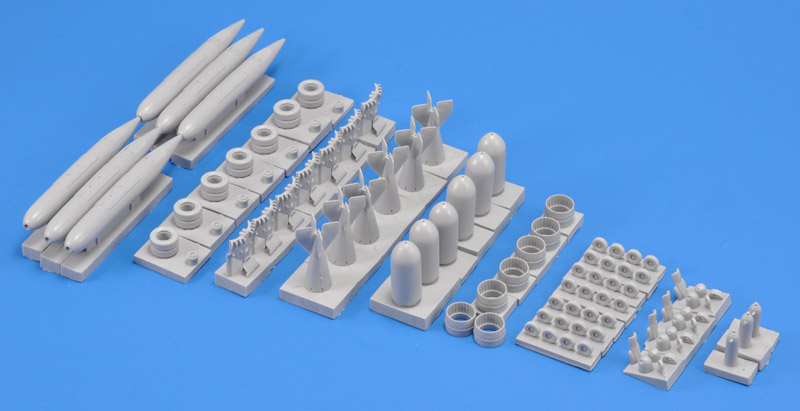
| Here's the result of a full day of casting - quite satisfying! My slow resin requires ~2 hours of curing, which determines the casting interval. But all castings were 100% perfect, not a single air bubble to be seen.
|
Shrinkage
A few words on the subject of shrinkage. Shrinkage can occur both in the mould and in the casting:
regarding the mould: one of the reasons for choosing addition cure (platinum catalyst) silicone rubber over condensation cure (tin salt catalyst) silicone rubber is that the former has close to zero shrinkage. The latter shrinks during cure, and (amazingly) continues to shrink during its life. Therefore my choice is simple: I use addition cure silicone rubber, and the mould will not show shrinkage.
regarding the castings: polyurethane resin itself shrinks very little during the curing reaction. However, there's a big 'but': when the resin heats up during the cure, because the cure is exothermic, it expands, pushing out some resin from the mould cavity. When it cools down after the cure reaction, the natural thermal shrinkage occurs, making the part smaller than the mould. The resin's potlife mostly determines the shrinkage: a fast cure means it gets hot, and a slow cure means it will hardly heat up. Fast curing resins can get so hot that they form steam bubbles in the centers of the castings! I use a 7 minute potlife resin (SmoothCast 305), and I never felt a temperature increase in the small parts that I produce. Therefore the resin hardly shrinks. SmoothOn lists less than 0.1%.
I tested the above theory by measuring my largest casting, the ALE-2 chaff pod. The master is 87.5 mm long, and of the five castings that I measured, four were 87.7 mm, and one 87.9 mm. I blame the length increase on temperature differences of the days I cast the mould, and the days I made the castings. Silicone rubber has a large coefficient of thermal expansion: I found values ranging from 200 to 300E-6/°C. Compare that to polystyrene 70E-6/°C and aluminum 21-23E-6/°C. That means a 10 °C difference makes a 0.25% larger silicone rubber mould, and that equals the size increase from 87.5 to 87.7 mm of my ALE-2 pod.
Epoxy resin vacuum casting
In rare cases, a stronger and/or stiffer part is required than can be achieved with polyurethane resin. In that case I switch to epoxy resin, usually a laminating resin that I have for small composites jobs. Epoxy behaves rather different though.
First of all, foaming is a major problem. With the R&G Epoxy L with Hardener L that I currently use, I once measured that it foamed to 15 times the liquid volume in the vacuum chamber; 35 grams turned into half a liter of foam. Also, the foam would break only very slowly. In other words, you need a very large container to de-foam the resin, and it takes a long time. You need to do a de-airing step before the actual casting. I'm experimenting with a defoaming agent, since the foaming is such a nuissance. Once poured in the mould and set in the vacuum chamber, the foaming starts again, maybe because the silicone surface triggers more foaming. So you need a large 'resin chamber' in your mould, or you can build a taller temporary wall around your mould, for example with wide tape.
Secondly, epoxy resin is much more aggressive for silicone moulds. I count on just five castings before the mould is damaged too much for further castings. My understanding is that the slow cure of epoxy means that it has a long time to attack the silicone rubber.
On the positive side: every time I cast an epoxy part, I'm amazed by the part's strength and stiffness, it's really impressive.
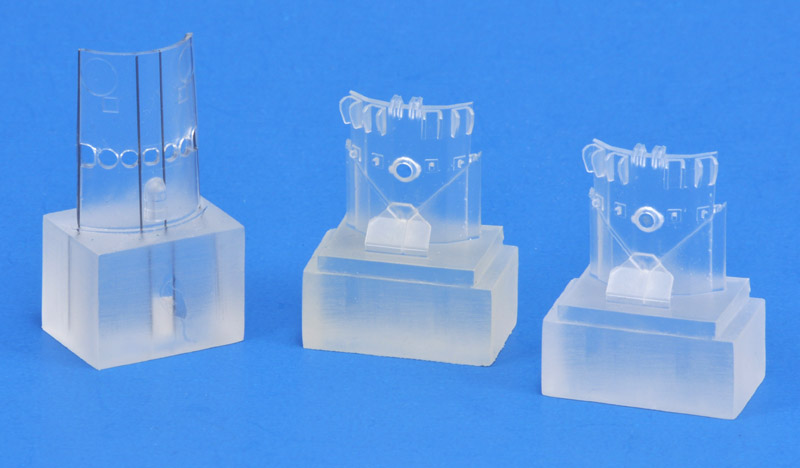
I had always planned to use fresh moulds to first cast parts in epoxy, to be saved as 'intermasters', back-ups for the real master parts. The latter sometimes get damaged when removing them from the mould. The U-2 Q-bay hatch on the left is a good example: the master part broke on the 'perforation' made by the seven camera windows. I used 0.3 mm spring steel wires to further reinforce the epoxy intermaster.
Having multiple 'intermasters' would also allow high-production moulds to be made, that contain multiple copies of the same part. But I'm not running large series of my parts, so that's theoretical.
| 
|
Literature
'Secrets of expert mold making & resin casting' by Karl Juelch, 1998, reissued in 2014. A fine manual, but does not cover vacuum casting. I found my own techniques, as described on this web page.
'The Prop Builders Molding and Casting Handbook' by Thurston James, 1989. Aimed at making props for theater plays, using a variety of techniques. Does not contain true scale model casting techniques. I sold my copy.
'A beginner's guide to mold making and resin casting for the hobbyist' by Mark Buchler, 2008, self published. I borrowed it from a friend years ago, and remember it shows a number of basic techniques.
'How to make room temperature vulcanizing silicone rubber molds for casting' by Arthur Green, 1990. Haven't seen it myself.
Fine Scale Modeler had articles about resin casting in the following issues: Fall 1983, November/December 1984, September/October 1985, August 1986, October 1987, September 1989, January 1993, May 1994, July 1994, March 1997, July 1998, July 2000, November 2002, March 2011. This list is not complete.
Safety
Here is some information on safety that I found. This discussion thread How toxic is resin? on Starship Modeler Discussion Forums was valuable. I condensed and reordered the information:
"The dangerous compound in polyurethane resin is called isocyanate. It is colorless, odorless and extremely hazardous. It can be absorbed by breathing it in and also through contact with the skin."
"The fact that polyurethane resin is mostly oderless makes it deceptive in regards to the fumes it gives off."
"Health effects of isocyanate exposure include irritation of skin and mucous membranes, chest tightness, and difficult breathing. Isocyanates include compounds classified as potential human carcinogens and known to cause cancer in animals. The main effects of hazardous exposures are occupational asthma and other lung problems, as well as irritation of the eyes, nose, throat, and skin."
"The 'deadly' effects are for breathing in the fumes. That really only happens when the isocyanate is in vapour form. If you look at the list of products, all of those need the isocyanate to be 'aerated', as in airborn mist [i.e. spraying polyurethane paint]. In the resins it is held in solution."
"The majority of the Smooth On and Alumilite products are very safe, because they are made with aromatic diisocyanates (MDI or TDI) that are already partly polymerized (called prepolymers) which means they are very large molecules with extremely low vapor pressures (i.e. do not evaporate much into the air around you). A lot of the warnings on industrial products pertain to these diisocyanates in their more volatile monomer forms (not at all polymerized)."
"Smooth-On and such is LOW in the toxicity area. They are designed to be used at home."
"While the part is curing the isocyanate is evaporating into the air, so it should be vented out of your living space. When the polyurethane has cured the isocyanate has evaporated and the parts no longer pose a threat." Note: I'm not sure it's correct that the the isocyanate is evaporating into the air; I think the majority is involved in the chemical reaction.
"You should cure it in sealed area that is vented outside until it has fully cured."
"The potential asthma-related effects can be delayed in onset. You can feel fine just after using the product, and have potentially fatal respiratory distress several hours later unexpectedly. Like with allergies, there is no way of knowing ahead of time who is at risk of serious reactions, so this is why there are all those warnings on the products."
"Diisocyanate exposure [.....] is a sensitization issue, not accumulation, i.e. once you've had a bad reaction to isocyanates from exposure, you're likely to keep having that reaction with increasing severity and lower thresholds on subsequent exposures."
"If I did casting work in the garage and did not ventilate, I would get a huge headache at the base of my scull and back of the head."
The Technical Data Sheet of Smooth-Cast 305 that I use specifically lists: "Contains Methylene Diphenyl Isocyanate" or MDI. That means the isocyanates are part of large molecules, that shouldn't evaporate much. However, the thread does not discuss the effects of putting polyurethane resin in a vacuum. Plus it's bubbling, maybe a very mild form of aerating? I have doubled my efforts to take all air exiting from the vacuum pump to the ventilation system, that was measured to have a capacity of 60 m3 per hour, or 17 liters per second. Also, I will ensure that the ventilation system will take away any vapours (if any) coming off the moulds with curing parts. I think this solution is better than using a mask, since I've read that isocyanate passes through most mask cartridges.
It worth repeating that isocyanate also penetrates the skin, and even the eyes if you're doing (full size) car painting in a professional paint booth. In April 2025, John McIllmurray, owner of AIMS that produced 300+ resin, photo-etch and decals sets, reported about the health damage done by 25 years of resin casting. He wrote: "I was diagnosed with isocyanate asthma after years of being treated for pneumonia every month with no answer to what was causing it. For years it was assumed that my immune system was compromised but all along it turns out it has been the toxic buildup of polyurethane resin particles on my lungs and in my system. If you cast resin be aware that splashes onto your skin causes the toxin to be ingested. I did not know this. I have had splashes on my arms and legs and face for decades without thinking it was anything but annoying to peel off." (Facebook link). One comment: it could be that industrial PU resins present more dangers than hobby-type PU resins - see the comments above on pure isocyanate versus methylene diphenyl isocyanate.
A few links for further study:
Platinum silicone rubber cure inhibition
An important drawback of platinum (addition type) silicone rubber is that the curing reaction can be inhibited by a number of materials. Note the word 'can', very different from 'will'. This is called inhibition or poisoning. I compiled a list of inhibiting materials, taken from brochures of all major manufacturers of of platinum silicone rubber. On the other hand, I use platinum silicone rubber exclusively, and it's maybe 25-30 years ago that I had cure inhibition. So it's definitely not an everyday problem with common modeling materials.
Condensation type silicone rubber (especially its tin-soap catalyst)
Unsaturated hydrocarbon solvents
Sulphur (in vulcanized natural and synthetic rubbers)
Phosphor
Epoxies containing strong amine catalysts
Isocyanates of urethane resins
Some polyester resins
Tape adhesives
Metallo-organic salt-containing compounds (especially tin salts and heavy metals)
Plasticizers in plastics (especially vinyl)
Materials containing nitrogen
Some modelling clays
Solder flux
Wood
Leather
Chlorinated products (such as neoprene rubber)
Vacuum pump oil replacement
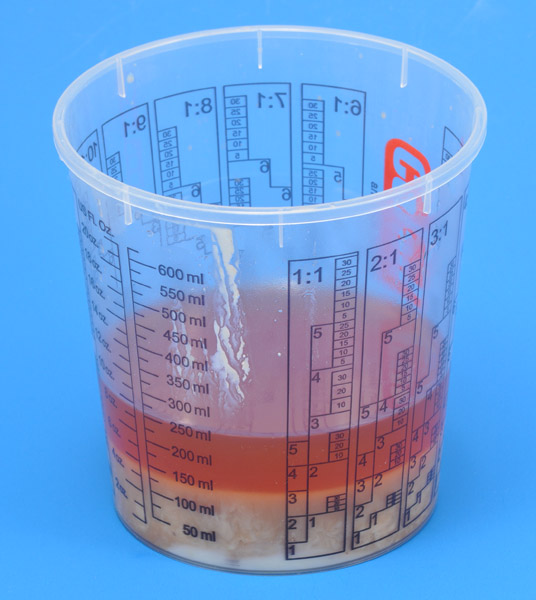
After sixteen years of on and off use, I replaced the vacuum pump oil. It looked quite horrible, with more than half the oil looking like the 'mayonnaise' you get when a car engine has a blown head gasket, and the engine oil and engine coolant mix.
I can't say exactly how much time the pump ran, but 5 hours total is my first estimate, 100 runs of 3 minutes each. That is less than a single overnight vacuum cure of a composite part - another typical use of a vacuum pump. But with such an application, with just a few liters of air pumped out, whereas mine did 100 x 9 liters = 900 liters, let's round it off to one cubic meter of air. That volume contains approximately 15 grams of water at 23°C and 70% humidity. Less than 10% of a glass of water, that doesn't sound like it's the problem to me.
I also read a warning that polyurethane resin vapors will contaminate vacuum pump oil, but I don't have a way of checking that. Maybe it helps to limit the vacuum level to (say) 5 mbar (abs) instead of going down to (say) 0.1 mbar abs, so that fewer chemical components will boil off. I tried that, by switching off the vacuum pump after 1 minute, but that resulted in castings with a lot of tiny bubbles.
It leaves the problem unresolved. One more thing I could try is putting the discarded oil in the vacuum chamber, to boil off all water contamination. But that could transfer the problem to the fresh oil..
| 
|
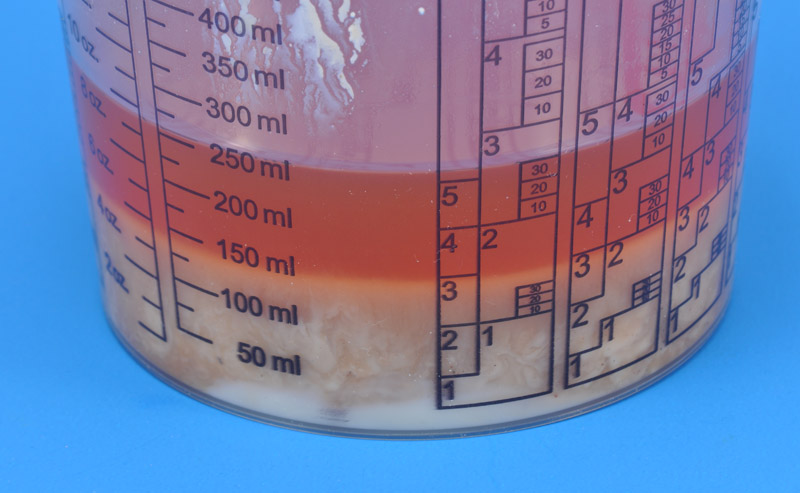
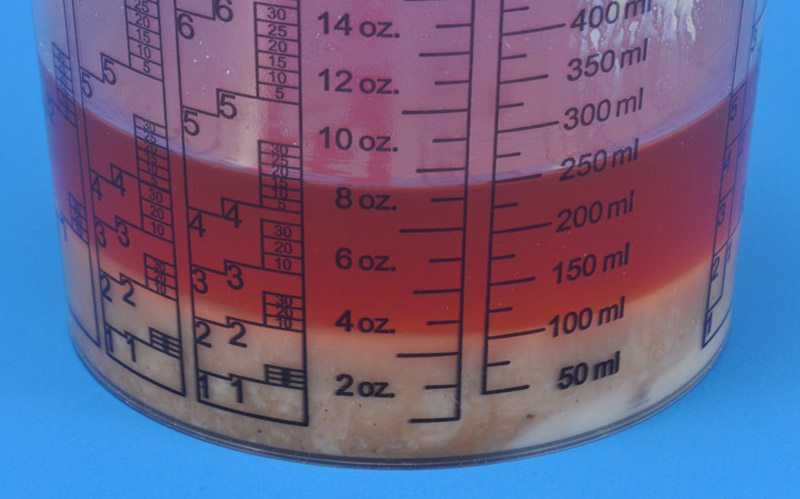
| This close-up shows how the oil separated after 20 hours. The top part looked like regular oil to me, then a layer that looked like 'mayonaise'. At the bottom I see some white parts. Weird!
|
| Interestingly, four days later the division line had moved down, from 140 to 105 ml, suggesting that the oil-water mix was slowly separating. However the separation stopped roughly at this point.
| 
|
Return to models page


