Academy 1/72 Me 163B Komet
| Within days the kit came out in the Netherlands in 2000, my modeling friend Eric Verschuur found one for me, and even donated it as a gift. Thanks again Eric! I decided to build my example straight from the box, to get to know the kit - I'm planning to do a few more. This report is also shown on my Komet web site.
|
'Straight from the box' build report
I assembled the whole model in one evening, using CA glue and Milliput. One difficult aspect is the lining up of the wings. Since they have a strong twist, just like the real thing. That makes it difficult to decide what to use as a reference. I decided to use the leading edge as reference, and give that zero degrees dihedral. About the only way to achieve this is to deviate from the instructions, and attach the upper wings halves to the upper fuselage, the three parts resting on a flat surface. I then added the lower fuselage, and finished with the lower wings halves.
The kit fits very well. An exception is the clear fuselage part (D4) which is too high and wide. I sanded the part and attached it under stress to the upper fuselage. This required super glue, and to prevent fogging of the clear plastic I had to cover both inside and outside with tape during this operation. Next time I will sand the part exactly to size before gluing it to the model. The four part fuselage has a complex division line and this also required some extra attention. Unfortunately the panel lines don't line up exactly at the rear fuselage break. Although I built my model straight from the box, I had to add one panel line on each side. It's one just above the rudder actuator. With this extra panel line, the rear fuselage break becomes much more natural.
The whole interior was painted RLM66 with suitable variations and some dry brushing. The cockpit tub is quite nice, with nice detail for a 1/72 model. But I think the tub sits a little too deep in the fuselage; the tanks should be closer to the canopy sill, and the rear bulkhead should connect with the upper fuselage. The headrest cushion does not have a completely accurate shape. There's another small problem: you can see from one rear window to the other. There should be some sheet metal blocking the view. I did not add these this time, but I definitely would do it next time.
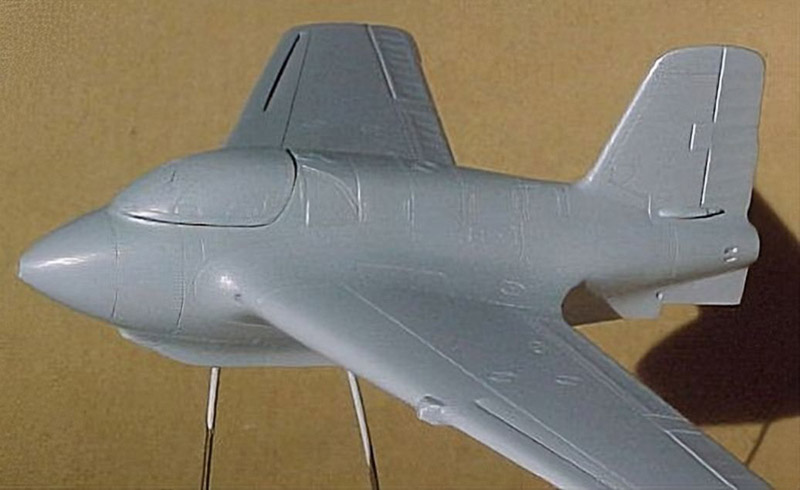
| The two pictures below show the model after a base coat of Model Master II enamel RLM 76. I think the excellent quality of the model shows. The transparent parts are covered with Cheap Chocolate Foil. Don't forget to mask the small circle where the radio antenna attaches! On the real aircraft the antenna mast passes through a piece of Perspex, attaching to equipment inside the fuselage. After this base coat, I found a number of areas that needed some reworking.
| 
|
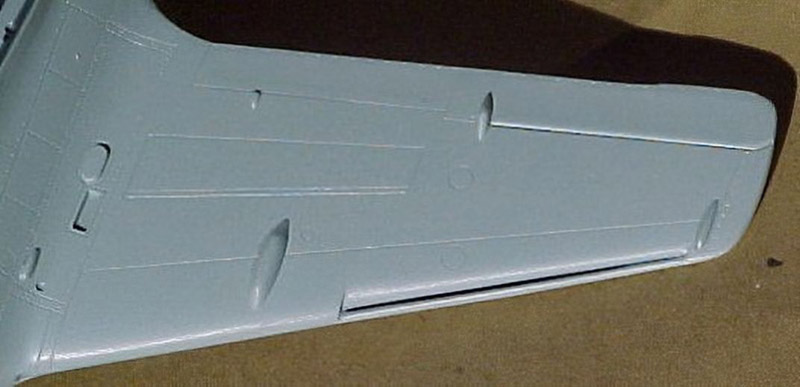
| This lower wing shows the nice detail and good fit of the model. Also apparent is the smooth finish of the Model Master II paint.
|
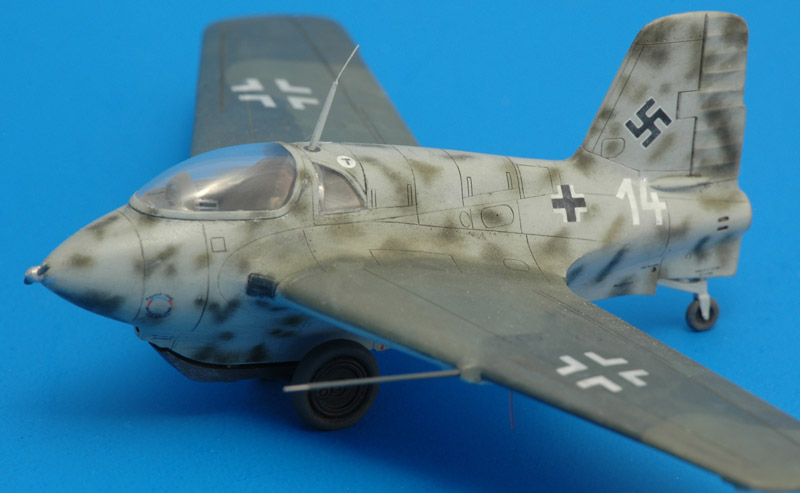
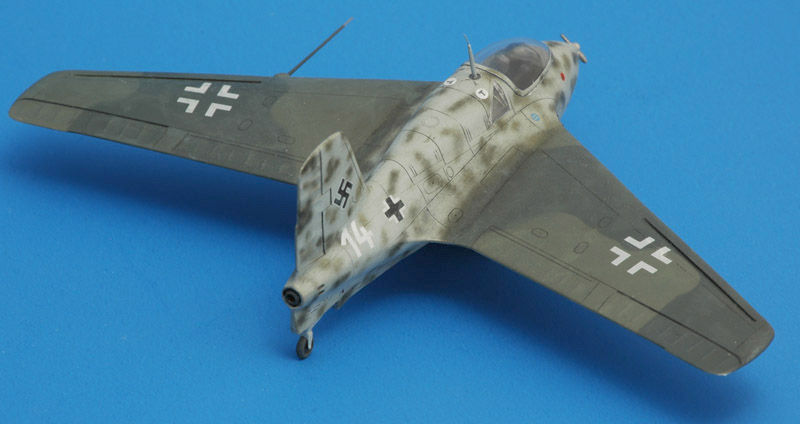
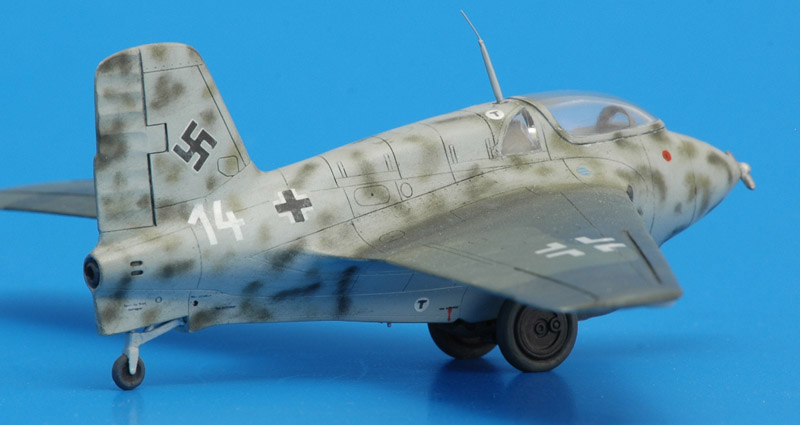
I had decided to build 'White 14', because it is quite well documented, and I find mottled Komets by far the coolest looking ones! Also, the other option, 'Yellow 26', doesn't have an original wartime scheme. I carefully studied all known pictures and sketched the mottle pattern on a large scale side view drawing. Unfortunately all pictures show the left side only. I tried a new technique to create the dozens of tiny mottles on the model. I can airbrush mottles in 1/48, but 1/72 is too small for me. Also I don't like the stress from the danger of doing one mottle wrong and messing up the whole model.
So I decided to try pastel powder. First problem was finding pastels in RLM 70 and 71. I painted pieces of plastic card in 70, 71 and 76, and went to an art shop. There I rubbed pastels on the RLM76 card, trying to match the 70 and 71 chips. I soon found two that looked suitable. In the mean time I had painted the whole model with Humbrol Satin Cote (thinned with lacquer thinner) in order create a slight rough paint layer, so the pastel powder had something to grab to. I sanded the pastel sticks until I had small heaps of powder, and went to work. I was a bit disappointed when I found out that only a little of the pastel powder wanted to stick to the model. I could not get an opaque mottle. The only solution was to spray another layer of Satin Cote over the model, and put new powder on that, most of it in the center of the previously applied powder. This worked much better than expected: it created a completely opaque center of each mottle (like in 1:1 scale), with a very nice soft edge, and I could even make half-transparent mottles. After that I added yet another layer of Satin Cote to seal it all.
| 
|
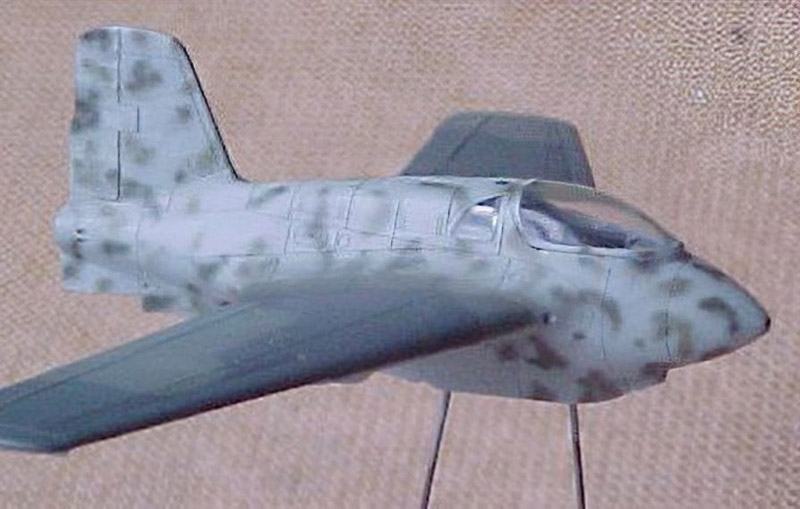
| Note that the mottling on the right side is completely fictitious. I tried to copy the style of the mottles on the left side, without making it a mirror copy. Actually I like the right side better than the left side, but that could be the result of the two different mottle colors showing a little clearer on the right side.
|
I did not shoot photos during this phase, that's why this and the next photos show the finished model.
That only left painting the wings. Again I used RLM 70/71 (Model Master II enamels), because I think that 'White 14' is an early Komet, that was painted before the late-war colors RLM 81 and 83 became available. Because I found the contrast between Model Master's 70 and 71 too big, I mixed my own version of RLM 71 from 71 and 70 in a ratio of 2:1. I followed Academy's wing camo pattern, because of a complete lack of better information. Komet wing patterns are a big mystery to me! The transition between the painted wings and mottled fuselage did not look right at this point, so for the third time I used pastels to create a nicer transition.
| 
|

| Next were the decals. Here I ran into troubles. My decal sheet was misregistered, and most decals having two or more colors were unusable. I replaced the fuselage Iron Crosses with those from a Techmod Komet sheet, and the T-Stoff markings from old Heller Komet sheets. Swastikas are not included on the Academy sheet and were taken from the Techmod sheet. Despite using three different decal brands, I suffered only some silvering on the wing Balkenkreuze, most likely caused by the panel line running underneath the decal. The Techmod decals resisted Micro Sol completely, and refused to conform to the panel lines. I left off the C-Stoff markings because I don't see them in the photographs of the real thing. I also cut away most of the red arrows near the stencilling. This style is only seen on some museum aircraft, and 'White 14' did not have them. I skipped the stencils on the lower side of the wing root (I have never seen any there), the dashed line around the trim tabs and the rudder lock stencil (seen on other Komets though).
Another detail I added was gun muzzle tape. Most Komets show this, and I tried to make it from thick aluminum foil. This proved to be rather difficult, since you have to force it into a double curved shape. They are also slightly too large. Next was a dark grey wash with water colors, and some 'anti-monochromatic' drybrushing of the wings.
|
| After that, I only had to add the smaller parts. I painted the skid RLM66 (many colors are visible on wartime Komets), the tires a very dark grey, the wheels and dolly axle a mix between black and dark grey, rocket nozzle dark grey, tail wheel similar to the main wheels with an RLM 76 arm, Morane radio antenna RLM 76, and the generator propeller silver. I attached these small parts with super glue and epoxy. The Morane antenna was very difficult to attach, since its base is tiny, and it is easily broken off. I did add a small piece of stretched sprue to the top of the antenna; Academy couldn't possibly have molded this. Lastly I added a new pitot tube made from steel wire and stretched tubing. Finished!
| 
|
Conclusion
Looking back at this project, I must say it was a lot of fun. The Model Master II enamels airbrushed surprisingly nice, but I don't think the colors are very accurate. I think I would use another pattern for the wing camo, a splinter pattern with soft edges probably.
Possible improvements
I quickly built this model straight from the box to get to know the kit. While building it I noted down the following points for possible improvement.
Cockpit
the tub sits a little to deep in the cockpit. Reduce the height of the sides of the instrument panel a little. The will probably also eliminate the gap between the top of the rear bulkhead and the fuselage. The headrest cushion is too small
replace the 'second stick'; it is a hydraulic pump handle set close to the left tank, and it is less prominent than molded by Academy
some 'sheet metal' is missing between the rear-view windows. Also, the internal windows are molded integral with the rear view windows, and this shows clearly on the outside. Not a perfect solution
the cockpit detailing is nice for an injection molded kit, but I would prefer to install a highly detailed resin tub
the canopy is very good, but a thinner vacuum formed replacement would be nicer. The Squadron replacement canopy does not fit since it was made to fit the Heller kit which has a narrow spine. The small fresh air window on the left side of the canopy should be positioned a little more aft
the glass armour plate is molded too thin (it should be as thick as the frame), and likely a little too small, in order to make it fit under the canopy. A vacuum formed replacement canopy would allow a true size armour plate. The bracing tubes on the front side should be added
Wing
all panel lines (excluding hatches and control surface lines) should be filled. The wings are wooden structures, and they don't show panel lines
the alignment tab of the left wing should be sanded a little at the front side to make the wing line up better with the fuselage
the pitot tube mounting is too large (see this photo), and possibly not all aircraft had it. Also, the position of the pitot tube mast is a little different to that of other kits. I don't know yet who modeled it correctly
fabric effect of the control surfaces should be reduced
add an IFF whip antenna under the left wing
the appearance of the slots can be improved by adding tiny ribs (stretched sprue). Note that the slot is fixed (it is not a movable slat), and no panel lines are present at the inboard and outboard connections with the wing
there should be a slot between the wing and the elevons (aileron). This requires cutting out the elevons. Also, the outboard hinge is missing
dropping the flaps should look cool
for early aircraft, the span of the trim surfaces (inboard) should be reduced
Fuselage
biggest problem is transparent part D4. It is too high and too wide. Paint the edges dark grey before gluing to prevent unwanted reflections
the panel lines at the rear fuselage connection don't line up perfectly
add a small whip aerial to Morane radio antenna
add canopy hinges
add a small air intake under the nose
add a small dent for jacking under the nose
use a little filler to make the towing opening circular
it would be realistic to make the spine a little less flush: on the real thing, the hatches did not fit smoothly. This could be achieved by adding thick aluminum foil to the hatches
the rocket motor nozzle is too small. Check the photographs on the site
Tail
one panel line should be added to both sides the vertical tail, running horizontally just above the rudder actuator fairing
the hatch on the right side of the vertical tail should be filled
Landing gear
the wheels don't look like the real ones at all. They should be slightly dished, without prominent rims. The replacements wheels in CMK set 7041 are slightly better, but still far from the mark (and the bulging of the tires is highly unrealistic). The wheels of Academy's FW 190D-9 are a much closer match, although they show 10 instead of 8 bolts. Also, the wheels should be 'hollow' on the inside
if you want tires with profile, as seen on a few museum Komets, the tires of Academy's FW 190D-9 appear to be very close. Diameter and width is completely identical to those of the Academy Komet
the skid hinges are very simple and unrealistic. If you display the skid extended, you will have to scratch build these. I tried it while building my Heller Komet, and extremely nice results can be achieved with stretched sprue. But you need a steady hand, good eyes and lots of patience. Also, the skid could use some detailing on the upper side (use PART part 35 here)
the V-ribbing under the skid is a little too prominent; a light sanding will improve it
the dolly axle can be improved: both front and rear ends look slightly different than the one modelled by Academy
Decals
almost all stencils have large red arrows. These are not seen on all Komets. The rudder lock stencil can be seen on some wartime aircraft (mottled 'White 7' in Späte's book). The stencil that I left off the lower side of the wing root does exist after all; it is present on the Berlin Komet; see this photo
I'm a bit confused now about the correct location of the blue oxygen filler decal, to be placed somewhere on the right front fuselage. On Me 163B's of the first (Messerschmitt-built) batch, the oxygen filler point is approximately at the rudder pedal position. On later Komets, the oxygen filler point moved, possibly to two positions. Some wartime and many museum Komets have the oxygen stencil painted on the right front fuselage. Examples are the St Athan, Duxford, US Air Force Museum and Canadian Komets. This stencil does not cover the actual oxygen hatch. Rather it indicates the refill point inside the cockpit. On some other Komets, such as the Deutsches Museum example, has the stencil painted on a hatch just above the right rear window. Just below this hatch a blue oxygen tank can be seen, so it could be the actual oxygen filling point. Since photos of the right side of 'White 14' do not exist (it seems), I have no way of checking whether I placed it correctly
Alternative markings
Available detail sets
photo-etched detail sets are currently offered by Airwaves (72059, for the Heller kit), Eduard (72099, also for the Heller kit), Eduard Zoom (SS136, for the Academy kit) and PART (72-121, for the Academy kit). The Eduard Zoom and PART sheets are the best by far. But they are also rather different, and therefore my recommendation is to use the best of both
The CMK resin detailing sets are quite good, and contain very useful detailing parts. Recommended
Squadron's replacement vac canopy is of excellent quality, but since it was designed for the Heller kit which has a narrow spine, it won't fit the Academy kit. But when the canopy is posed in the open position, it will do fine. The vac canopy of CMK set 7039 is nice, but not as clear as the Squadron canopy. It will most likely fit the Academy kit well
the resin Walter engine by S8M (later issued by Extratech) is rather basic, but a good basis for a highly detailed engine. You will have to cut open the fuselage though, since Academy's fuselage break does not coincide with the fuselage break of the real aircraft
2023 conversion
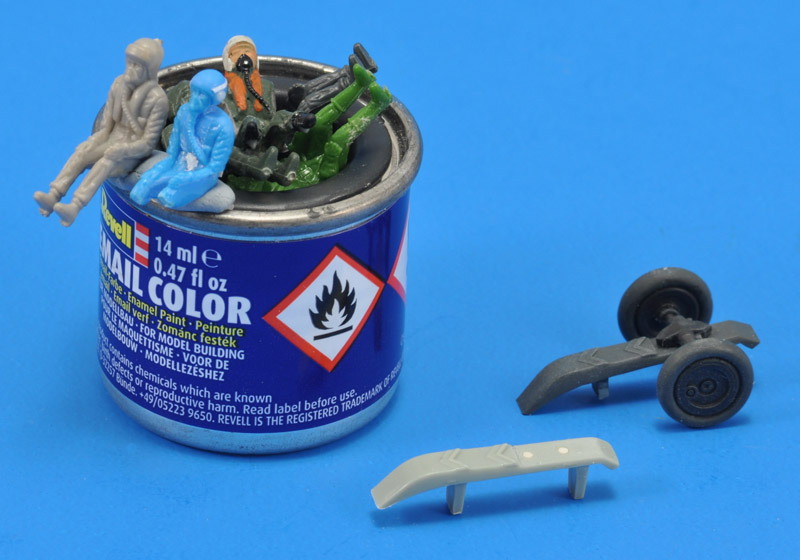
I finished this model originally in 2000. In 2023, a club project revolving around fictitious shop displays required a few modifications to the model: a pilot in the cockpit and a retracted skid.
I found a bunch of 1/72 pilots in my spares box, and selected the blue one as the best suitable for conversion. The light tan pilot is identical, and I do not know the origin of these pilots, but the colors strongly suggest Matchbox. The helmet of the blue pilot was sanded down to leather cap dimensions, and two ear bulges were added. There's a strap for goggles, but I didn't manage to build realistic goggles, so I skipped that. I also gave him a bit more of a neck by scraping down the shoulders, and removed the life jacket.
Luckily I hadn't glued the skid with landing gear dolly, so I could slide it out. The replacement stil has to be painted.
| 
|
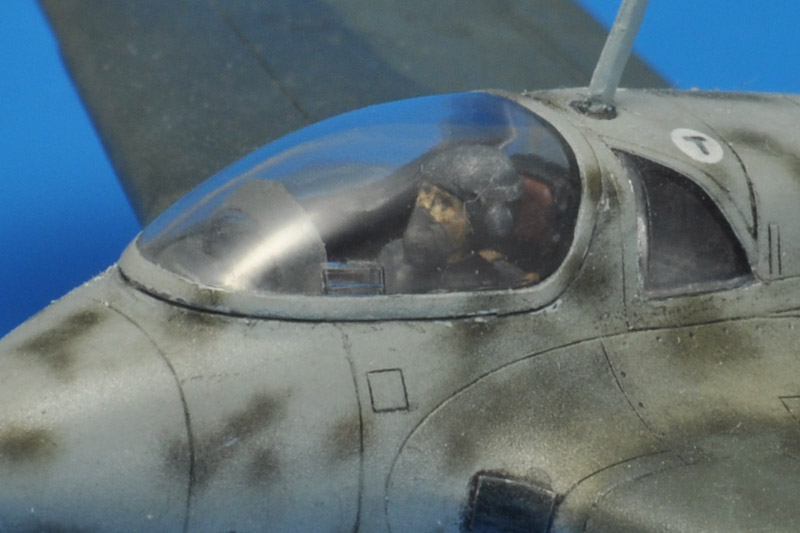
| The goggles I planned to add were so small that I gave up - the club project did not require this level of detail anyway. I used Humbrol HU3 'Neutral Grey 43' for the suit and cap, a wild guess at color of the special chemical suit.
I painted the skid Revell 9 coal black, and drybrushed it. Done!
|
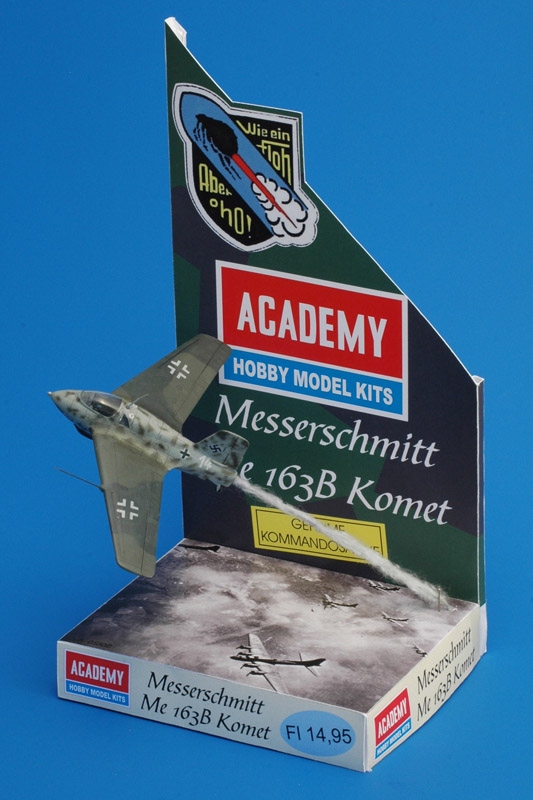
| And here's the model on its shop display. This was the first shop display I came up with, way back in 2016. I wanted the Komet to fly right through a formation of US bombers, with a rocket engine smoke trail. That was easy, some cotton wool glued to a spring steel rod. For the background I selected the great 'Wie ein Floh - aber oho!' emblem, a large Academy logo, and 'Geheime Kommandosache', all placed on a camouflage pattern. Maybe to visually support the climb angle of the Komet, I cut off the card at an angle. I had it printed at a copy shop, that gave me a quality I could not achieve at home. In 2023, we finally unveiled it to the public on our IPMS Regio Zuid-Holland club table at Euro Scale Modeling.
| 
|
Return to models page