MPC 1/25 'Blues Brothers' Ford Pinto Wagon


For our club's fictitious shop displays project for the 2023 Euro Scale Modeling, I wanted to build the Pinto Wagon from the 1980 movie 'Blues Brothers'. Car modelers have been begging for a 1974 Dodge Monaco sedan to build the 'Bluesmobile'. But the same modelers are apparently not interested in the antagonists' car: the 1977 or 1978 Pinto Wagon of the 'American Socialist White People's Party'. And that car is available from AMT, although long out of production. Luckily I found a built model, but it was a true 'glue bomb'.


Pinto Wagon kits

Shown below are all boxings of the MPC Pinto Wagon:

               
1-7728
1977 version
Old Model Kits
1-7828
1978 version
Scalemates
1-0780
Scalemates
1-0738
1979 version
Scalemates
MPC845
2016 reissue
Scalemates

I bought 1-0780 as a glue bomb on the Dutch auction site Marktplaats. It had the instruction sheet of 1-7728.

Some comments on the model:


Glue bomb

Here's the model that I found on the Dutch auction site Marktplaats. The model has clearly been assembled with a lot of tube glue. The rear panel of the rear seats has been installed as a spoiler on the rear of the roof. The inserts for the rear side windows had been installed with a lot of glue, so I expected clear parts that would be unusable. It had the optional V-8 engine installed.
I was lucky with the clear parts: they were mostly undamaged. I cut out the interior tub; the detailing is quite nice. Because it has separate side panels, the detailing is full height instead of vague relief with a one-piece interior tub.
An overview of the remaining parts, including the low-end four-cilinder engine. Later I noted some missing parts, but that comes with a glue bomb I guess.


Body repairs and construction

I started work on the sides of the car. The glue spots were easier to repair than I expected. For example the dot on the top of the B-pillar was restored mostly using a JLC razor saw. You can also vaguely see that the excessive glue left 'gas bubbles' in the B-pillar. I filled those with plastic dust and CA glue. I had to do similar repairs in several places.
The rear door had a lot of glue on it. I drilled out the rear hatch opening button to have more room for restoration work. There were again gas bubbles in the glue joint that had to be filled.

Later I moved the door's lower panel line to the 'corner' instead of slightly above it, since that's what I saw in photos.
I bought an extra AMT 1977 Pinto (2019 reissue) as a parts donor. I expected the same model with a different body, but to my amazement the kits are completely different. Even the four-cilinder engine and the wheels are different.

Before the kit arrived, the plan was to replace the complete front end, from the windscreen wipers forward, to replace all the parts that were too damaged by excess glue. But the bodies differed considerably in width, so that plan was scrapped.

Instead, I planned to replace the paravane, hood and front facia. I cut out the paravane, and replaced it with the slightly longer paravane of the '77 kit. The glue-covered original part can be seen at the front.
Even more work to replace the front facia, that was impossible to repair due to the excessive glue. It's integral to the body on the Wagon kit, but a separate part on the '77 kit.

Using a JLC razor saw, I cut off the front section section (left), and sanded and scraped until the replacement part would fit (right).
The kits are different in about every aspect and detail, down to the length of the hood.
The 'new' front facia is now faired into the 'old' body using Apoxie Sculpt. More problems were found: the model shows a gap between the grille and hood, instead of a gap between the bumper and the grille. I started the modification by cutting off the grille from the front bumper. Later, the center part of the front fascia will have to move up by about 1 mm.
The hood from the new Pinto was installed, after adding plastic strips along the edges, to solve the fit problems. The glue joint was pretty weak, and I reinforced it with 0.30 mm plastic card strips on the inside.
The bumper was extend aft with 1 mm plastic card, since this area will be visible through the newly created slot between bumper and grille. The lower edges of the headlight buckets were extended with small sections of plastic rod, since AMT made them slightly recessed.
I scribed a line on the top of the bumper part, 2 mm behind the edge, like I saw in photos of the real car. It's vaguely visible in the photo. I also stripped the chrome, since it was damaged by the modifications, and had ugly molding lines anyway.

Next job was the find the correct position of the grille. It looks like it's slightly too small in height to fill the gap between bumper and hood.
I decided to split the modified bumper part, to simplify painting and chroming later. A combination of needle scribing and JLC razor sawing did the job.
Then I noted I used the wrong grille, the narrow one from the original kit, instead of the grille that I cut from the donor's kit bumper. That one gives the gap that I was looking for.

I tried to cover the bumper in Bare Metal Foil. The effect is not bad I think.
The missing marker light bodywork was built from 2x1 mm plastic strip, cut on a RP Toolz mitre cutter. Next, the edges were chamfered. I broke the grille part free to make body painting easier (with less masking).
One error of the model is the location of the filler cap. I cut out 6x6 mm squares with a JLC saw, and swapped them. The filler cap is now 17-18 mm more forward.

I repaired the C-pillars with two pieces of 0.75 mm spring steel wire each. I cut slots in the windows sill for them. I made them largely parallel with the B-pillars, maybe a tad more upright.
The one-piece transparacies would not fit properly inside the body, they were slightly too large. I decided to cut the windows apart. I added the separate front windows from the second kit. Note the ejector pins markings, I hope that they can be polished out.
The first layer of Tamiya Fine Surface Primer, and the first round of small repairs. I also filled the side marker lights with an oversize blob of Apoxie Sculpt.

I glued the piece with the four grille lights to the body, because in reality they were one molding with the headlight.

I repaired the windscreen wipers with a piece of 1.2 mm rod as the pivots, and a small piece of strip to restore the arms. Not perfect but good enough.


Body painting

I found the orange paint code here: Color Code Database: 1977 Ford Pinto Paint Codes, and it's '8G M5466 Orange FRD77:8G 165942'. Maybe I could have had it mixed by (for example) ZeroPaints, but I lacked the time to do that. Instead I opted for Model Master FS 12197 International Orange.

The model was painted using the Donn Yost method: 1:1 thinning with lacquer thinner, lay down a fairly dry color coat, followed immediately with a very wet coat. Unfortunately I used my Badger 150, I should have used my Paasche H for a wetter wet coat.

From experience, Model Master enamels take around 5 days to cure. I speeded it up by having it a full day in an improvised hot box at ~38°C. Using a rule of thumb, that should reduce cure time to 1/3rd.
Another look at the restored marking light moldings on each side of the radiator. It's only with paint on it, that you can see what you made.


Windows

I used dots of epoxy glue to attach the clear parts. It's a first for me, still learning! The side windows proved to be unusable after all, with small glue spots that I could not polish out. Instead I used 1.0 mm PETG, cut to shape. I included the front side windows, although typical US car kits don't have them.
PETG is really clear, and comes with protective foils on both sides. But when I buffed them with a tissue, I got scratches..


Chassis

Revell 9 coal black was used for the underside, after removing most of first builder's damage. I did not remove the ejector pin markings, since this was not meant as an all-out build.
I glued the inner halves of the wheels to the axle stubs, using steel blocks butted against the wheels to avoid camber and steering angle. I think that worked well.

To create a bit of color variation, I mixed some old Revell 87 brown paint in the Revell 9 coal black to paint the brake drums. But it's maybe too subtle to be noticed.

I lost the position of the chassis in the body at the rear, having cut another glue-soaked joint there. I decided to make a ledge inside the body, as stops for the chassis. By shimming it, the position could be fine-tuned. I used the edges of the interior as reference, making them flush with the window openings.


Interior

The movie shows a black or dark black-brown interior. I went for the latter, to avoid a coal-pit look, and because it would be a good interior color for an orange exterior.
One more view of the interior of the movie car, or one of the movie cars.
I found some pictures of the '1978 Ford Color and Trim Selections Book' on Ebay (officially called 'Color and Upholstery' books). Shown here is an out-of-focus photo of the Pinto page. The drawing shows the black or black-brown interior option, and the bottom page shows the corresponding fabric sample. I went for the fabric sample on the second row, second column: dark gray with a black stripe.
I designed decals for the fabric inserts of the seats: horizontal striping, black on dark gray, in seven rows. Most 1977/1978 cars shows that the fabric extends a bit on either side of the center panels of the seats. I copied that, but with some doubts. It's all a bit of a guess.. The front seat decals are on the left, rear seat decals on the right.
The original builder had attached the tub sides canted to the floor plate. I removed both sides are reglued them in the correct position.

Humbrol 85 'satin black', 10 'service brown' and 127 'satin ghost grey' were mixed in a 1:1:1 ratio, and everything was initially painted in this color. I also wanted to see what could be seen of the large glue stains after scraping most of it away.

I ran out of time, and couldn't use the seat decals. But maybe I'll apply them later.


Wheels

The movie car had slotted steel wheels, painted in body color and fitted with chrome hub caps.
I don't have many US car models to borrow parts from, but luckily my AMT 1949 Ford had suitable wheels and hubcaps, and they fitted on the tires from the Wagon kit. I made resin copies of the parts. The tires are very glossy with crude details, plus they are strangely tapered on the thread area - just looks at the camber angle of the two tires on the left! The hub caps (lower left) had 'Ford' lettering that the movie car did not have, so it was sanded off.
I wanted to tone down the glossy vinyl tires. Revell 9 coal black enamel was my first try, but the paint remained tacky. I stripped the paint with cleaning alcohol in an ultrasonic cleaner. Next try was Aeromaster acrylic paint in a 1:1 mix of RLM-22 Schwarz and RLM-66 Schwarzgrau. That give me a nice rubber color I think. Maybe it's strange to use WW2 Luftwaffe colors, but I don't have many acrylic paints.
Only afterwards I looked at the wheel sizes. The Wagon glue bomb had 17.0 mm wheels; multiplied by 25 and divided by 25.4 makes 16.7", minus 1.6" for the tire bead lip makes them 15" wheels. The replacement wheels from the 1949 Ford are 16.7 mm, so they are 15" wheels too. The wheels in the reissued 2019 kit are 14.4 mm; multiplied by 25 and divided by 25.4 makes 14.2", minus 1.6 makes them 13" wheels.

In the screenshot, I used the known wheelbase figure to scale circles representing 13" and 15" wheels (actually 14.6" and 16.6" because of the tire bead lip), and the former is clearly a much better fit. The 1977 and 1978 Ford Pinto brochures list 'Bias ply 13" BSW tires' as standard fit. Therefore, the wheels must have been 13" ones, and my model's wheels are too big.

I don't have nearly enough spare parts of American street cars to replace my oversized wheels, unfortunately.


Markings

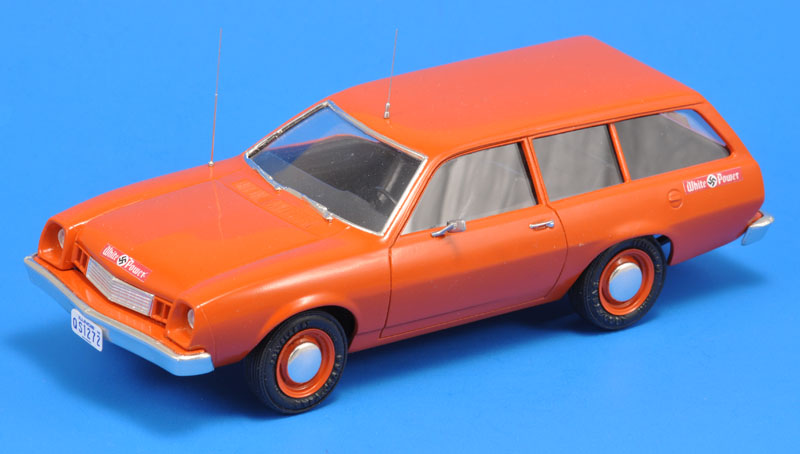
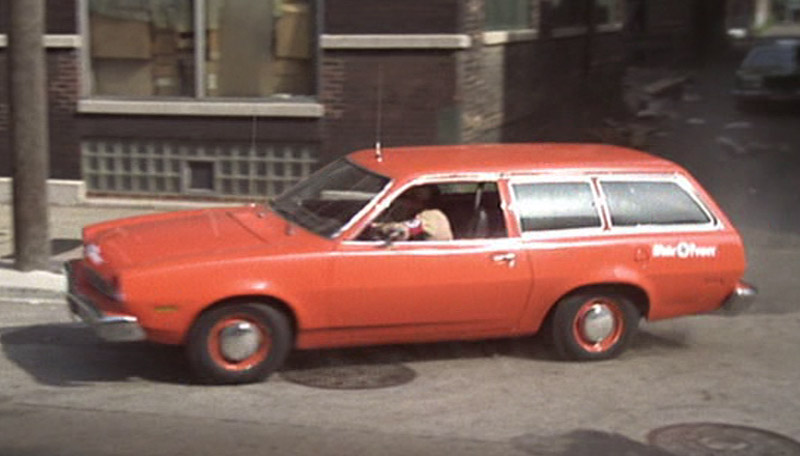
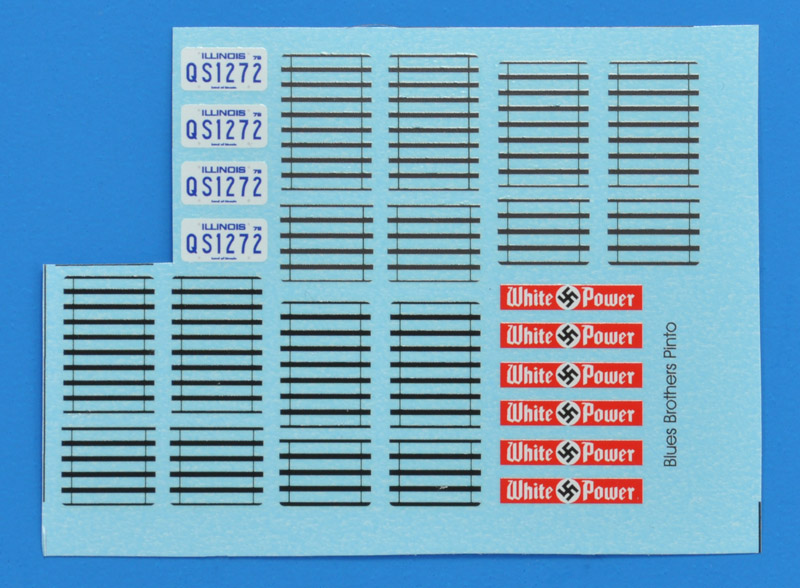
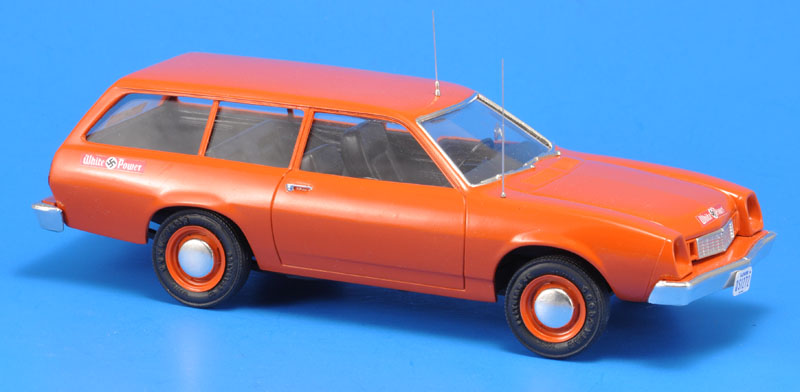
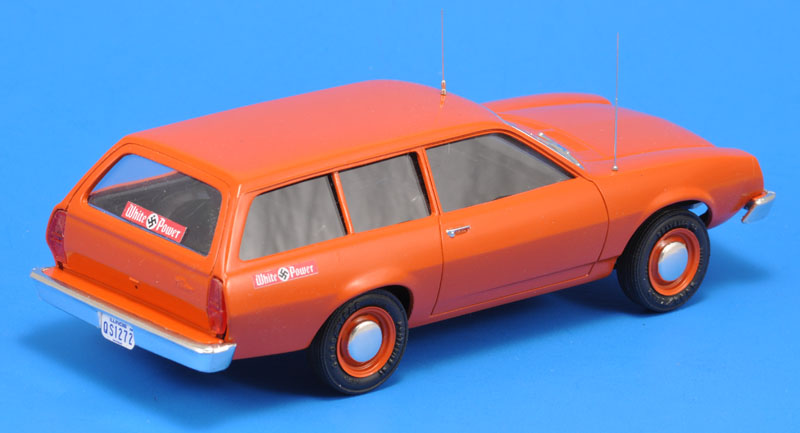
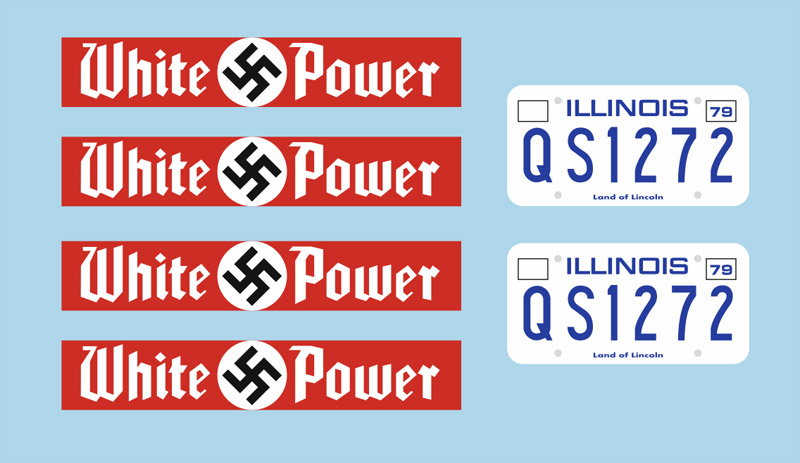
In movie screenshots, I read the license plate first as '051272'. But a production photo showed 'OS1272' or 'QS1272'. Both 'OS' and 'QS' ranges were not issued in 1979, according to Rick Kretschmer of the excellent Rick Kretschmer's License Plate Archives, and he commented: "It's very common in American movies to use replica plates on vehicles, often with plate numbers that had not been or would never be issued, rather than the actual license plates assigned to the vehicle by the state." I decided to go for 'QS1272' as a 1979 plate, and used the licenseplates.tv website to get an idea of the lettering type. I redrew all numbers and letters in CorelDraw. The real size of the plate is 12 x 6 inches, and I scaled that down to 1/25 scale.

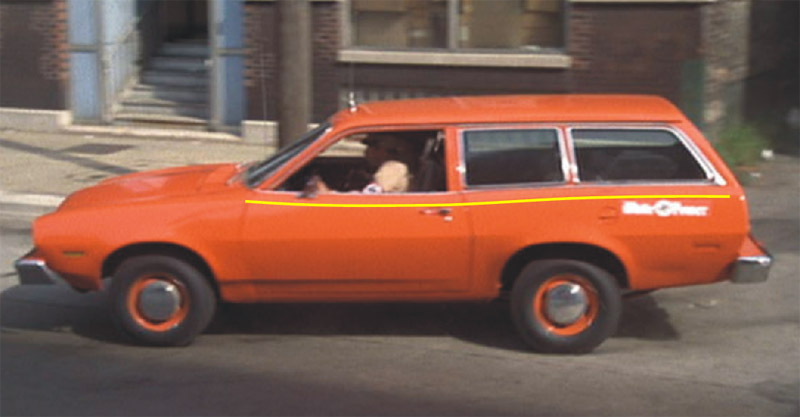
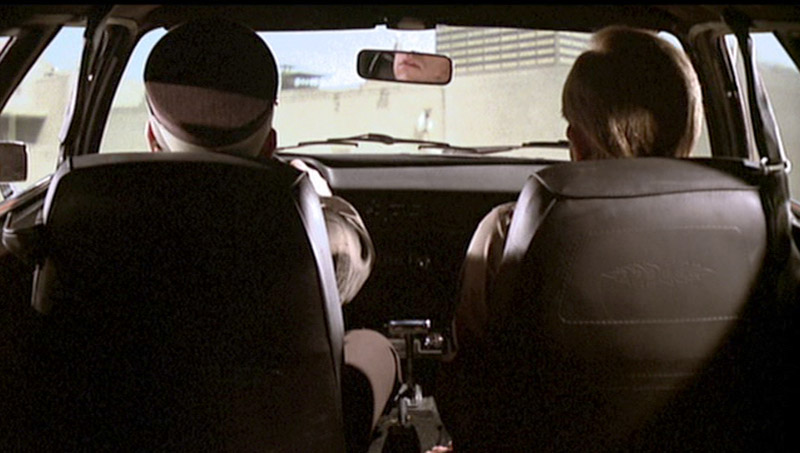
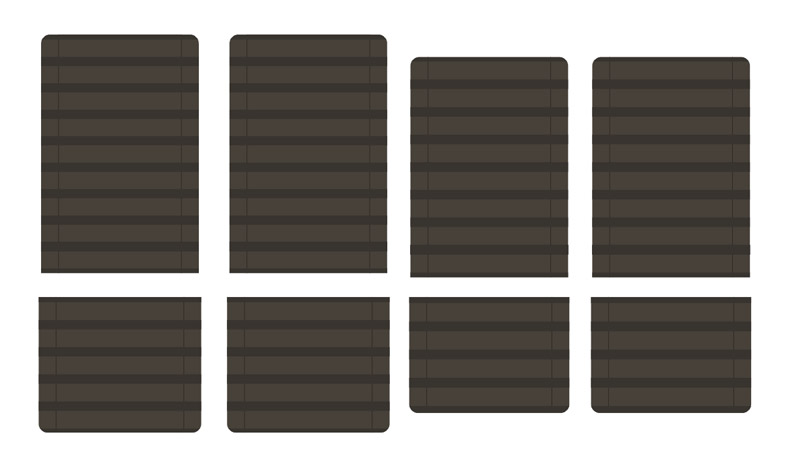
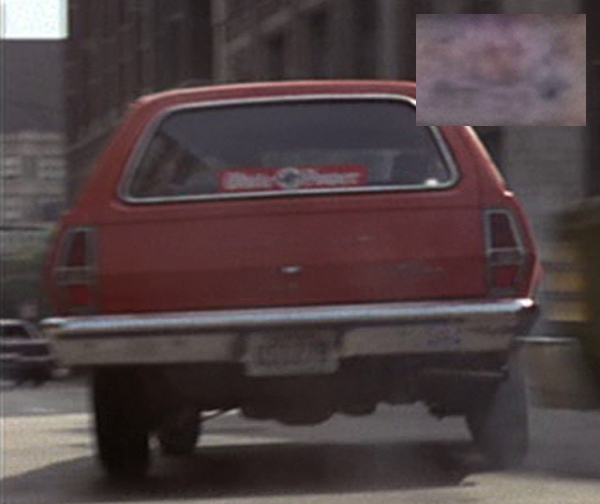
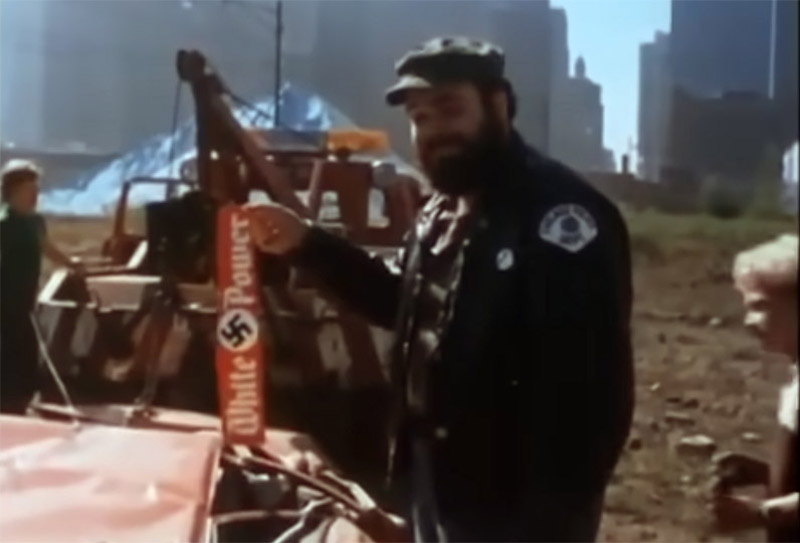
The 'White Power' stickers on the car were even more laborious. I found one in-car shot where the sticker on the rear window was visible. After reversing it, I enlarged it, and tried to replicate the lettering using numerous Gothic fonts. None of the many fonts would fit, and in the end I picked one, and modified it extensively to what I think I saw in the enlarged movie shot. It's a best effort. The size was 20 inches, and I scaled that down to 1/25 scale.
Here's the printed version, printed by SpotModel.
There's a mystery sticker on the rights side of the bumper. A blown-up close-up is shown top right. Despite best efforts I could not figure it out, so I skipped it in the end.
About a year later, I found a much better picture of the 'White Power' sticker, in the 'Making of The Blues Brothers' feature. I think it's producer Robert Weiss that picks a sticker from the flattened wreck of the Pinto, that was dropped from a helicopter.
Here's the sticker rotated, for the improbable chance I will redraw my decals. In that case, the 'P' and 'r' need redrawing.


Finished model

I'm not proud to admit that I slapped the model together in the last stage. The model had to be done that day, for our club's fictitious shop displays project for the 2023 Euro Scale Modeling event.

I added headlights from a Monogram 1971 Plymouth GTX, but skipped the four front marker lights on either side of the grille. The license plate decals were applied to plastic card, and glued on the bumpers. A fender antenna for the radio was made from 0.3 mm spring steel wire, slid into 0.5 mm Albion microtubing. The CB antenna on the roof was also made from 0.3 mm spring steel wire, with a turned foot to simulate its mount. Lastly I quickly scratch-built a side mirror.
In this view, you can see that the (lower) window line looks too straight on the model, compared to the real car. The model also rides a bit too high I think.
A rear view of the model. It was sufficiently ready for display, but I hope to do the missing details later.


Shop display

Here's the model on the fictitious shop display that I designed in CorelDraw. Of the 33 shop displays, this one was probably the least recognized one. I asked quite a few viewers whether they remembered the movie, and a small majority did. But only very few remembered the Illinois nazi's car - I counted two.


Update / Rebuild

One of the shortcuts I took to make the show was to skip the problem of the missing rubber & chrome strips surrounding the side and rear windows. This gives gives the model a 'airy' modern look. The solution presented itself in another project: my 'Duel' Peterbilt 281 that required heavy rubber windshield gaskets. I designed them in 3D CAD (see Peterbilt 281 windshield gaskets) and club member Wim printed them. Here's a test fit on the model.

Here's a list of things to do, apart from the side window strips:


Return to models page