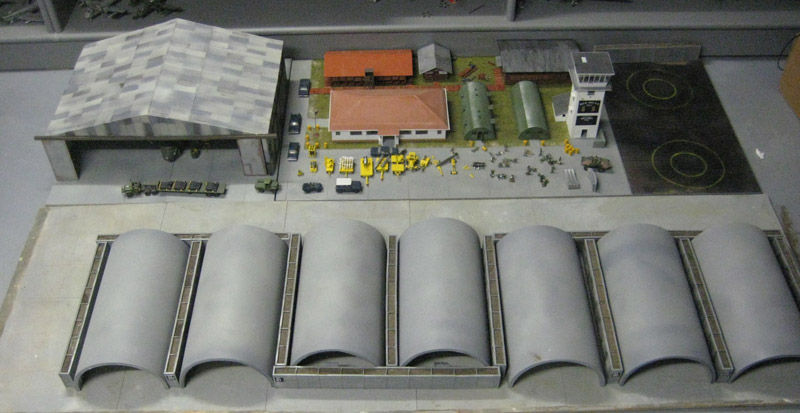
Shelter scale models

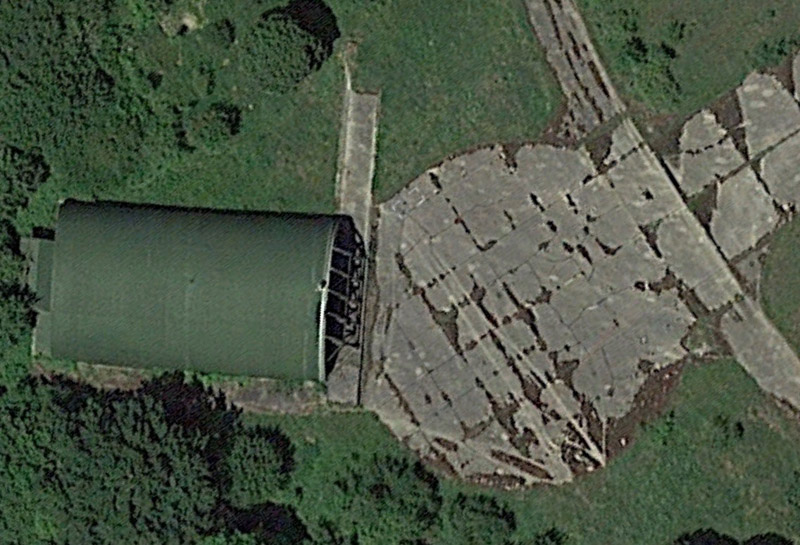
Hahn photo by Ron / Niederrhein Aviation Society (posted on Panoravia, via Wayback Machine)
Part 1: TAB-VEE shelters and their genesis
Part 2: Soesterberg TAB-VEEs walkaround
Part 3: shelter scale models
| After publishing Part 1 ('TAB-VEE shelters and their genesis'), I received several contributions about shelter models. Initially I added them to the main page, but later the scale models were split off to keep the page size manageble.
|
Modeling details
Various shelter models
Barrie Raterink shelter models
Alex Hunger French shelter model
Alex Hunger Bien Hoa 'arches' shelter models
Alex Hunger USAFE 2nd generation TAB-VEE shelter model
Alex Hunger USAFE 3rd generation TAB-VEE shelter model
Alex Hunger USAFE 2rd generation TAB-VEE shelter model
Alex Hunger Marineflieger shelter model
Alex Hunger Luftwaffe shelter model
Modeling details
Some remarks to help construction of a scale TAB-VEE:
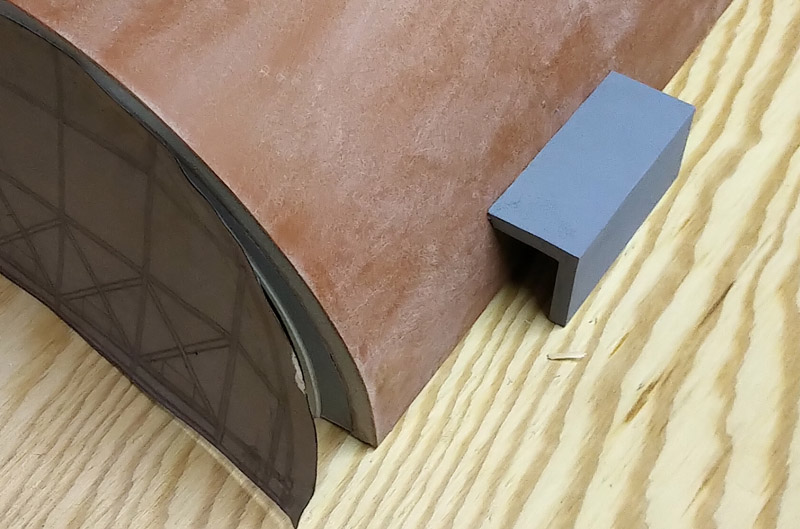
The upper edge of the concrete pouring casings can be seen easily on the finished shelter, even many years later. On some shelters, the side edges of the casings can be seen too. It probably depends on the lighting conditions.
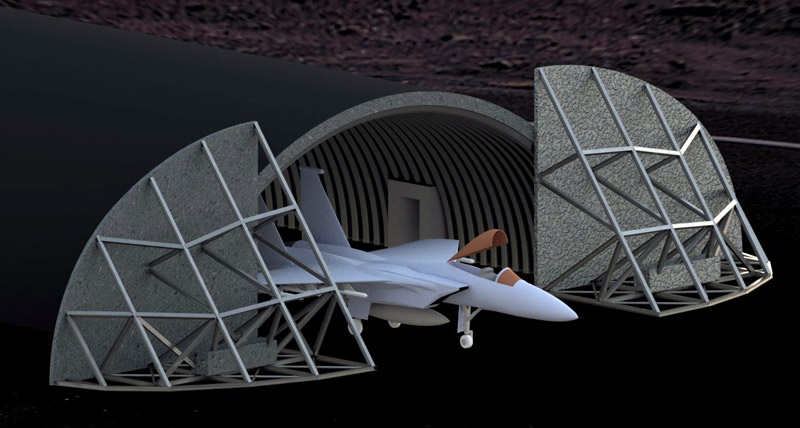
An area roughly 1x1 meters of the inner arch structure is cut out, to make room for the upper hinge of the clamshell doors. Just maybe this is the result of a design change to enlarge the door opening from 42' to 43', in an attempt to make the unmodified 1st generation suitable for the F-15. To compensate, a concrete patch of roughly 2x2 meters is added to the exterior.
My impression is that TAB-VEE exteriors were left in their natural color until roughly 2000, as witnessed by bases closed after the end of the Cold War (Bitburg, Hahn, Soestberg). You can now see painted shelters on Google Earth. On some bases they are all in the same color (for example: Ramstein dark gray, Aviano light gray), on other bases different colors are used (Incirlik: sand, mint green, brownish, beige-green). At Lakenheath the shelters still are in bare concrete.
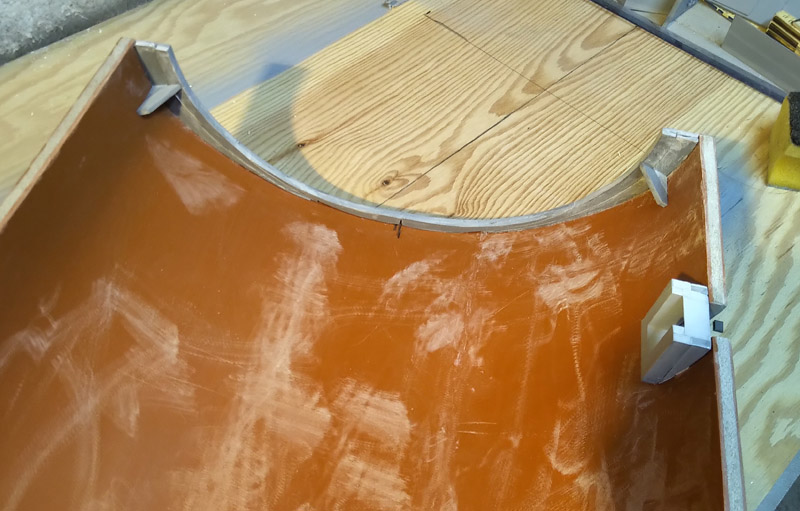
A count on a Soesterberg construction photo shows exactly 50 arch rings. That makes a shelter length of 50 x 2' = 100' plus ~3".
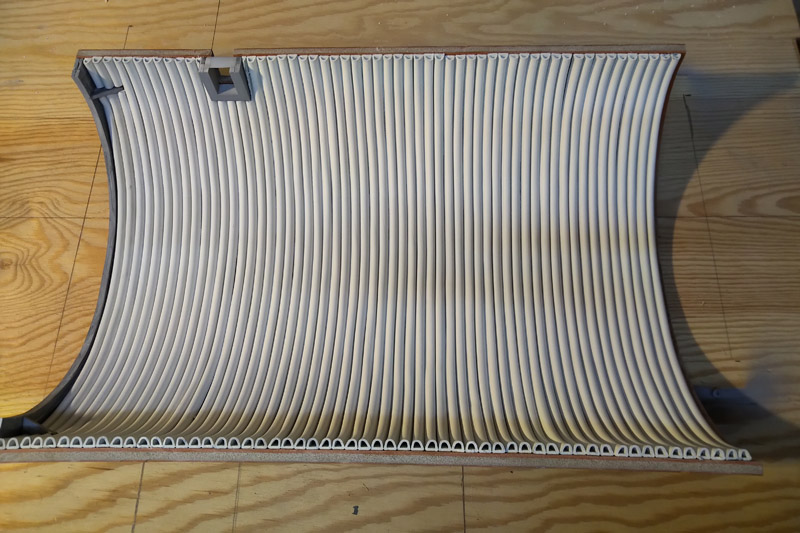
On a Hahn 1st generation shelter, I count six whole and one partial arch element to make a complete arch. The arch elements are 12'8" according to my analysis, with 10" uncorrugated ends. As far as I can see, the arch elements within one arch are 'stacked' like roof tiles, apparently to prevent water ingress. The connection positions are mirrored for each arch.
Water leaking through the bolt holes of the arch elements creates interesting patterns on the interior.
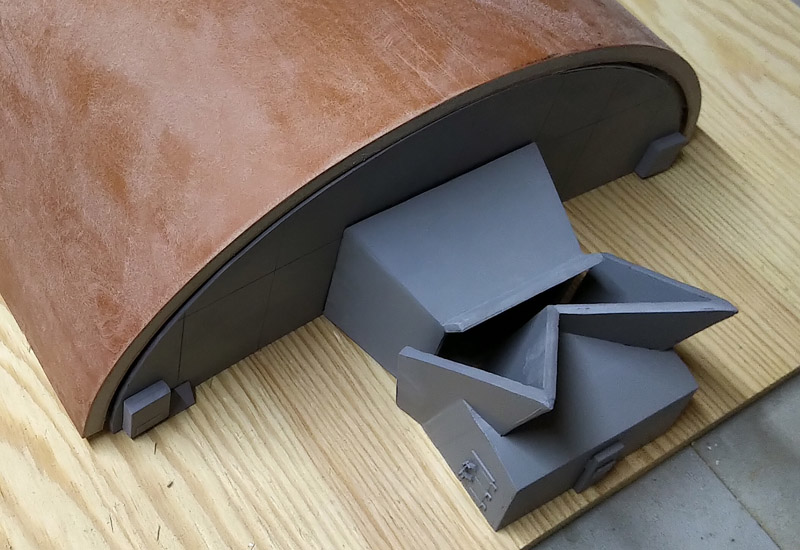
There are door stops for the clamshell doors
The door beams of the Soesterberg 3rd generation shelters are square 180 mm H-beams (measurement courtesy of Barrie Raterink)
another interior detail is that many shelters have a 'vault' for nuclear weapons. See for example: U.S. Nuclear Weapons in Europe.
Various shelter models
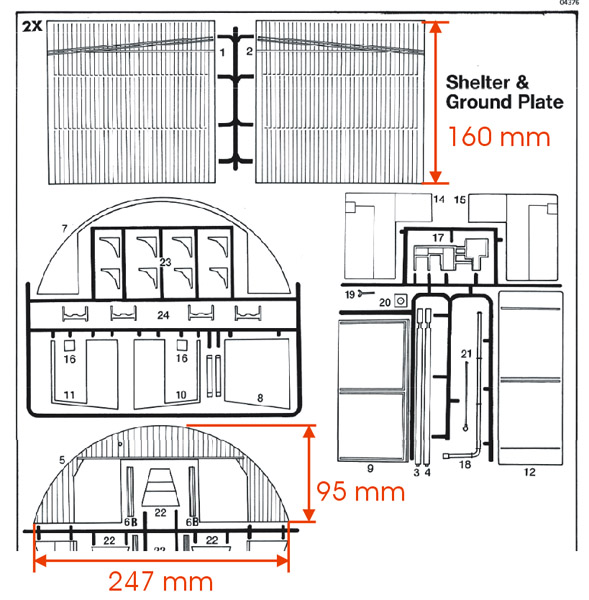
Revell issued a 1/72 Luftwaffe shelter in 1990 (see Scalemates) that was reissued a few times with an added Eurofighter. I've always understood it was underscaled, barely large enough to house a 1/72 scale model, but the jury is still out on that question. Here are a few build reports:
IPMS-NL regio Zuid-Holland club member Onno Oostveen was kind enough to measure his unbuilt kit. If 1/72 scale is assumed, the kit's length scales to 23.0 meters, the width to 17.8 meters. If the wall thickness of the shells is included (guestimated at 2 mm each), the external width is 18.1 meters. The real measurements are (roughly) 31.0 meters length and 18.5 meters width (see Alex Hunger Luftwaffe shelter model), therefore the models scales to 1/97 in length and 1/74 in width. One could add sheet styrene (or maybe thin MDF) to the exterior to create a more realistic shell thickness, and thereby also making it closer to 1/72 scale.
I would say that the model is usable for 1/72 scale aircraft, although it's too short. There are probably a few more problems. For example, to my eye, the doors are set too far forward, possibly the result of the compromised length.
| 
|
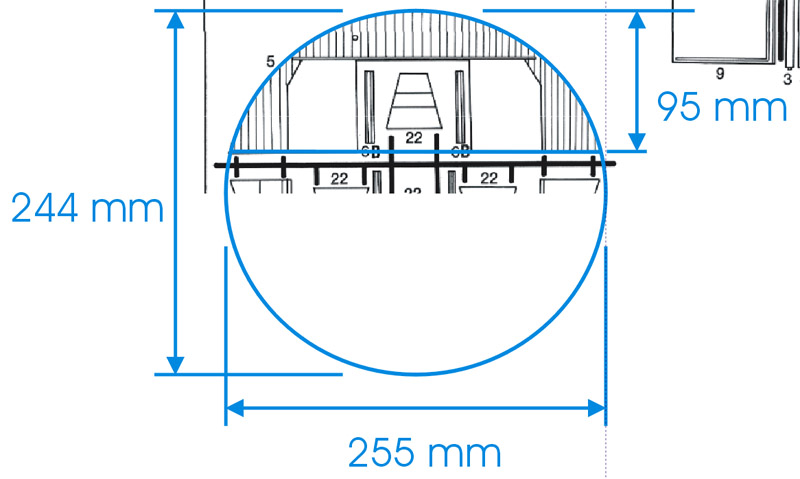
| Stretching the parts analysis to the limits, I checked whether the cross-section was circular or elliptical. Shown here is a best fit, this is just slightly elliptical. I would guess that the real design was circular, to make construction a bit simpler. If I take the average of 244 and 255, and multiply it by 72, a number very close to 18 meters results. Sounds plausible to me.
|
Here are a few build reports of the Revell shelter model:
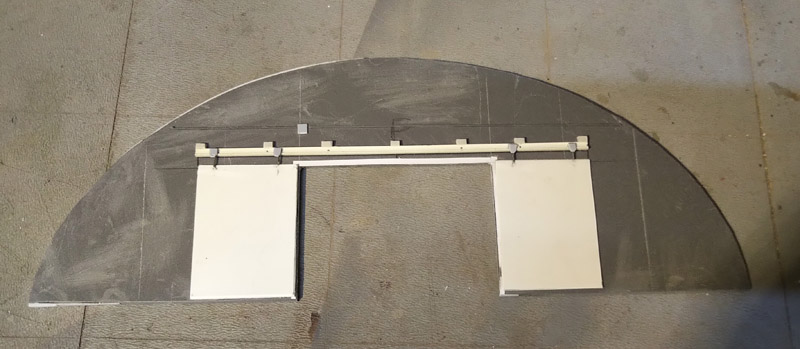
Polish cardboard models manufacturer GPM produces a 'Hangar 1/72-cut with laser model' that resembles the 3rd generation TAB-VEE shelter. However the scale is far off: the inside dimensions of 31 x 22 cm make it roughly 1/100 to 1/120 scale.
Fine Scale Modeler magazine, March 2016 issue, contains an article by French modeler Jean Paul Poisseroux about building a French shelter. The real size is approximately 14 x 27 meters, roughly similar to the USAF 1st generation TAB-VEE. He used a 19 cm thick-walled PVC pipe, and created the arches with thick electrical wire, wrapped in printed paper to simulate the corrugations.
Barrie Raterink shelter models
| Barrie Raterink (The Netherlands) was probably the first to use the above information for a scale model. He made a 3D CAD model of the 3rd generation shelter in 1/144.
| 
|
| He went to the former Soesterberg air base to take a better look at the door frames and the concrete ballast blocks. He plans to print the main parts on a filament printer, and the detailed parts on a resin printer.
|
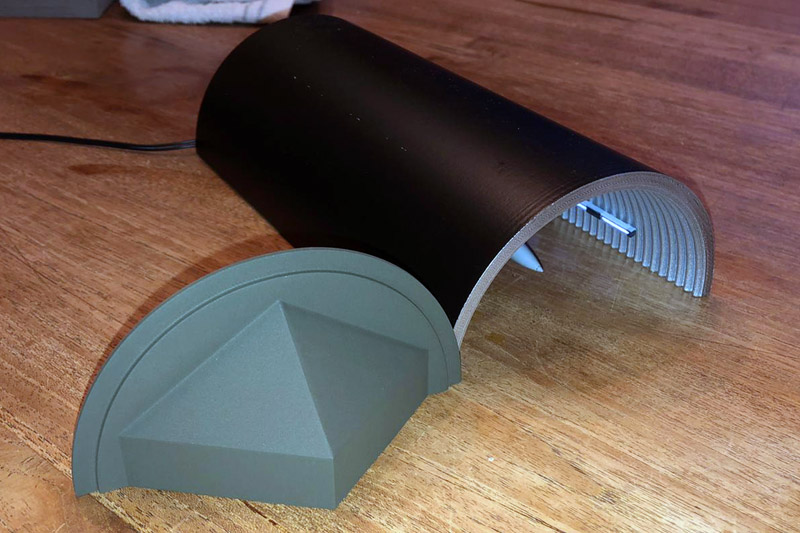
| Barrie made the 1st generation shelter in 1/44 scale, and posed a 'CR' coded F-15 in it. He plans to add the Soesterberg Zulu (alert) hangar, of which he found drawings.
| 
|
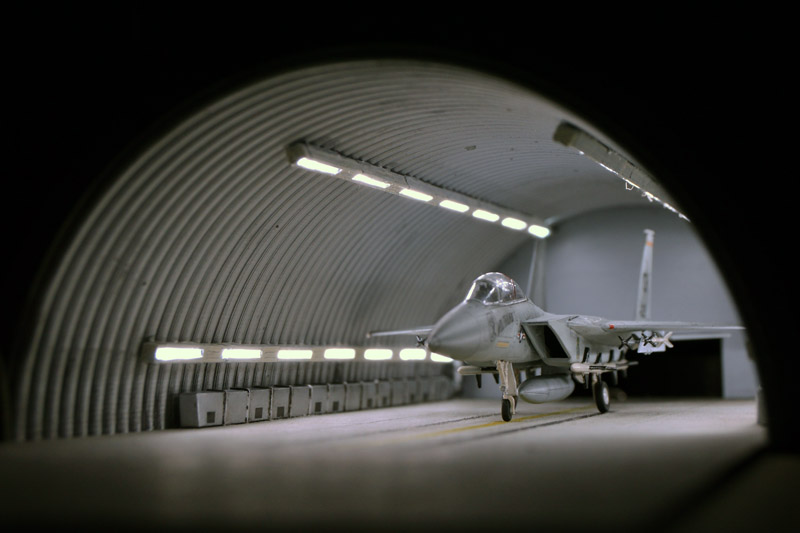
| The shelter was fitted with miniature lighting, plus ventilation ducts along the sides of the shelter.
|
Alex Hunger French shelter model
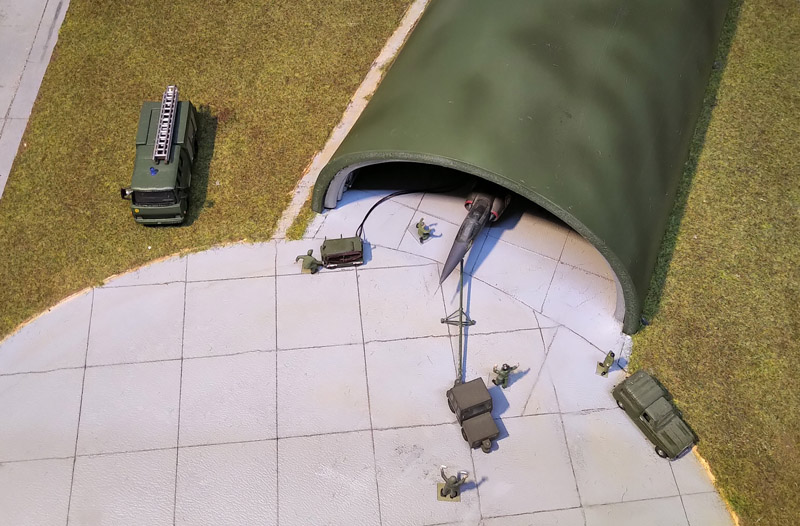
| Alex Hunger (Germany) built two French shelters, that are called 'Abri Durci' or 'Hangarette Durci' in French. He used measurements taken via Google Earth of defunct bases (BA 136 Toul-Rosières shown here) and talked to some veterans. Alex reports that the French air force shelters all had a diameter of 16 meters, but were built in two lengths: 28 meters for normal jets (Mirage III, Jaguar, etc) and 36 meters for Mirage IVA. The long ones had a larger jet blast deflector box in the back. The short ones (built in the early seventies) received an armoured door on rails towards the end of the decade, or 1983 at the latest.
| 
|
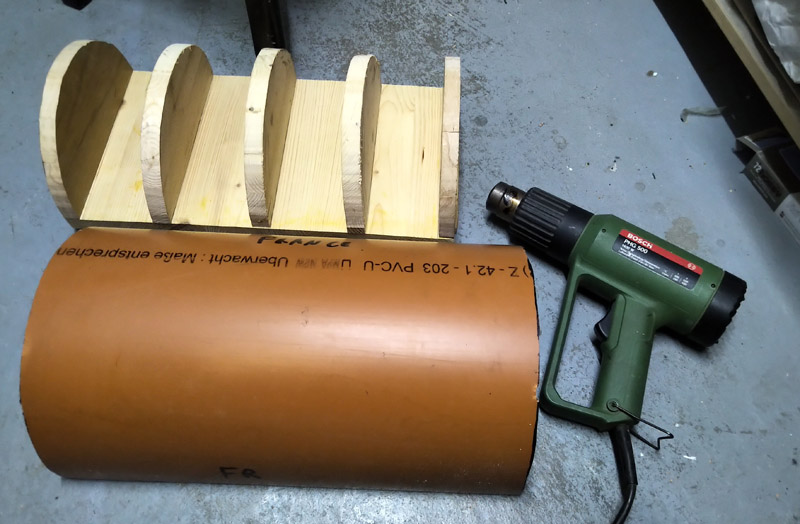
| Alex used plastic sewer pipes. He had 25 and 30 cm diameters, but needed a diameter of 22 cm for the French shelter. He built a wooden framework of the reduced diameter, placed a 25 cm half pipe over it and carefully melted it with a heat gun until it conformed to the frame. Since the plastic wants to partially return to the larger diameter, he constrained the half tube with six short screws on the base plate, that keep it at 22 cm.
|
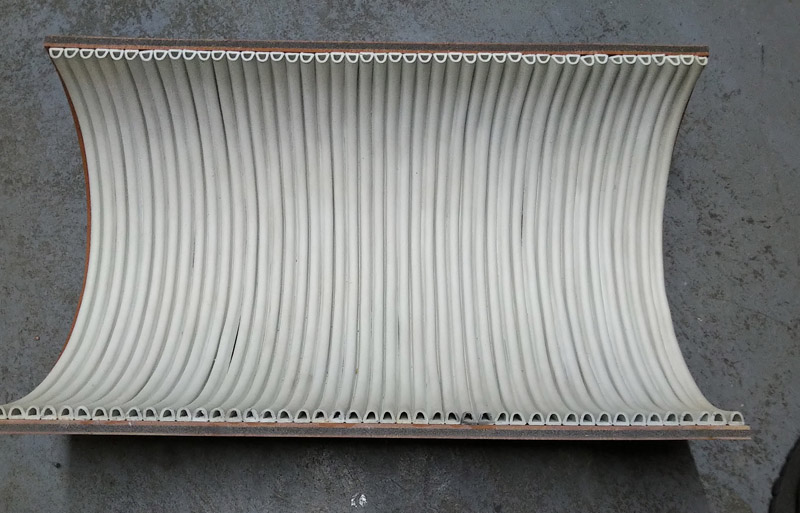
| Alex used self adhesive foam insulation tape to build the interior structure. It's a smart and easy way to replicate the 'Wonder arches'.
| 
|
| Here's the oldest type that Alex built, that lacks the armoured door.
|
| Here's the other shelter, with the armoured door on rails. At Toul-Rosières, the doors on part of the shelters moved to the right, on others to the left.
| 
|
Alex Hunger Bien Hoa 'arches' shelter models
| In 2017, Alex did a series of Bien Hoa 'arches', built inside the existing revetments. He used 20 cm diameter PVC pipes for these.
| 
|
Alex Hunger USAFE 2nd generation TAB-VEE shelter model
| Next to build was an USAF second-generation Upper Heyford TAB-VEE, using 30 cm PVC pipes. It requires a new and larger wooden frame, seen here.
| 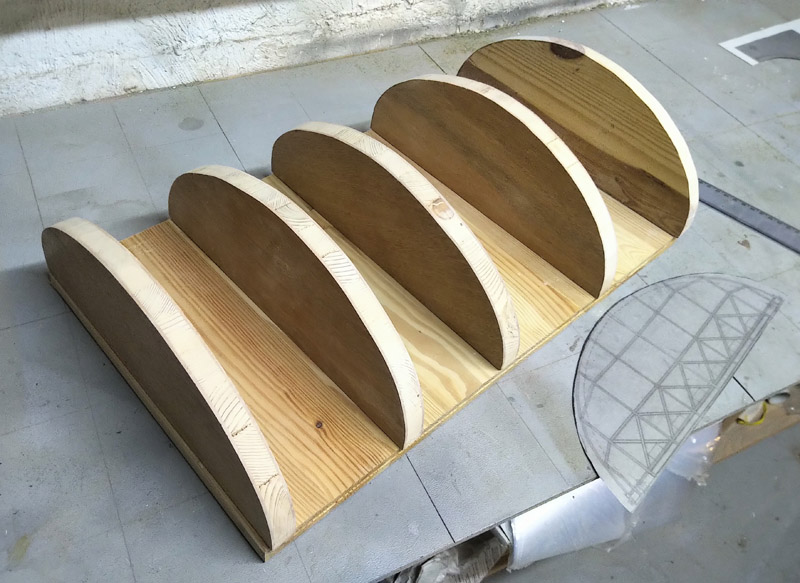
|
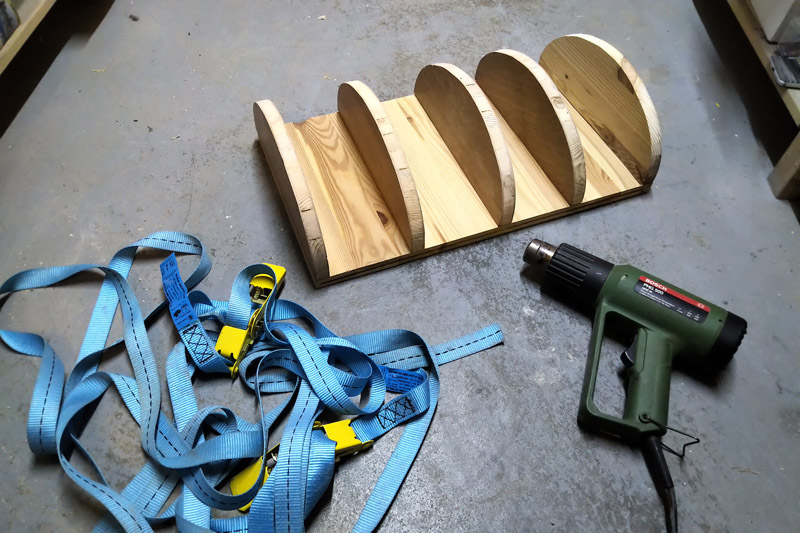
| Ready for forcing the PVC pipe into its new shape, using a heat gun and lots of straps. It required several sessions stretching it over the rack with the heat gun and the straps, to get it in the right shape.
|
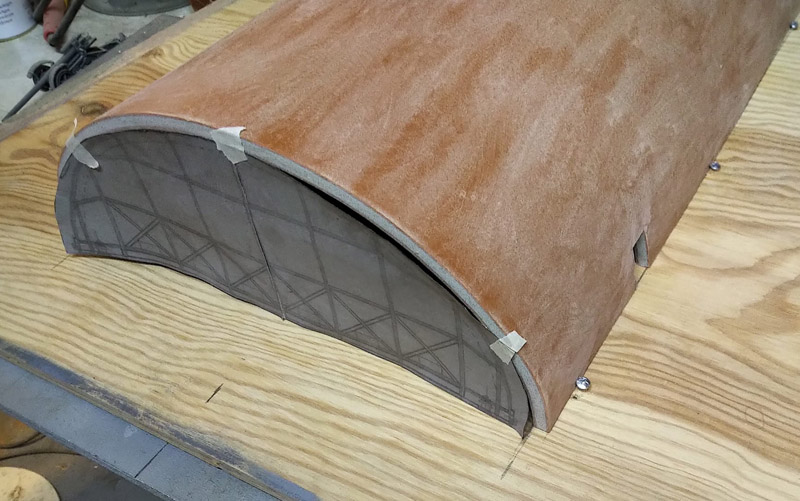
| The resulting shape, with screws at edges to avoid springback. The side door is already cut out. Alex later decided to use a larger baseplate, of 60 x 90 cm, which will give a bit of room for the hardstand in front.
| 
|
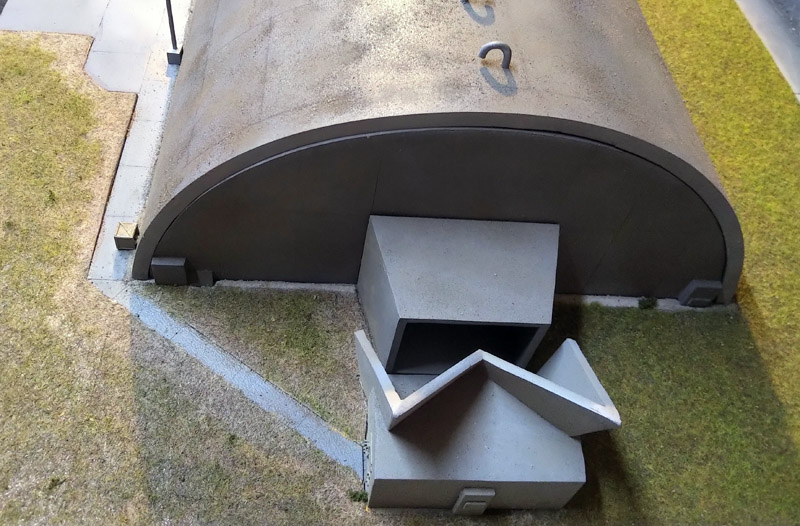
| The exhausts at Upper Heyford and Lakenheath have pointy 'ears'. The shape is quite complex and there are a couple of compromises as a result. Alex contacted the Heritage Center to learn more about the terminology and the function of the relevant parts, maybe they know more. There is also a door at the side of the rearmost part, perhaps a generator room.
|
| The side entrance was also detailed with a concrete extension.
| 
|
| The second generation TAB-VEEs have a partial 'front wall', apparently because they have the same size doors as the third generation TAB-VEEs. Alex also built the inside part of the entrance.
|
| The steel 'wonder arches' interior was made using self adhesive foam insulation tape, like in the French shelter. It required some 15 meters of tape.
| 
|
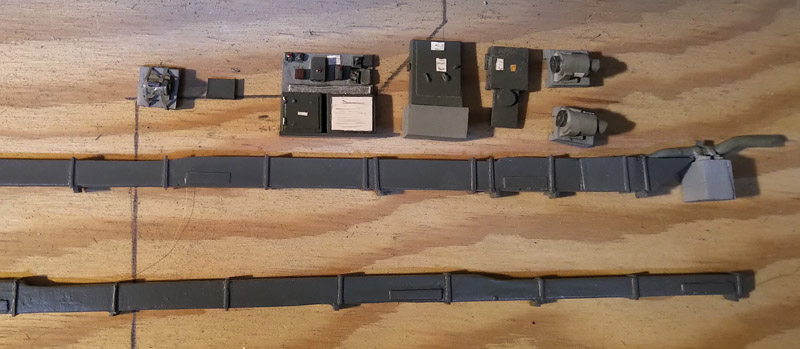
| The interior details consist of a fresh-air ducting, winches, electrical boxes and a control panel. The details are based on photos of operational shelters (30 years ago) at Bentwaters. The Upper Heyford TAB-VEEs are stripped of their original equipment.
| 
|
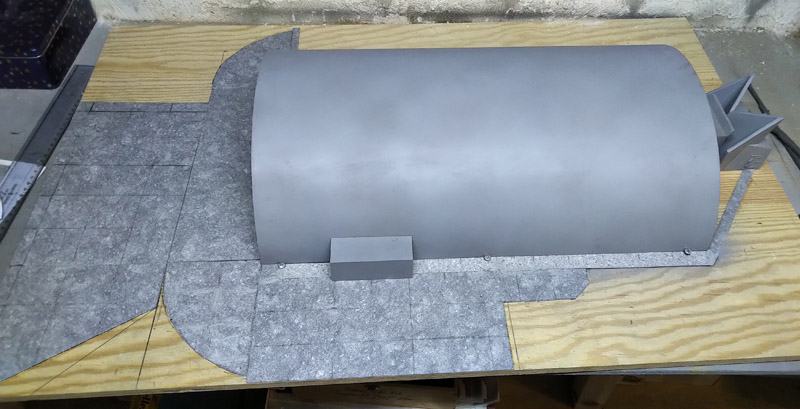
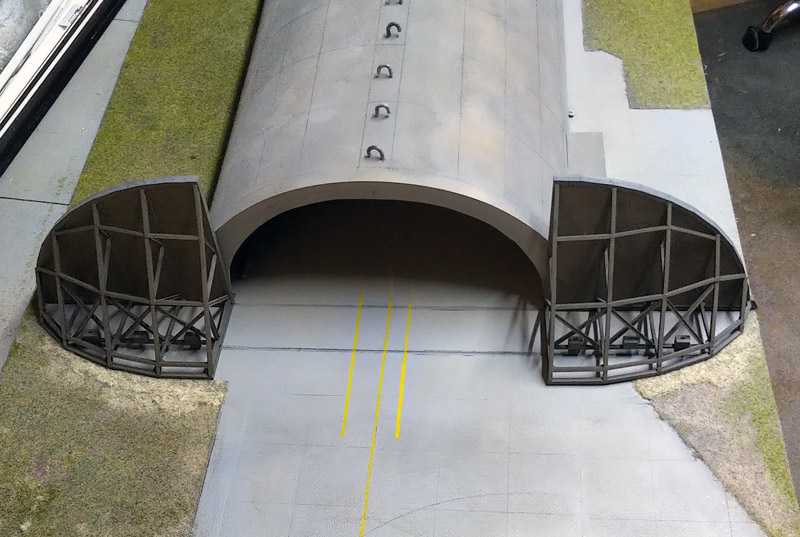
| The concrete pavement was next. The brass rails for the doors will have to be recessed, otherwise they will stick out too much from the pavement.
|
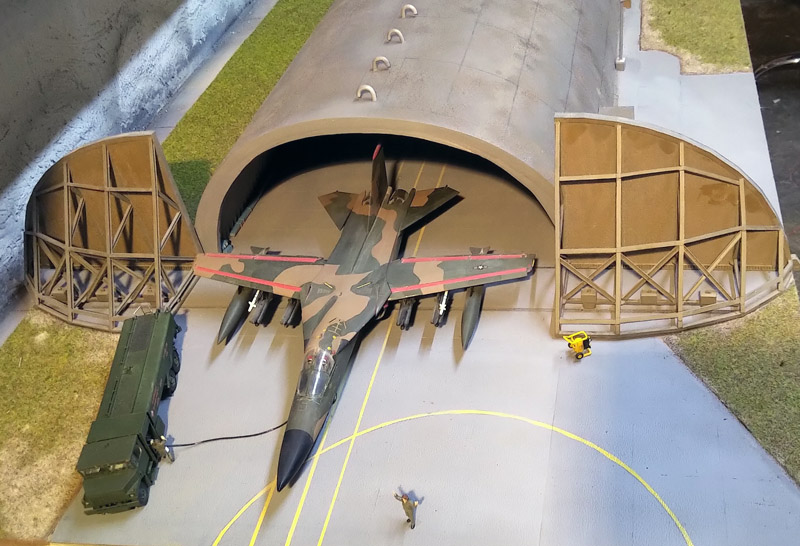
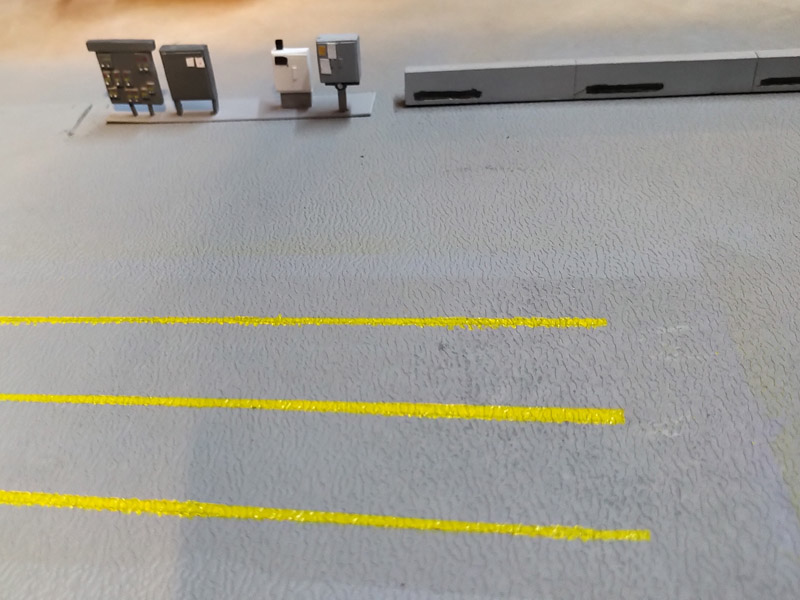
| Here the interior details are installed, and yellow stripes are painted on the floor. The F-111 model probably answers why the 2nd generation TAB-VEEs are extra wide compared to the 3rd generation TAB-VEEs: the F-111 wing span takes the full width.
| 
|

| Work also continued on the smaller details, like the personel entry door.
|
| Alex filled the area between the cement slabs with cardboard to avoid the rough stucture of the plywood base, and filled the cracks with clay.
| 
|

| Landscaping started with a lot of masking, then brown paint, followed by white glue and static grass.
|
| The TAB-VEE was was given a weathered and textured appearance, by using spray glue and some dust found behind Alex' paint booth. The mottling of the concrete slabs was reduced considerably, then weathered again with paint booth dust and tea stains.
| 
|

| The casings used when the concrete was poured left behind small raised 'seams' on the shell. They were added using a pencil. The ventilation pipes on the roof were also installed. They were made from heat-softened sprue bent over an appropriately sized tube.
|
| The resin Bachmann doors were delivered, and Alex comments that they look pretty good. They are about two millimeters larger than the PVC shell on all sides - not a real problem if the the doors are left open. Seen on the right is a brass rail to be recessed in the panel, for the doors to move on. But Alex found a much shallower wooden rail at a DIY store, which will be easier to work with than the brass one. Thin plastic rods will be glued to the bottom of the doors for them to slide within the rails.
| 
|
| The double wooden rails were sanded down flush with the hardstand, and some more work was done on the landscaping.
|
Alex Hunger USAFE 3rd generation TAB-VEE shelter model
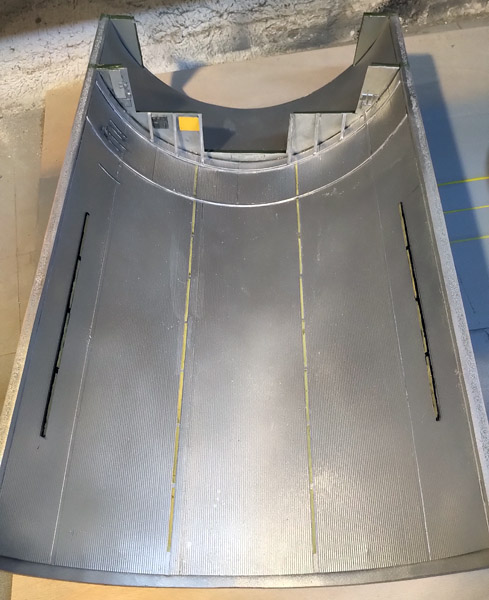
| Alex followed the construction method of the 2nd generation shelter to build a 3rd generation TAB-VEE shelter model. First a PVC pipe was heat-formed to the required shape. Next the Bachmann HAS door was cloned to a slightly reduced size. Here's step one: the doors, made from thick plastic card.
| 
|

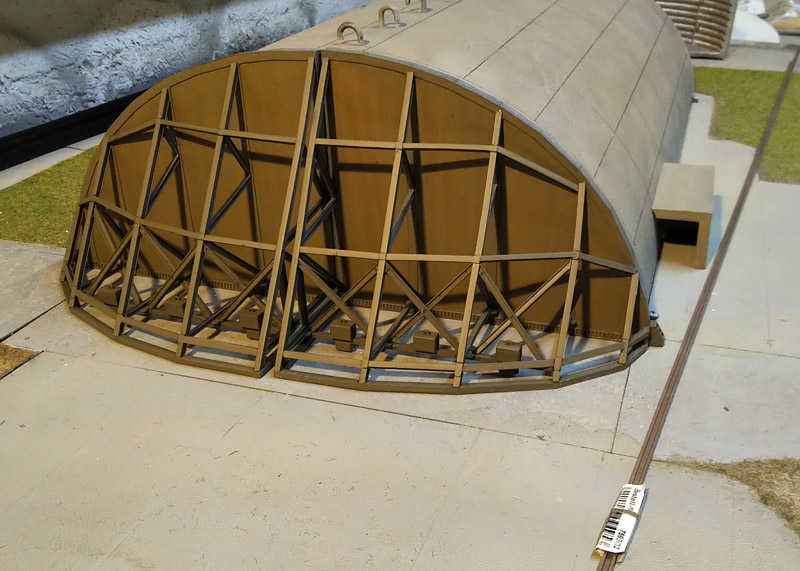
| A whole pack of Evergreen 4 x 4 mm H-Column (catalog number 285) was used for the largest beams. Nearly three packs of the smaller Evergreen 3.2 x 3.2 mm H-Column (catalog number 284) were needed for the remainder.
|
| The correct exhaust system was also built for this shelter. It still has the 'W' shape, but lacks the high walls sticking out.
| 
|

| The two scratch-built doors are finished and painted in the approximate brown color. The rear of the doors is painted white.
|
| As usual, the inside of the PVC shell was covered with numerous strips of self adhesive foam insulation tape. Lamps were added inside the arch. For the top lamps, Alex used twenty pieces of sprue, sanded into bell shaped blobs. These were drilled through so that a piece of copper wire could be pushed through. These pins were then pushed into part-way holes drilled in the PVC shell. The simulated electrical wire is stretched sprue. The lamps on the sides are strips of plastic card with a bit of clear packaging glued on.
| 
|
| Alex made some boxes and a barrel to hide the bolts that hold the PVC shell in place. Some bushes are glued onto the bolts on the other side, and small bush-like clumps were added near the rear exhaust system.
|
| More 'stuff' to hide the bolts: the middle bolt got a lantern. The lantern does exist, it's just normally a bit more to the right and doesn't have a little box to cover the bolt. A yellow box was added to the side entrance and an other grey panel or box to the right of the lamp post.
| 
|

| Finished: a 3rd generation TAB-VEE as seen at RAF Bentwaters and RAF Woodbridge, and others bases. Alex posed one of his A-10s in front of it.
|
| A good overview from the rear, showing many of the details mentioned above. The parking area on the left side is for ground equipment.
| 
|
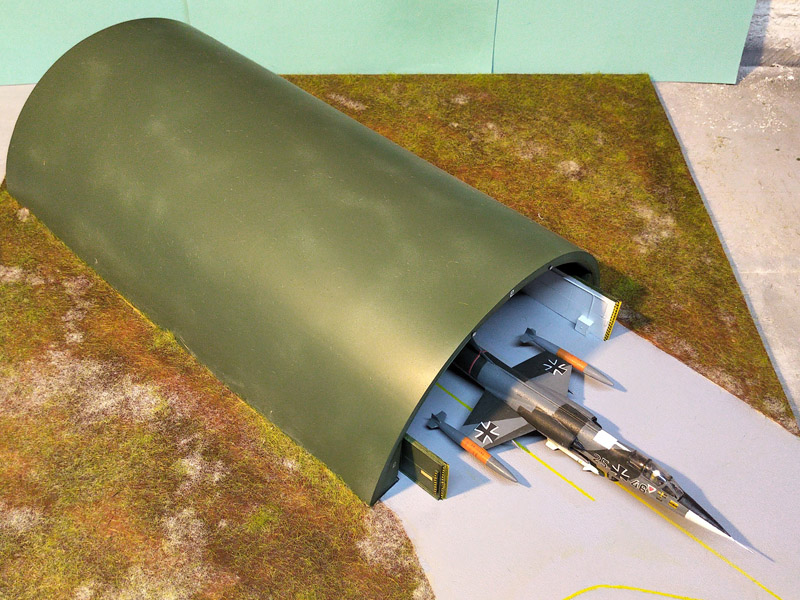
Alex Hunger USAFE 2nd generation TAB-VEE shelter model
| Alex built a another version of the second generation TAB-VEE. It will nicely complement the other second generation that he did earlier, with some small improvements.
| 
|
| The receipe is well established: a plywood base, a PVC tube, scratch-built doors based on the Bachmann set, but a different exhaust at the rear compared to the previous one. You can't see it, but on the sliding doors for the exhaust, deep in the back of the shelter, Alex copied the artwork seen on a real shelter's exhaust doors.
|
| Here's the finished article, with a Hasegawa Upper Heyford-based F-111E posed in front, with its wing spread - looks like it will fit inside! The fuel truck is an AIM Oshkosh R-11 Generation 1.
| 
|

| Painting and weathering is similar to the previous shelter model.
|
| The rear side with the complicated exhaust gas deflector. It represents the version seen at Upper Heyford, compared to the Bentwaters-style exhaust on the previous shelter model.
| 
|
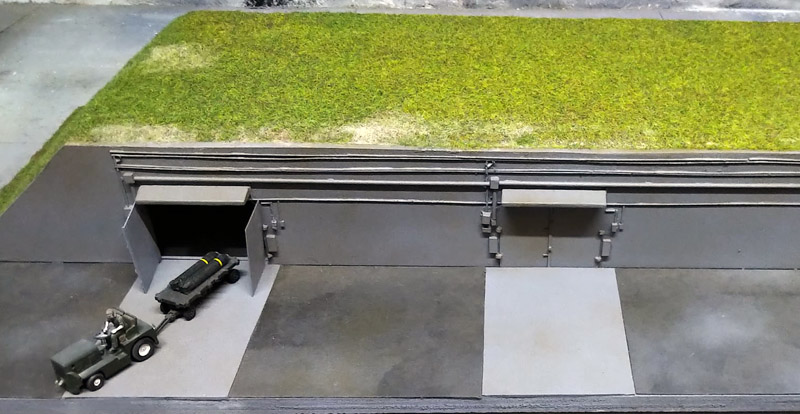
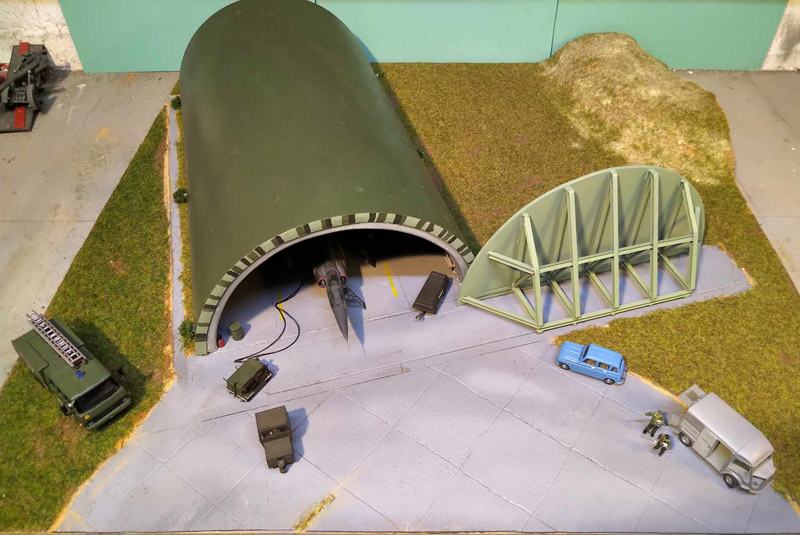
| Alex also built a section of the Upper Heyford Weapons Storage Area, in the center-north area of the airfield. The Clarktor-6 tractor from the old Revell 1/72 F-16 pulls a Hasegawa munitions cart, with what looks like SUU-30s.
|
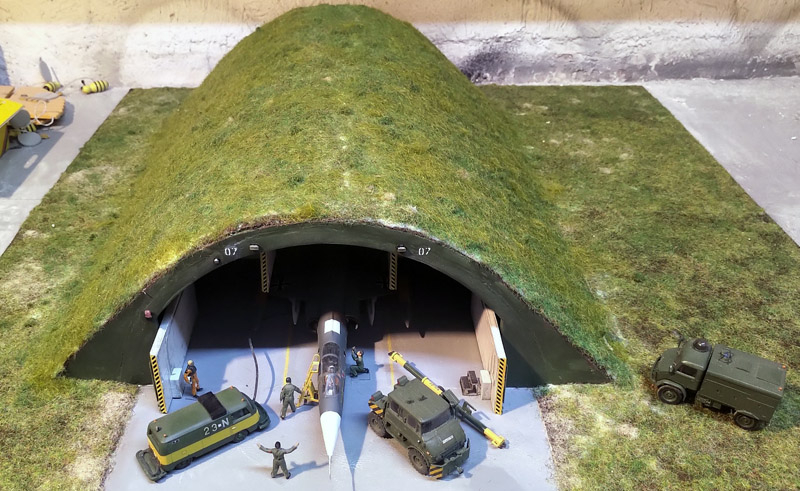
Alex Hunger Marineflieger shelter model
| In 2025, Alex built a German Navy shelter. He relied on Google Earth for external dimensions, as usual. The internal ribbing runs longitudinally in this shelter design.
| 
|

| It has a full interior, with fresh air ducting, a winch and electrical boxes.
|
| A view from the rear of the shelter, showing the front wall, that lacks the doors at this build stage.
| 
|
| Alex used photos of the exhaust system that were posted on a Facebook group for members of the former German Navy Marinefliegergeschwader 2 (MFG2). This allowed him to duplicate that to an acceptable level of accuracy. The exhaust system is removable.
|
| The end result: a great 1/72 scale model of a shelter at Fliegerhorst Eggebeck in Schleswig Holstein, with a F-104G, two Unimog trucks and a van.
| 
|

| A view of the rear of the shelter, with a detailed exhaust system.
|
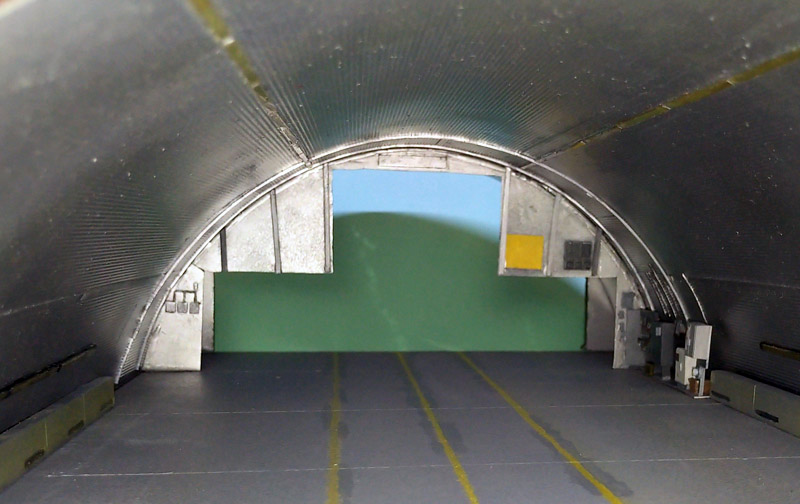
Alex Hunger Luftwaffe shelter model
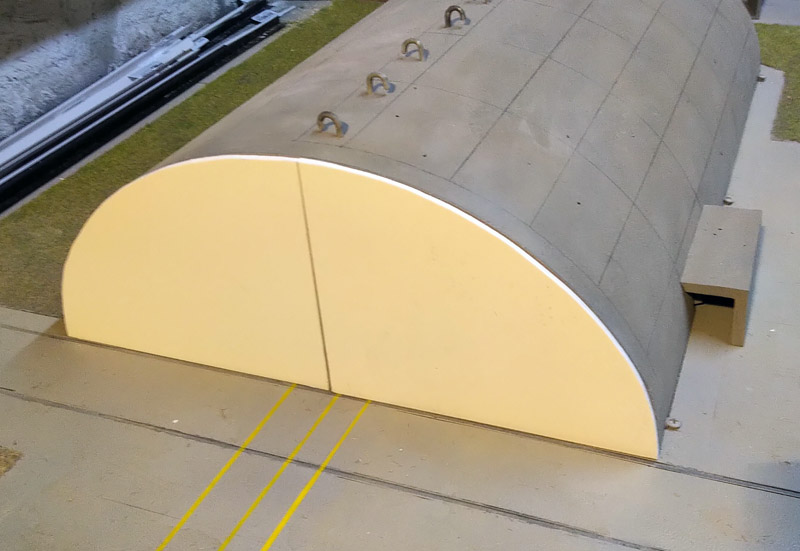
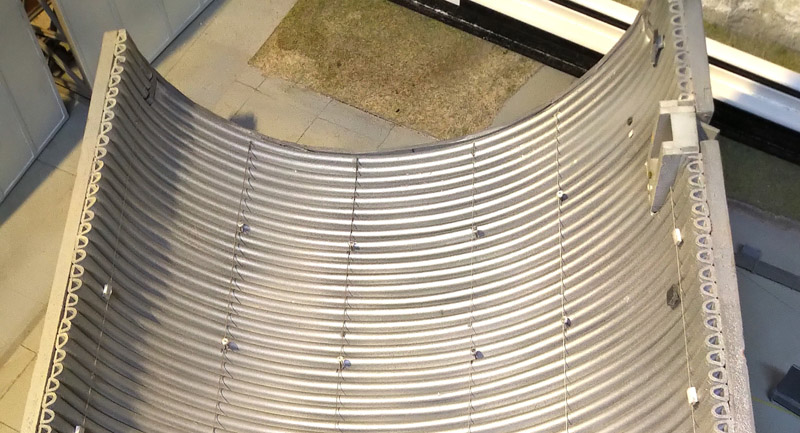
| Late 2025, Alex built a Luftwaffe shelter, just in time for the Telford IPMS-UK show. He built it without the earth covering with grass, just as they built from the late 1960s onward. Some second line air bases, like Oldenburg kept their shelters this way until closure. The Luftwaffe shelter is 31 meters long and 18.5 meters wide, in an elliptical shape. Alex intended his shelter model to represent Wittmund air base, where Jagdgeschwaders 71 'Richthofen' flew the F-104 from 1963 to 1974.
| 
|
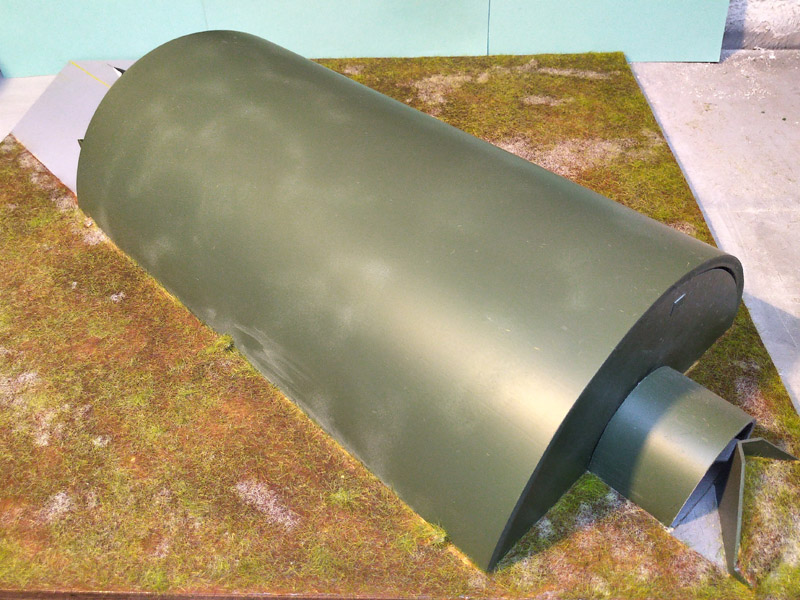
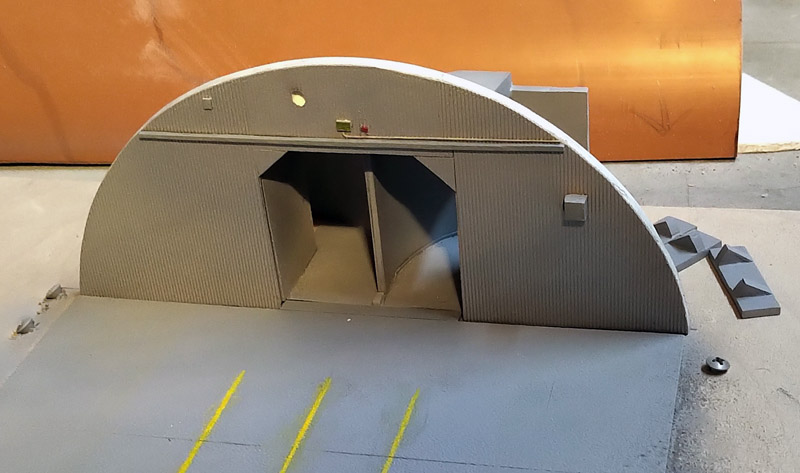
| The Luftwaffe shelters originally had a semi-circular exhaust. This type of exhaust was retained for all bases operating F-104s, F-4Fs, Alpha Jets, and now also the Eurofighter. On all Luftwaffe bases operating the Tornado, they were modified to the shape seen in Alex's previous model, shown above.
|
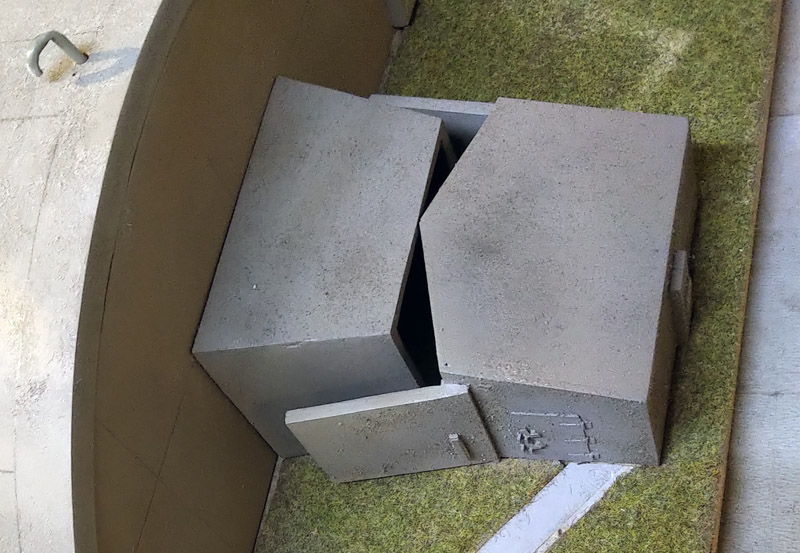
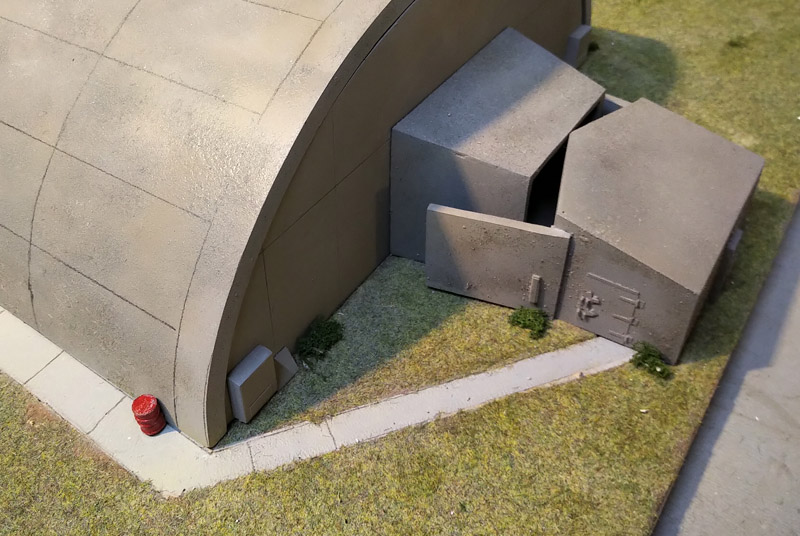
| Seen from the outside, the service boxes are on the left side. Alex also added the air conditioning ducts. The Luftwaffe is a bit touchy about bespoke photos from the interiors but have often released photos for publicity shots where details could be cumulatively gleaned behind the crews and the depicted aircraft. The shelters also acquired a small white prefabricated metal and glass shed for the crew chief at the left rear of the shelters, which Alex elected not to duplicate.
| 
|
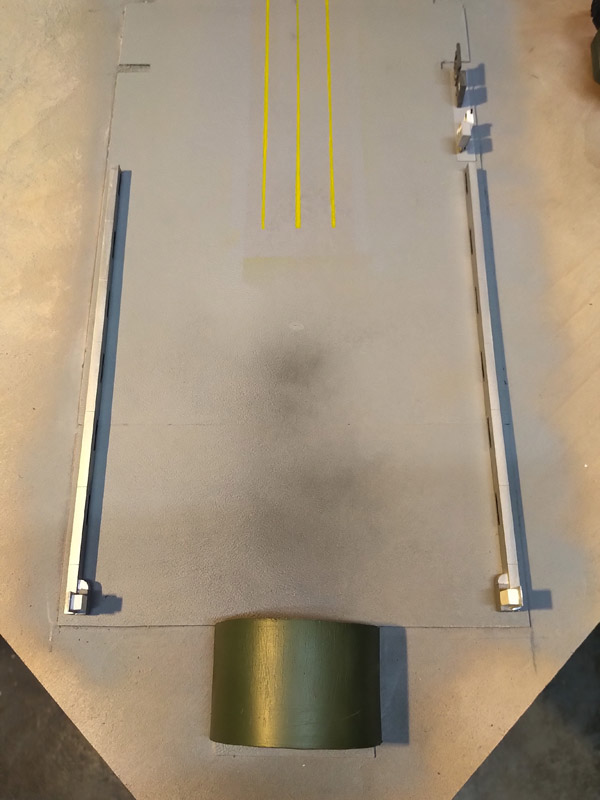
| Here's the base without the shelter superstructure. The grass had not been added at this point.
|
Return to models page